Extract IOS IPA
You need to use the App Configurator application on Mac.
Connect your phone via USB, click “Add” on App Configurator to select the app: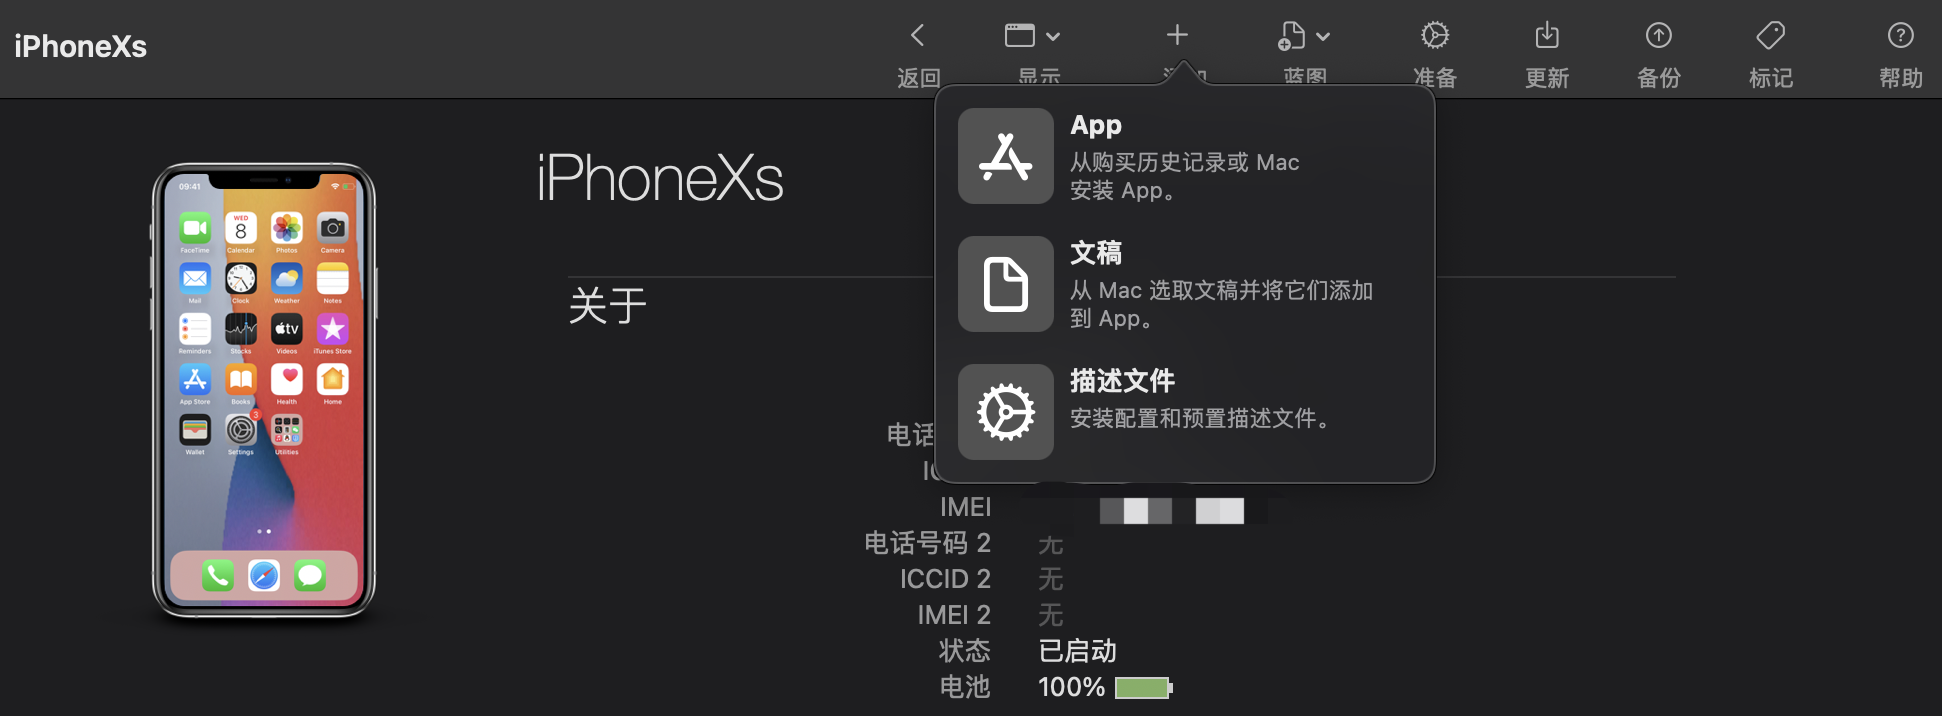
Then log in with your Apple ID, and it will display your purchase history: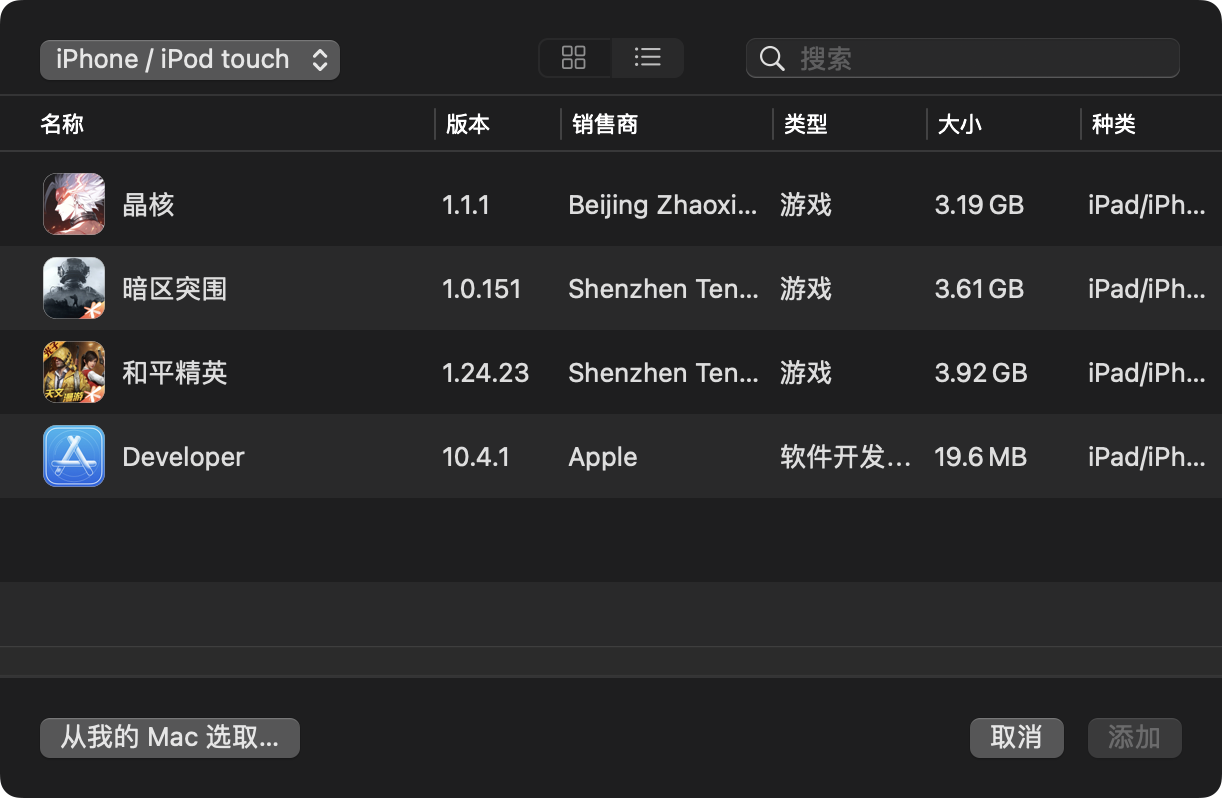
Select one and click Add to start the download.
After the download is complete, installation will take place. If the app is already on your device, you will be prompted: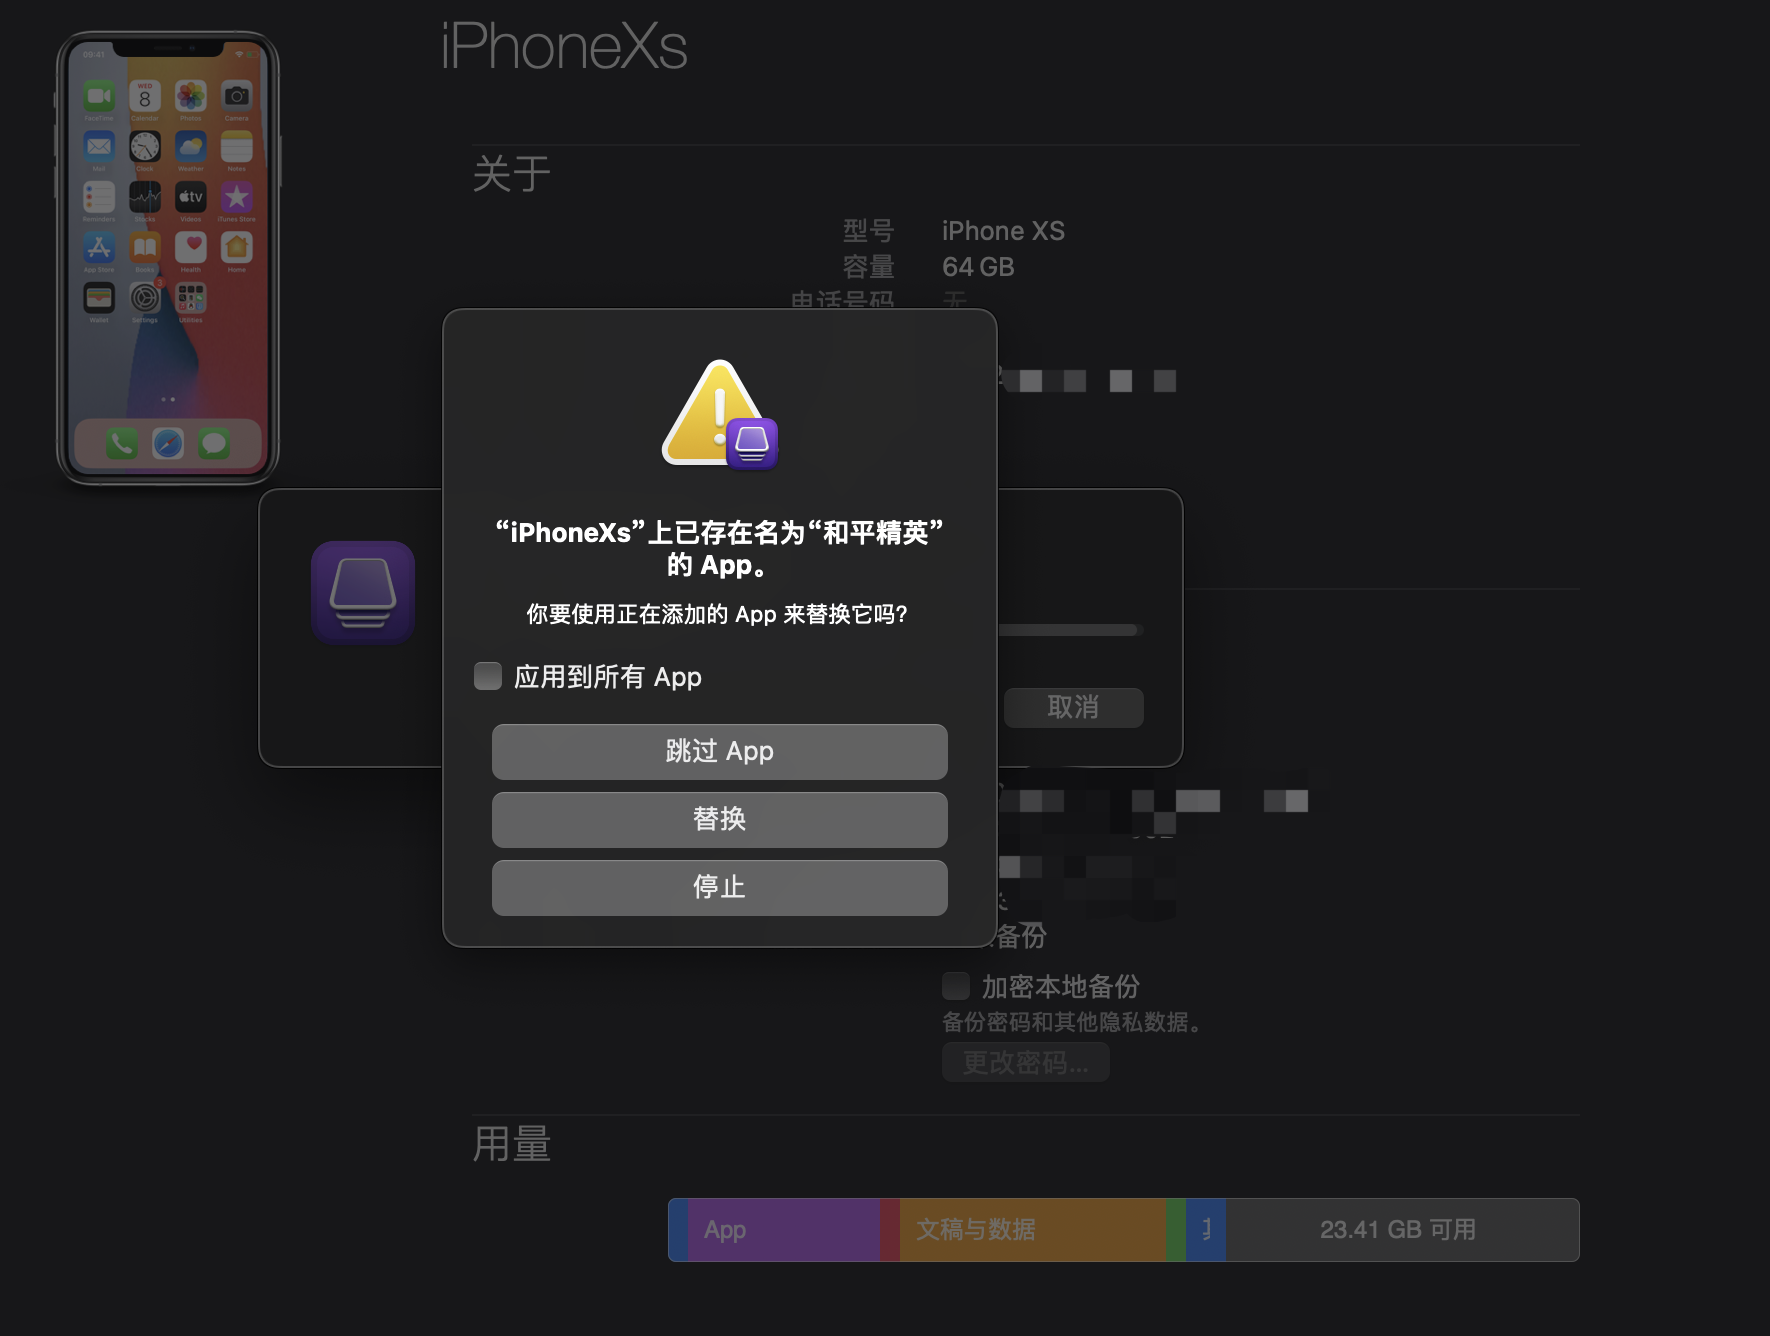
Note: Keep this interface open, as during the download, it will first cache to a directory before being deleted once installation is done. Thus, we need to keep this interface active and navigate to the following path:
1 | ~/Library/Group Containers/K36BKF7T3D.group.com.apple.configurator/Library/Caches/Assets |
You will find the exported IPA here: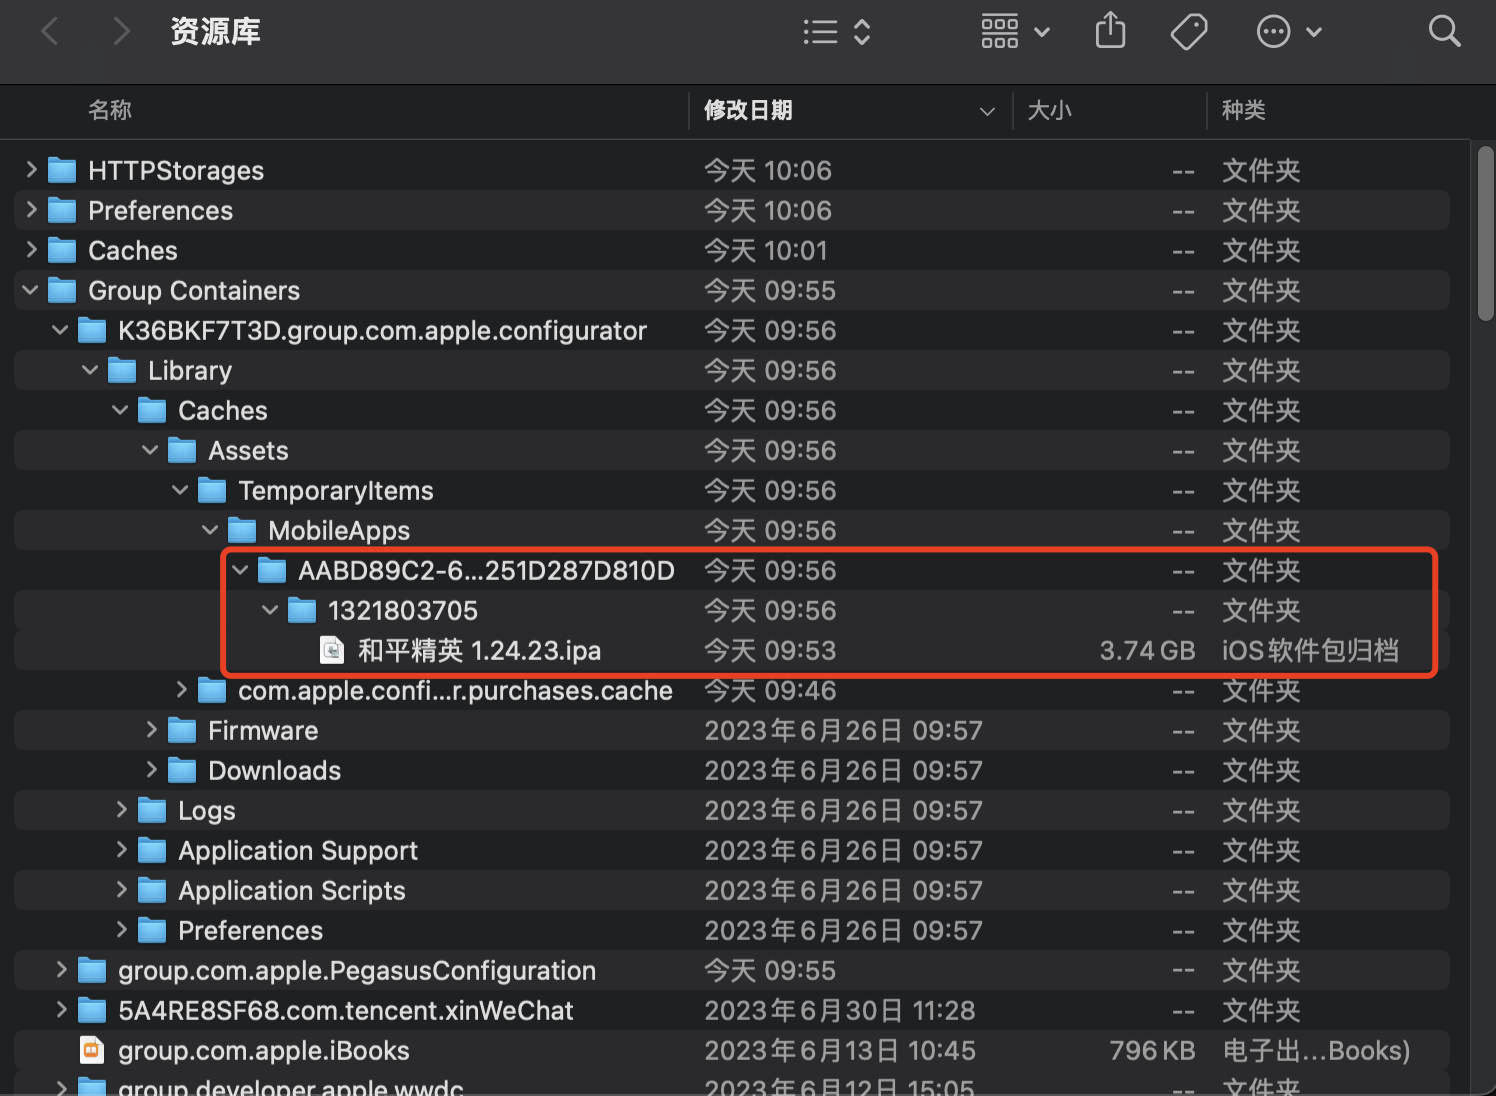
Note: This IPA is a wrapped version.
Create VS Offline Installer
First, download vs_setup.exe from the official VS website.
Then execute:
1 | vs_community.exe --layout OUTPUT_DIR --lang en-US --config vs.vsconfig |
This will download all components specified in -config to the Output directory. You can compress it and transfer it to other machines.
Offline installation:
After extraction, launch cmd from the root directory and execute the following command:
1 | vs_setup.exe --noweb |
Convert docx to md
You can achieve this using pandoc:
1 | pandoc test.docx -o test.md |
However, it uses pandoc’s formatting, which is incompatible with generic markdown.
You can specify GitHub-flavored markdown with --write gfm, but if the docx contains scaled-down images, they will all be converted to HTML img tags.
This can be combined with the following Python script:
1 | import panflute as pf |
Usage:
1 | pandoc test.docx -F remove_img_size.py -o test.md |
My weekly technical summary, batch command for converting docx to md:
1 | find . -name "*docx" | sed -e 's|^\./||' -e 's/\技术点_lipengzha.docx$//' | xargs -I {} pandoc --extract-media=./docx_images/{} {}技术点_lipengzha.docx -F remove_img_size.py -o {}_技术点.md |
Enable New WebUI in Chrome
Visit chrome://flags/, search for Chrome Refresh, and change the following two options to Enable:
Install 7z on Mac
You can install it via homebrew:
1 | brew update |
Proxifier Registration Code
L6Z8A-XY2J4-BTZ3P-ZZ7DF-A2Q9C (Portable Edition) # No installation version
5EZ8G-C3WL5-B56YG-SCXM9-6QZAP (Standard Edition) # Installed version
P427L-9Y552-5433E-8DSR3-58Z68 (MAC)
Get Double Backslash Path
Replace the current path from \ to \\, cmd code:
1 | set final_path=%~dp0 |
Add Startup Entry in cmd
1 | @echo off |
Traverse and Copy Files in cmd
1 | @echo off |
Check cmd Command Path
1 | where git |
Batch Rename File Extensions in Windows
1 | ren *.txt *.log |
Android Offset Conversion Symbol
You can use the addr2line command in NDK: addr2line
1 | Usage: addr2line [option(s)] [addr(s)] |
Example usage:
1 | # addr2line -C -f -e *.so ADDR |
Parameters:
-C -f: Displays the function name where the error line number is located-eprints the path and line number for the error address

Conversion result: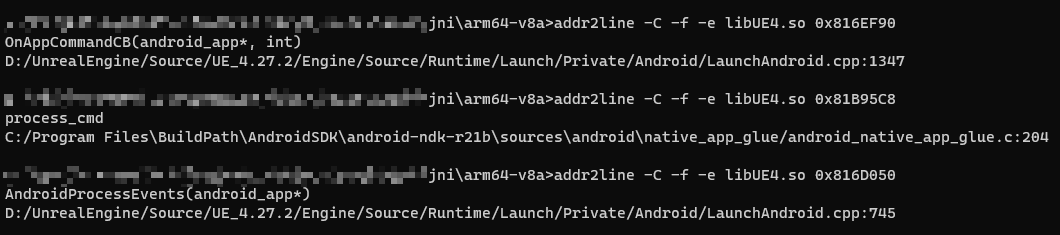
Keytool Character Encoding Issues
If you encounter garbled text when executing keytool on Win10+, you need to run the following command in the command line:
1 | chcp 936 |
Then rerun the keytool command.
Google Translate API
You can call it in the following form:
1 | POST https://translation.googleapis.com/language/translate/v2?key=XXXXXXXXXXXXXXXXXXXXXXXX |
Pass JSON array:
1 | { |
IOS Beta Update
Register at the following link: Apple Beta Software Program
ffmpeg
Convert MKV to MP4
1 | ffmpeg.exe -i UOD2022.mkv -vcodec copy -acodec copy UOD2022.mp4 |
Length Trimming
Trim content between 00:00:03 and 00:58:29 from the original video.
1 | ffmpeg.exe -i UOD2022.mp4 -vcodec copy -acodec copy -ss 00:00:03 -to 00:58:29 UOD2022_CUT.mp4 |
Convert MOV to MP4
1 | ffmpeg -i input.mov -q:v 0 output.mp4 |
Concatenate MP4
Convert MP4 to TS, then concatenate:
1 | ffmpeg -i begin.mp4 -c copy -bsf:v h264_mp4toannexb -f mpegts begin.ts |
Extract Audio from Video
1 | ffmpeg -i test.mp4 -f mp3 -vn test.mp3 |
Split Audio
- segment_time: seconds
1 | ffmpeg -i test.mp3 -f segment -segment_time 30 -write_xing 0 -c copy out%03d.mp3 |
Install CMake to PATH on Mac
- One may add CMake to the PATH: (restart required)
PATH="/Applications/CMake.app/Contents/bin":"$PATH"
- Or, to install symlinks to ‘/usr/local/bin’, run:
sudo "/Applications/CMake.app/Contents/bin/cmake-gui" --install
- Or, to install symlinks to another directory, run:
sudo "/Applications/CMake.app/Contents/bin/cmake-gui" --install=/path/to/bin
JS Convert Date Format Without Importing Library
1 | new Date().toISOString().split('.')[0].replace(/[^\d]/gi,''); |
This results in the following formatted date: 20221020021706.
Typora+PicGo Timestamp Renaming
In Typora’s Verify Image Upload Options, find the installation path of PicGo.
In the exe directory, execute the following command to install the super-prefix plugin:
1 | picgo.exe install super-prefix |
Then modify PicGo’s configuration file to specify prefix format and file format for renaming:
1 | { |
Trigger GitHub Actions with curl
First, you need to add a repository_dispatch in the action’s yml:
1 | on: |
The curl trigger API:
1 | curl \ |
Official documentation: Create a repository dispatch event
Using Python:
1 | import requests |
Google Docs Functions
Get og:title attribute from the page:
1 | IMPORTXML(post_link, "//meta[@property='og:title']/@content") |
Replace string:
1 | SUBSTITUTE("xxxx - 博客园","- 博客园","") |
Get the title from the page:
1 | IMPORTXML(post_link, "//title") |
Check if value is NaN:
1 | IFNA(Value,"") |
Check if value is Error; if so, replace with an empty string:
1 | IFERROR(Value,"") |
Google Translate:
1 | =IFERROR(GOOGLETRANSLATE(G2,"zh-hans","en"),"") |
Extract the article title from the link:
1 | =IFERROR(SUBSTITUTE(IFNA(IMPORTXML(post_link, "//meta[@property='og:title']/@content"),IMPORTXML(post_link, "//title")),"- 博客园",""),"") |
Download Files from Google Docs
Install and use Pandas: python -m pip install pandas
1 | import pandas as pd |
Enable ProjFS
1 | Enable-WindowsOptionalFeature -Online -FeatureName Client-ProjFS -NoRestart |
Check if Binary Supports SSE Instructions
You can use dumpbin to check:
1 | dumpbin /disasm required.exe > required_disasm.asm |
Check if the assembly instructions include SSE/SSE2 instructions, such as movss, xmm0, or xmm1.
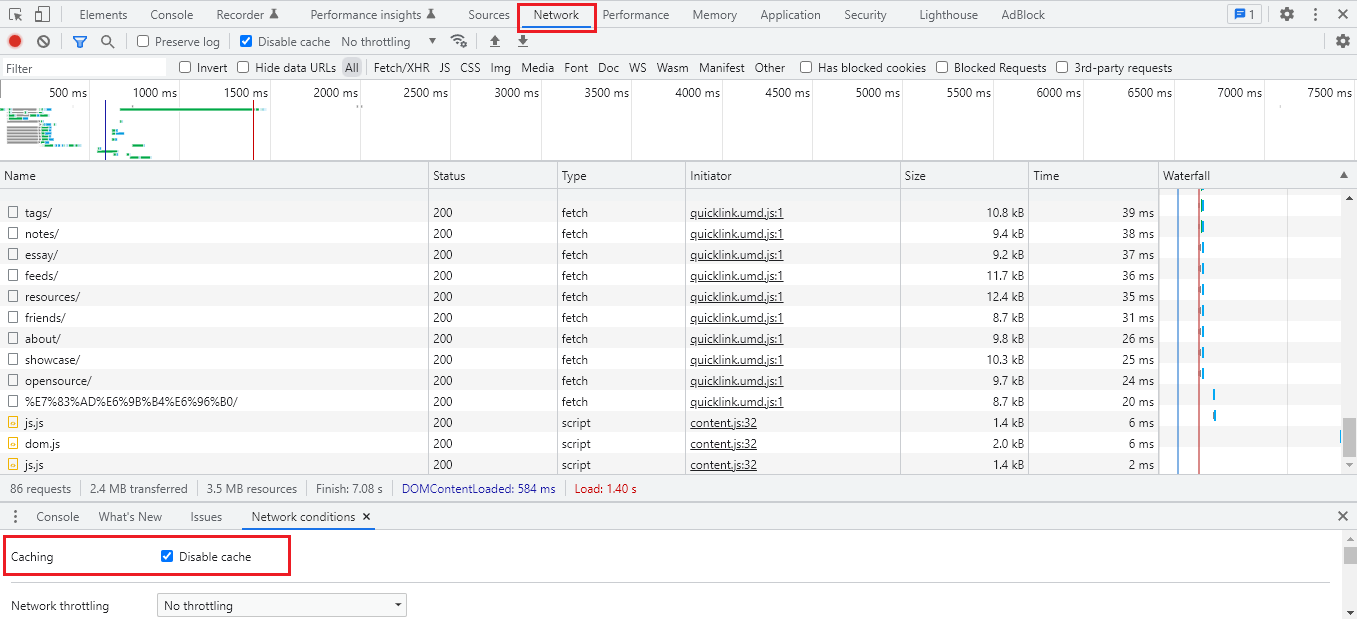
Disable Cache in Chrome
- Press F12 or right-click to select Inspect to open developer tools:
- Select More Tools -> Network Conditions,
- In the interface, check the “Disable cache” option:
![]()
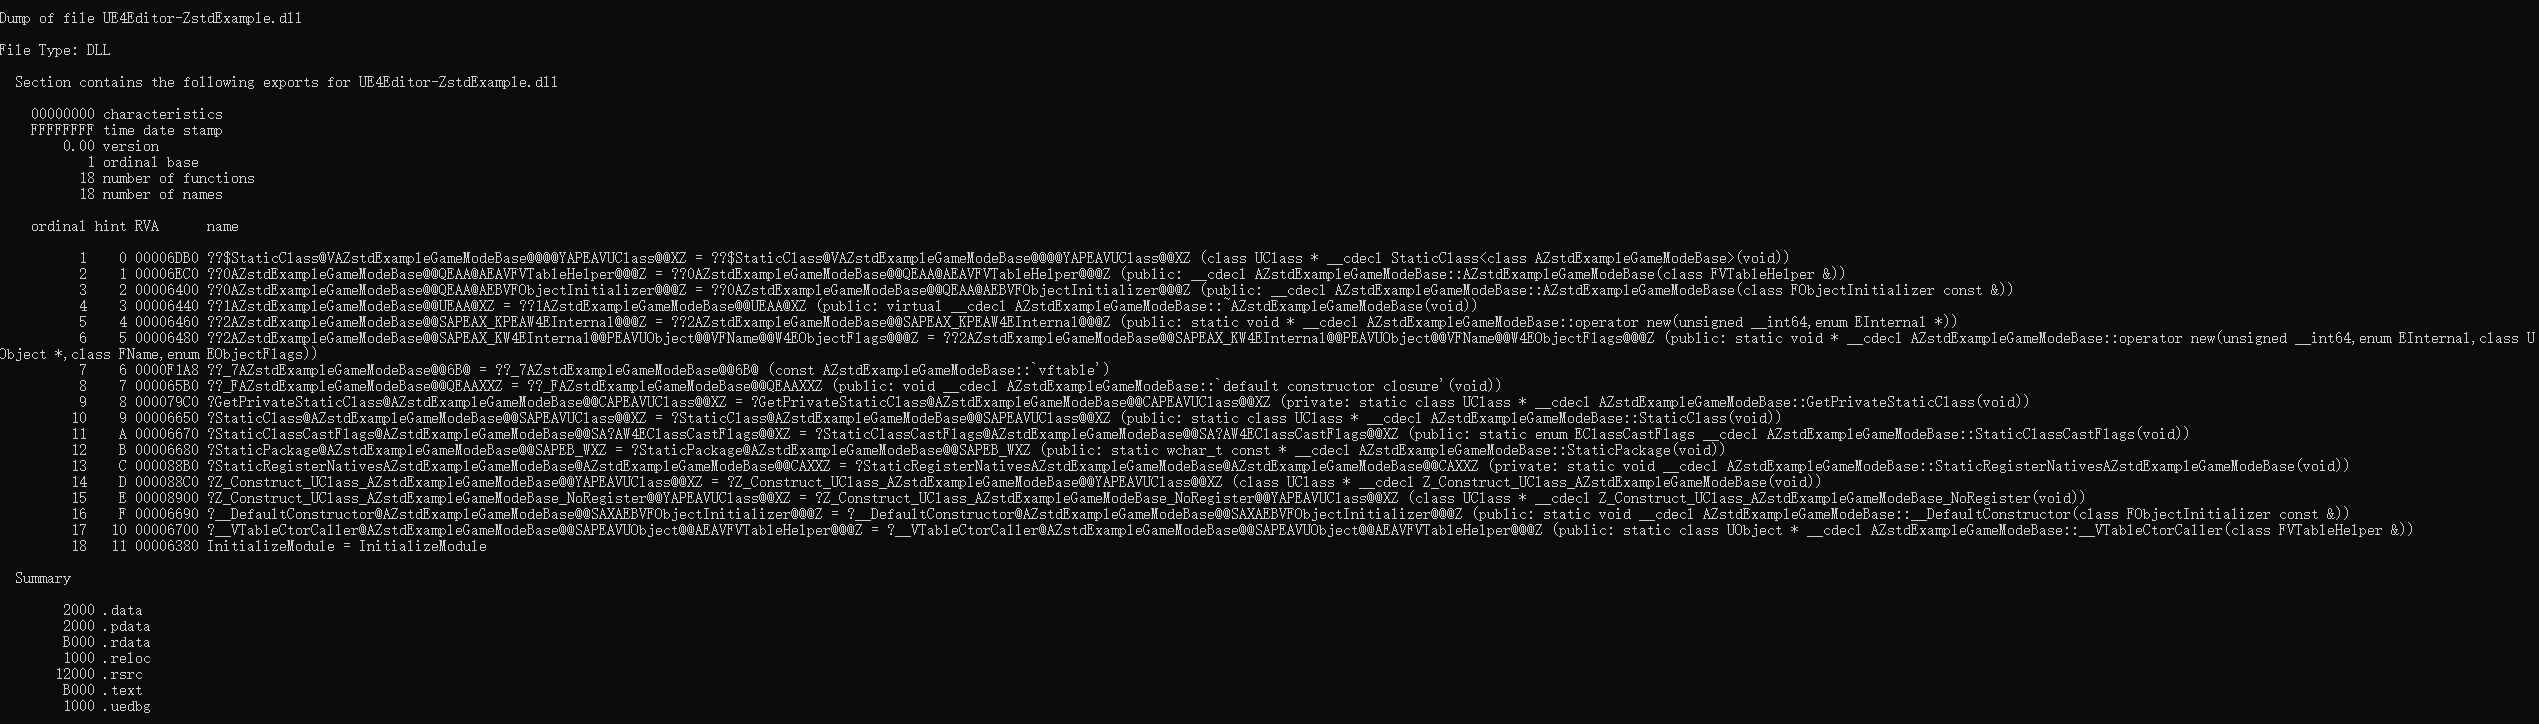
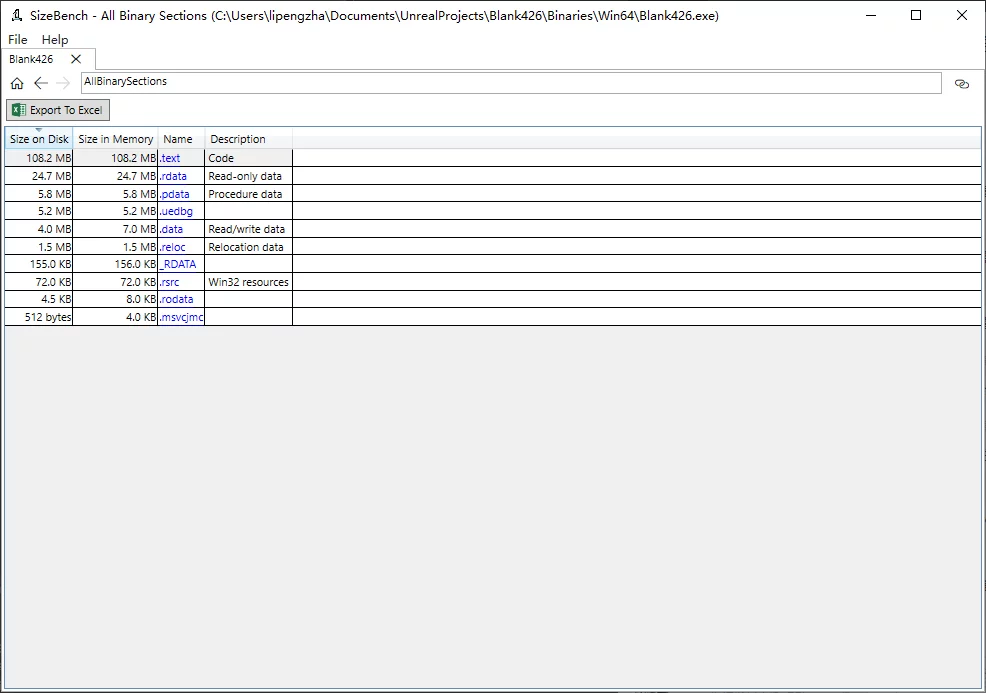
View PE Symbol Information on Windows
In Unix, you can use nm to view binary symbol information, but it’s not very convenient for PE types on Windows.
However, MSVC provides an equivalent dumpbin.exe for viewing PE file symbols:
1 | Microsoft (R) COFF/PE Dumper Version 14.25.28614.0 |
View imported and exported symbols:
1 | dumpbin.exe /imports UE4Editor-ZstdExample.dll |
Win10 UTF8 Encoding
After enabling it, it will modify HKEY_LOCAL_MACHINE\SYSTEM\CurrentControlSet\Control\Nls\CodePage under ACP, OEMCP, and MACCP values to 65001: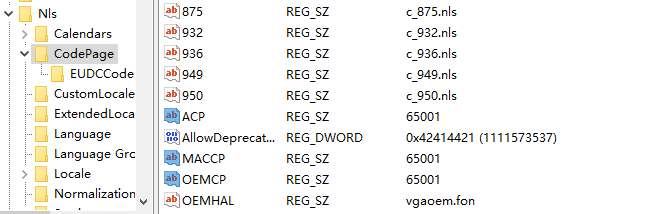
You can check their values to see if UTF8 encoding is enabled.
1 | [HKEY_LOCAL_MACHINE\SYSTEM\CurrentControlSet\Control\Nls\CodePage] |
Check if File Exists in BAT
1 | @echo off |
View Virtual Memory Usage in Windows
You can check it using the systeminfo command: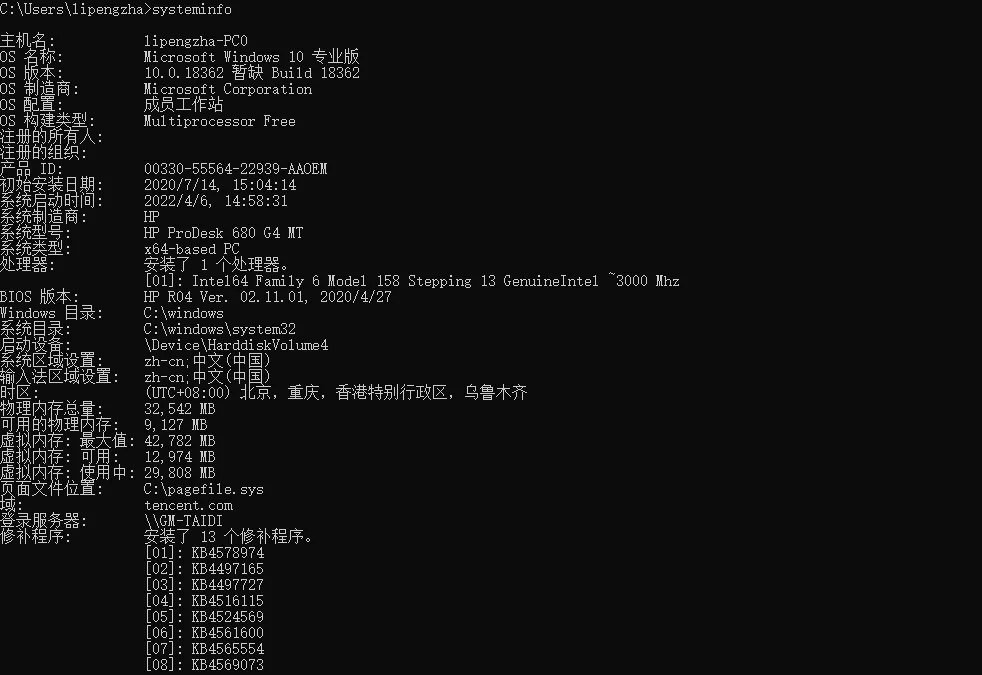
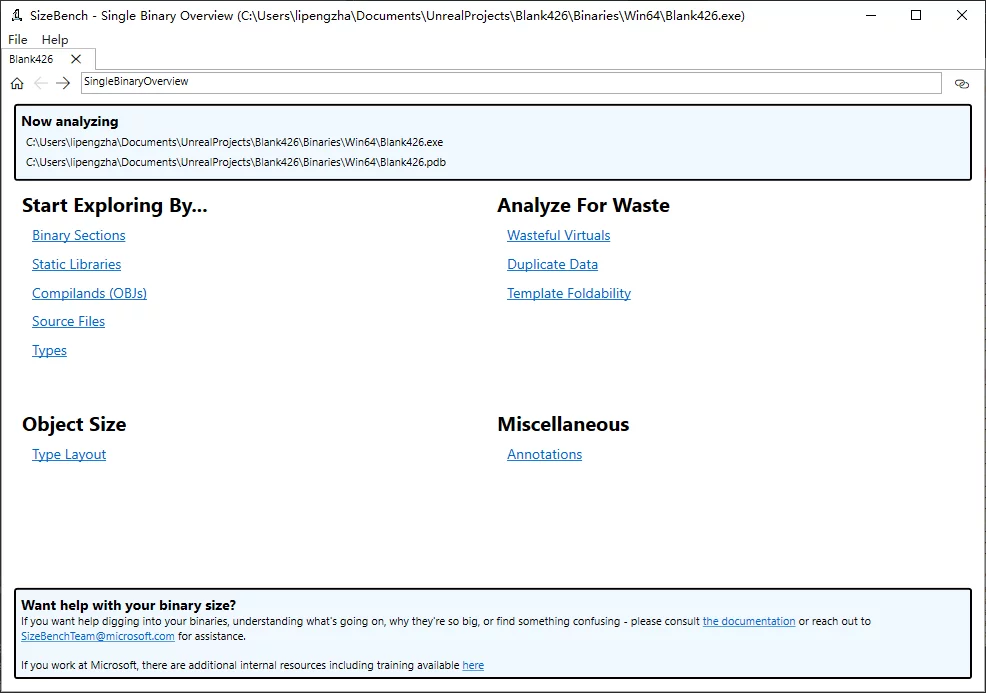
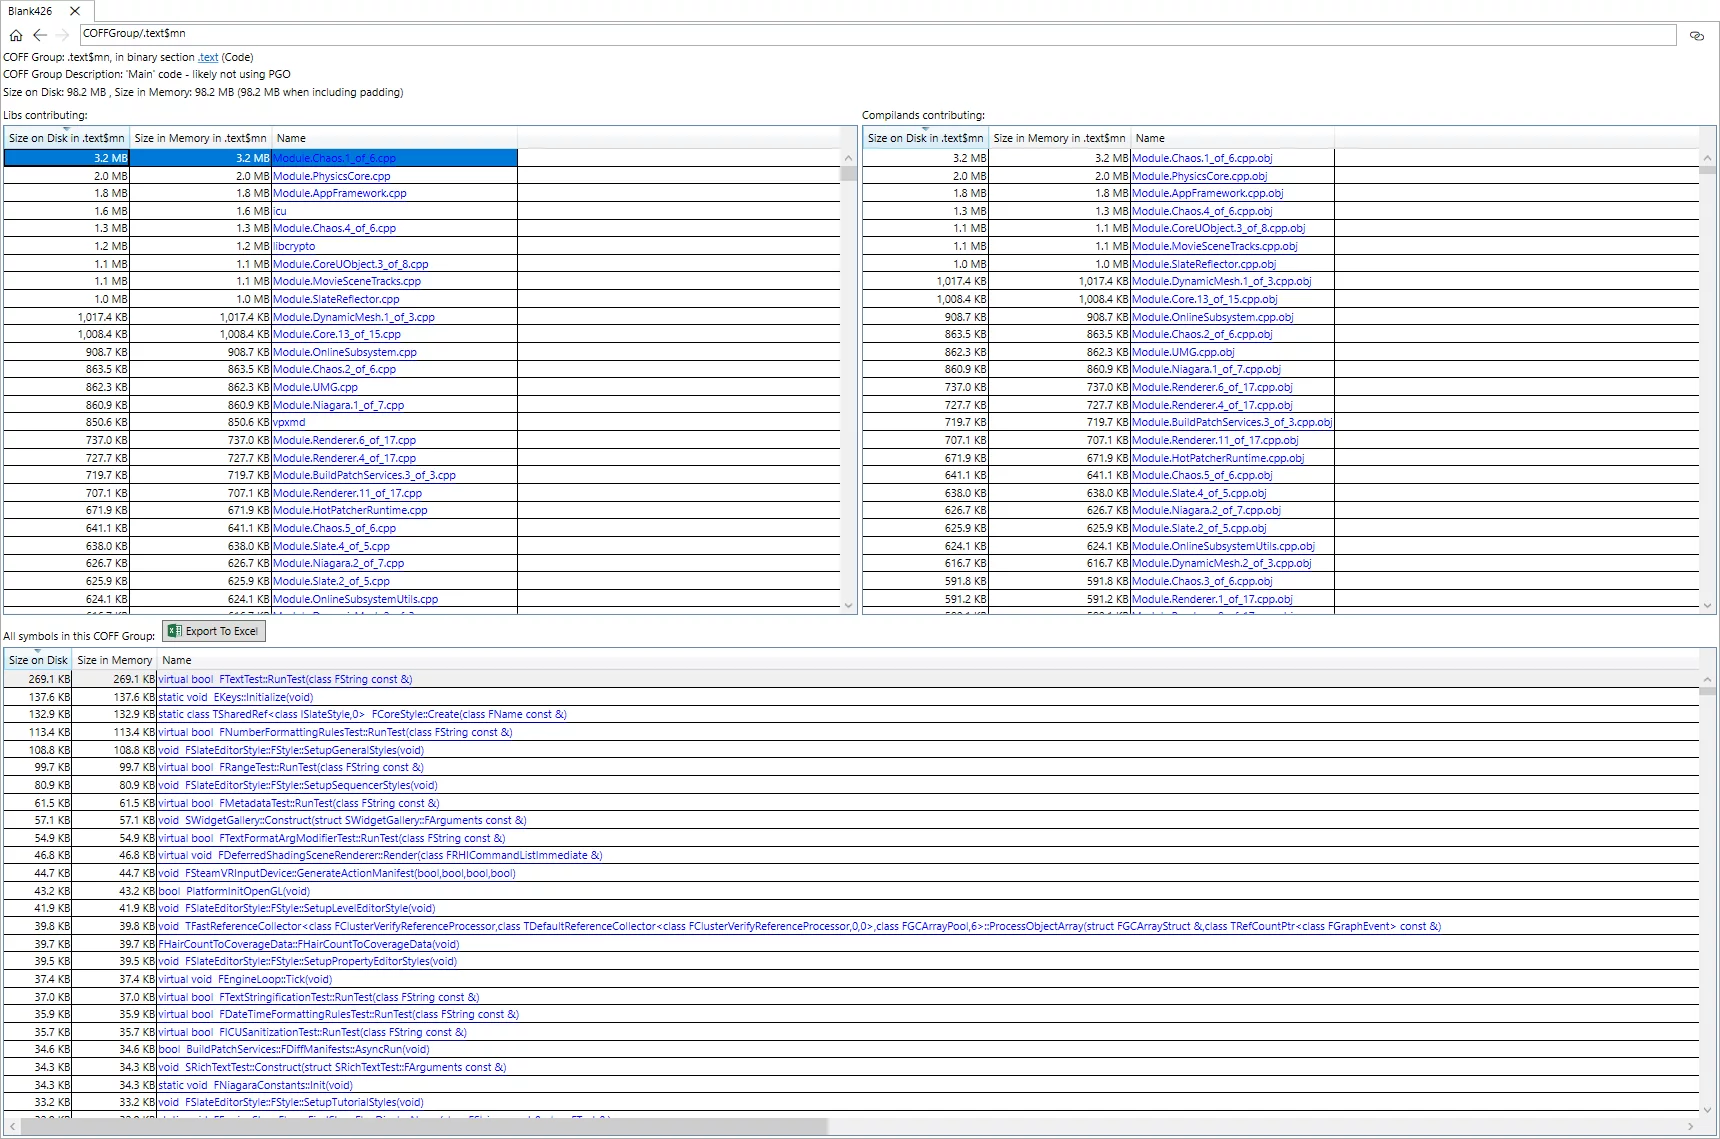
View PE File Binary Symbol Space Distribution in Windows
You need to load pdb and exe for analysis:
SCP Upload/Download Files
- Download a file from the remote:
1 | scp username@host:/path/filename /local_path/ |
- Upload a local file to the remote:
1 | scp /path/filename username@host:/remote_path |
- Download a folder from the remote:
1 | scp -r username@host:/remote_dir/ /local_dir/ |
- Upload a folder to the remote:
1 | scp -r /local_dir/ username@host:/remote_dir/ |
You can customize the SSH port with scp -P 2222.
Check Process Priority in Windows
You can check it through Task Manager: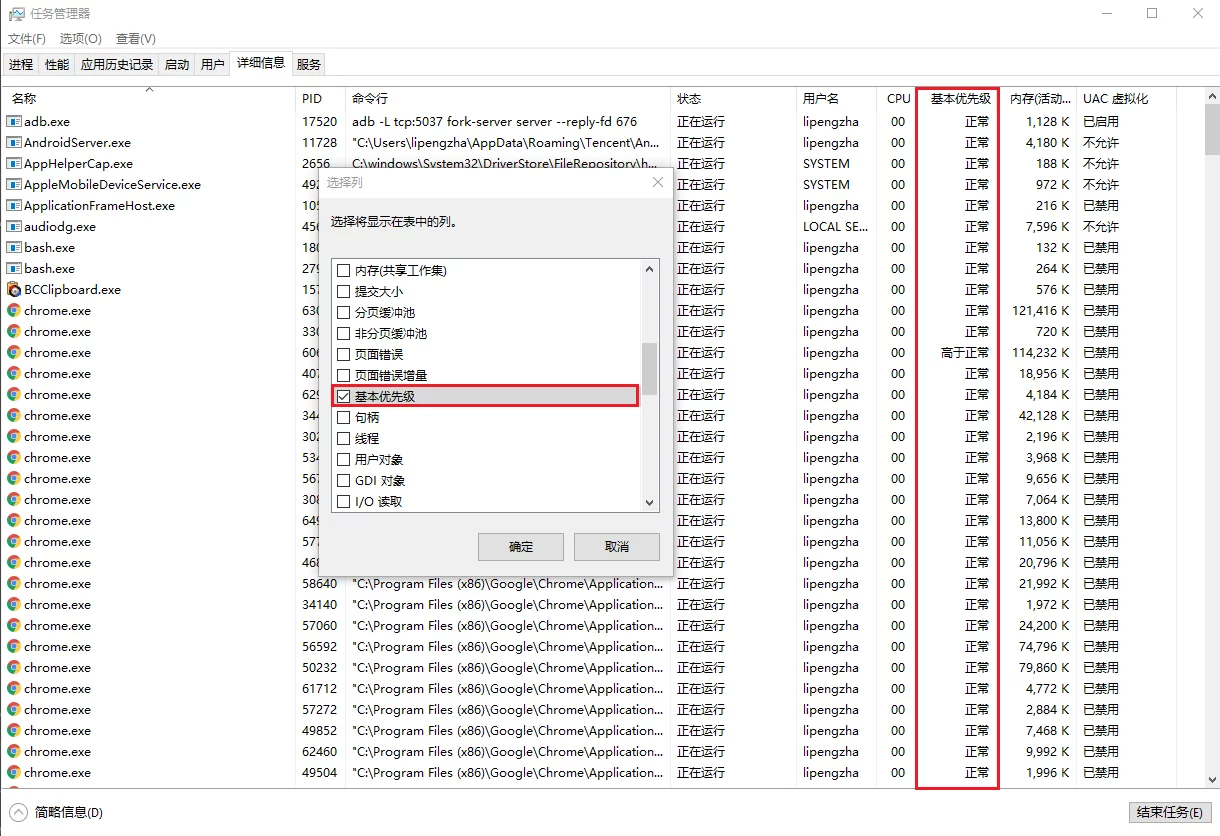
LibChecker
View Android Apk’s so, services, Activity, permissions, etc.
View Which Process Occupies a File in Windows
You can use the Resource Monitor to search for the filename and see which process occupies the file: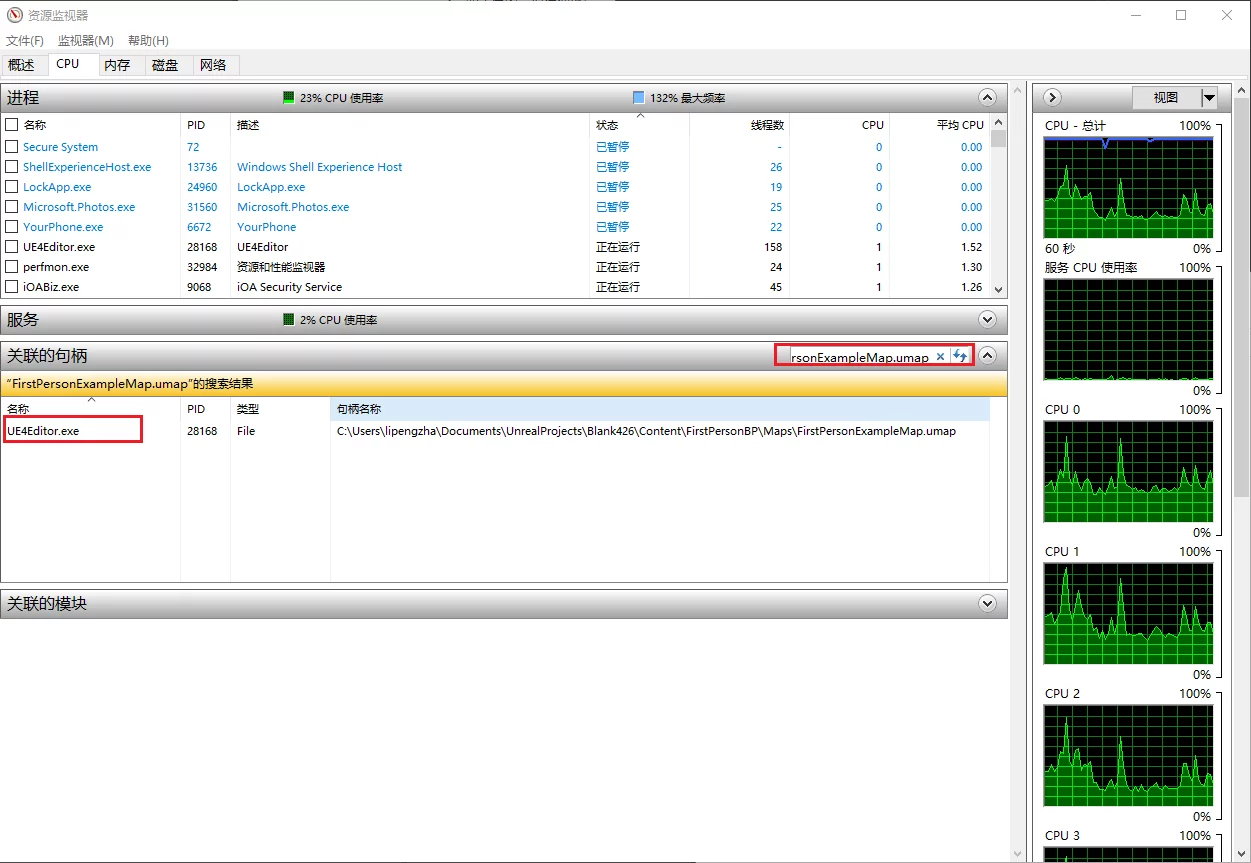
ADB Over Wi-Fi
Connect the device with USB
Make the device’s
adbddaemon listen on port 5555, waiting for PC connection:1
adb tcpip 5555
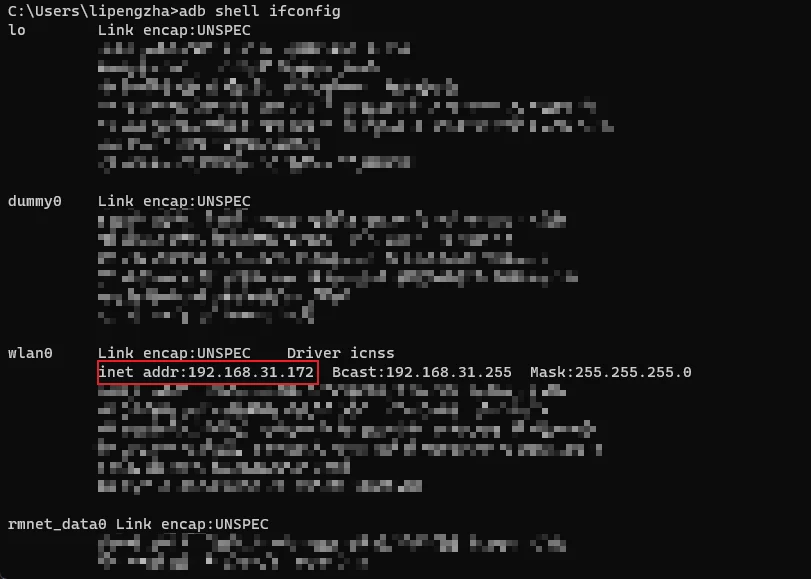
Check the device’s IP, get the
wlan0IP address:1
adb shell ifconfig
![]()
Disconnect the USB connection
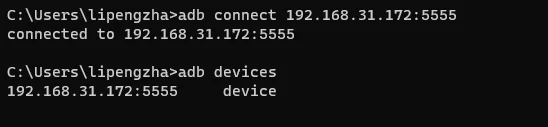
Connect to the device remotely using ADB:
1
2adb connect DEVICE_IP:5555
# adb connect 192.168.31.172:5555You can see the remotely connected device using
adb devices:![]()
Download Gist File with wget
And yet there is, look for the raw button (on the top-right of the source code).
The raw URL should look like this:
1 | https://gist.githubusercontent.com/{user}/{gist_hash}/raw/{commit_hash}/{file} |
Note: it is possible to get the latest version by omitting the {commit_hash} part, as shown below:
1 | https://gist.githubusercontent.com/{user}/{gist_hash}/raw/{file} |
Python
Encoding Error
1 | SyntaxError: Non-ASCII character '\xe8' in file PreCommitChecker.py on line 10, but no encoding declared; see http://python.org/dev/peps/pep-0263/ for details |
You can add encoding at the top of the py file:
1 | #coding=utf-8 |
Get Current Directory
1 | current_path = os.getcwd() |
Importing Parent Directory
1 | import sys |
Running Programs with Spaces in Their Names
Use subprocess to replace os.system:
1 | ps = subprocess.Popen(final_cmdlet) |
Check for UTF8 With BOM
1 | import codecs |
SSH Key Login Failure
You can modify the SSH configuration on Mac (/etc/ssh/sshd_config):
1 | RSAAuthentication yes |
Then reload the configuration:
1 | $ sudo launchctl unload /System/Library/LaunchDaemons/ssh.plist |
Enable WSA on Windows 11
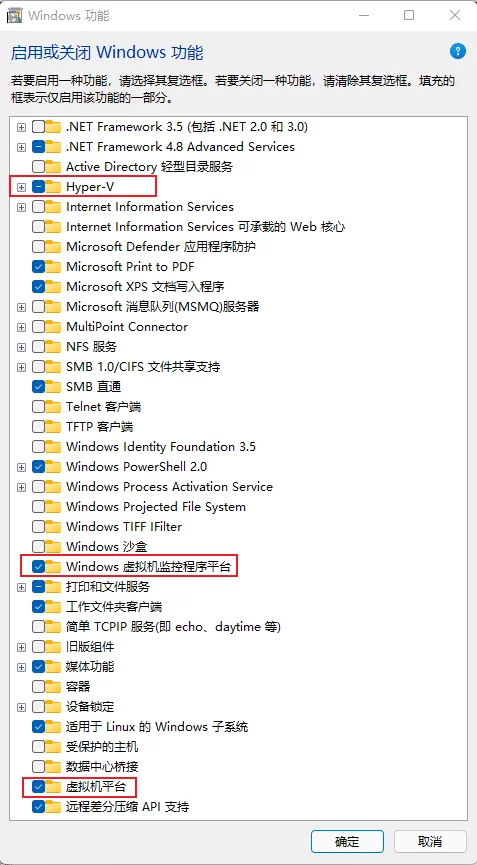
Enable Hyper-V/Windows Hypervisor Platform/Virtual Machine Platform:
![]()
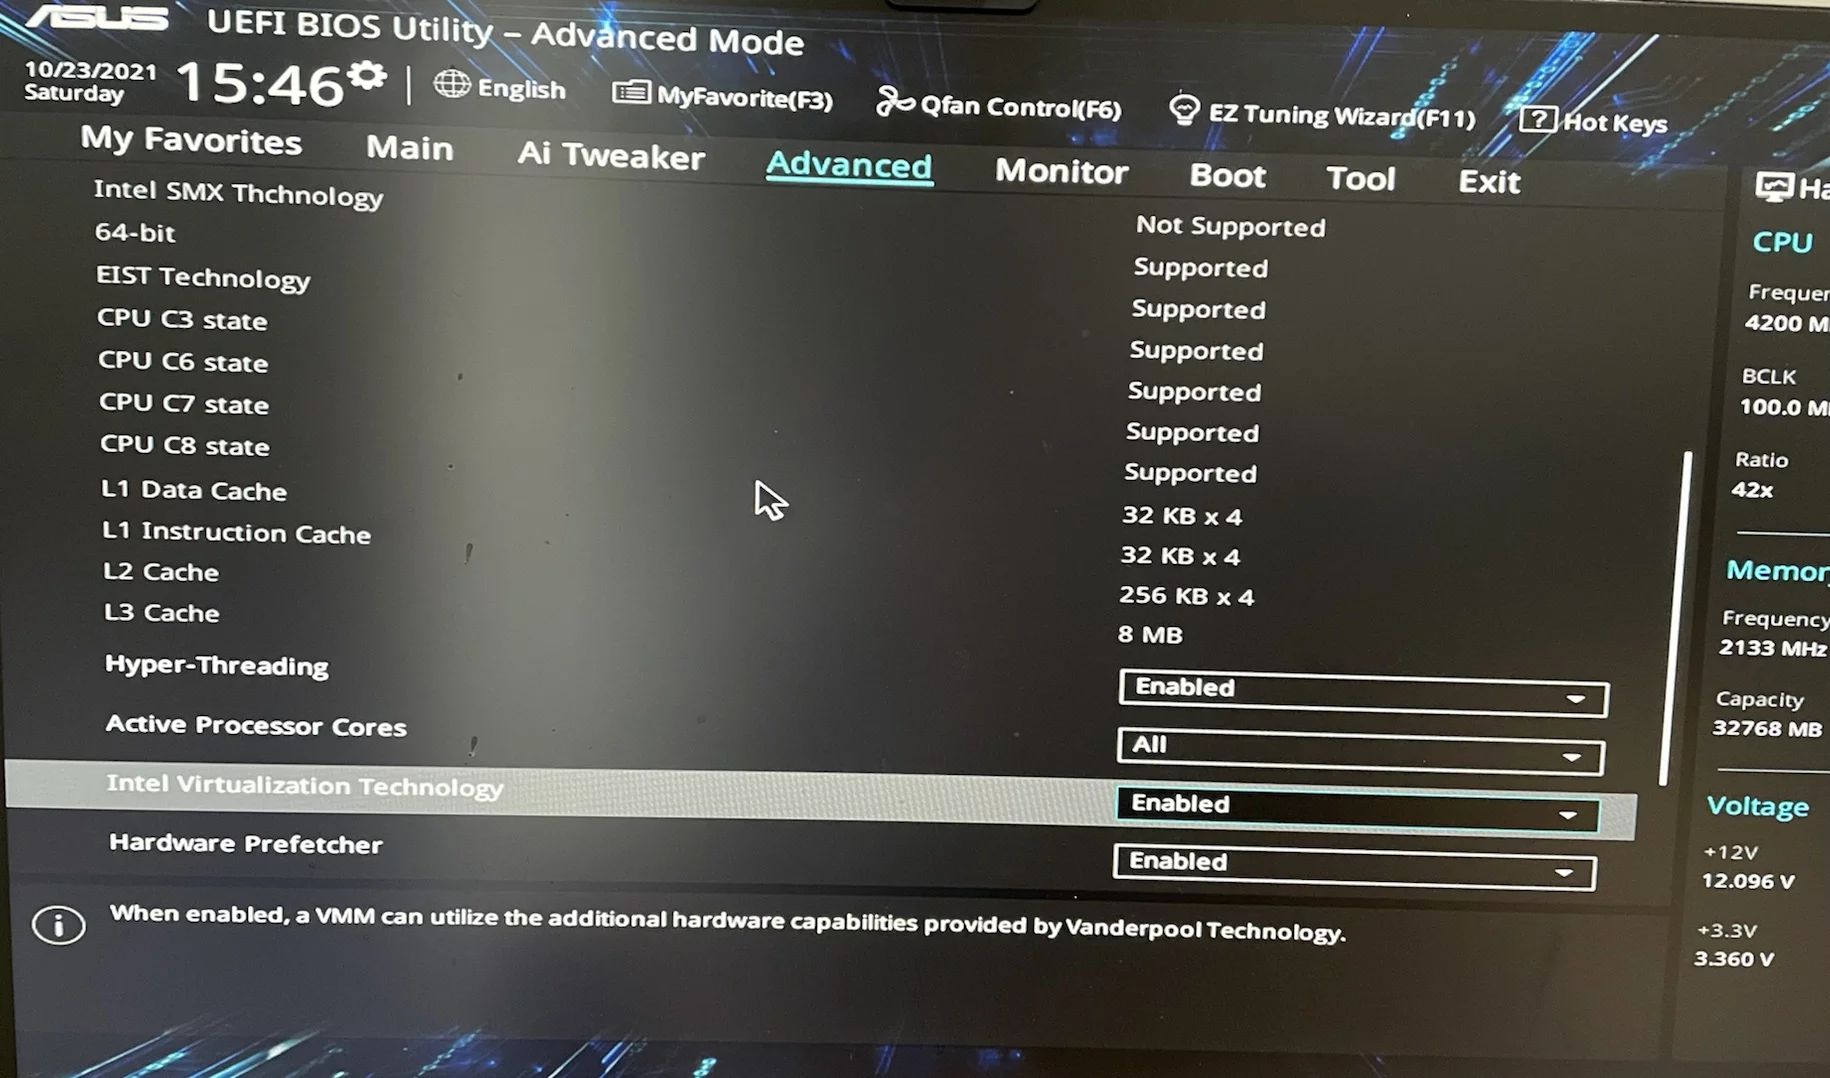
Enable CPU Virtualization (Intel Visualization Technology) in BIOS:
![]()
Download the WSA offline installation package link, extraction code: iogg
After extracting, use admin privileges to start powershell and execute the following command:
1 | Add-AppxPackage -Path MicrosoftCorporationII.WindowsSubsystemForAndroid_1.7.32815.0_neutral___8wekyb3d8bbwe.Msixbundle |
Once installed, you can find WSA in the start menu: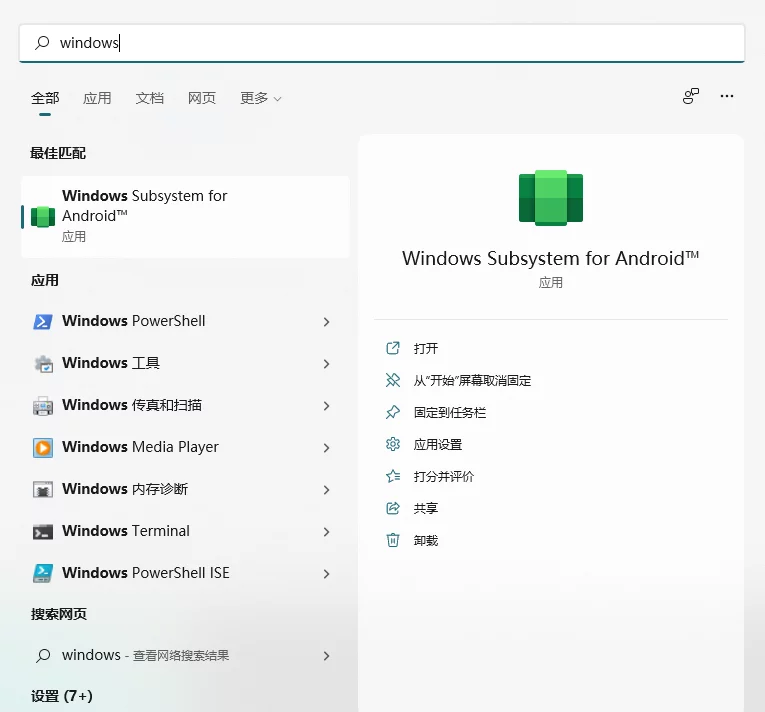
After starting, enable developer mode: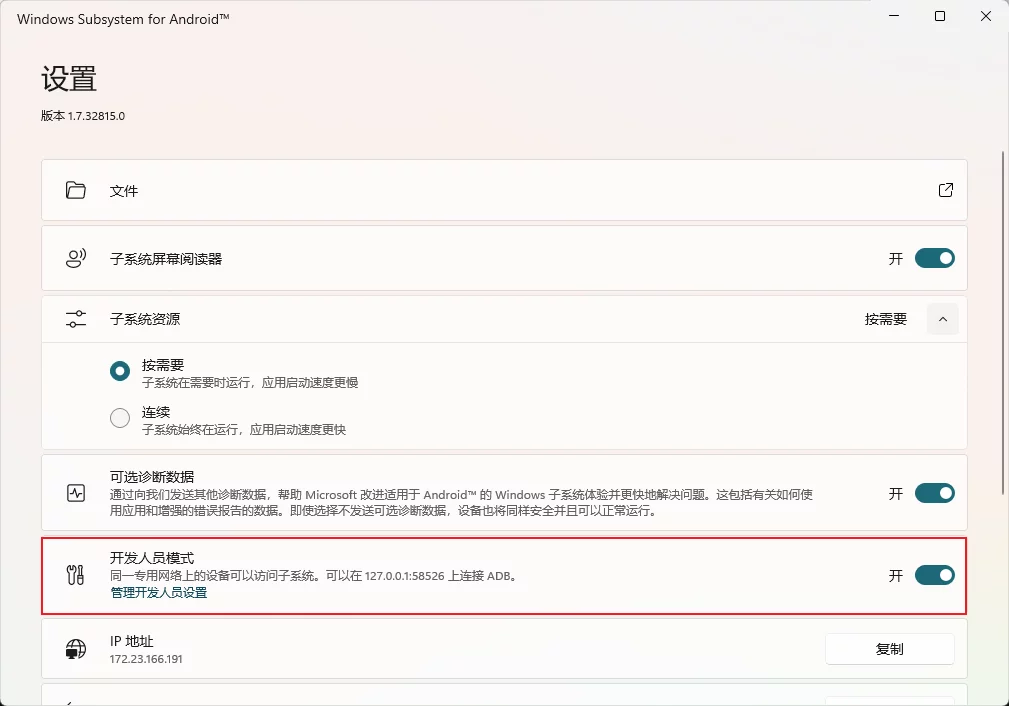
You can see the WSA’s IP address here.
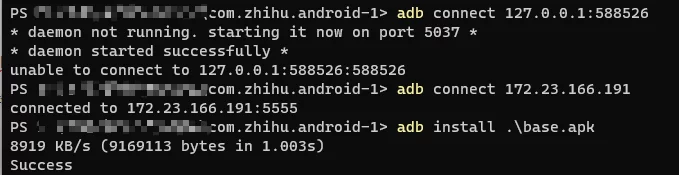
After installation, you can install APKs into WSA. First, you need to download ADB, and use ADB to install the APK file.
Use adb connect to connect to WSA (the IP address can be found in WSA):
1 | adb connect 127.0.0.1:58526 |
Then use adb install to install the APK:
1 | adb install base.apk |
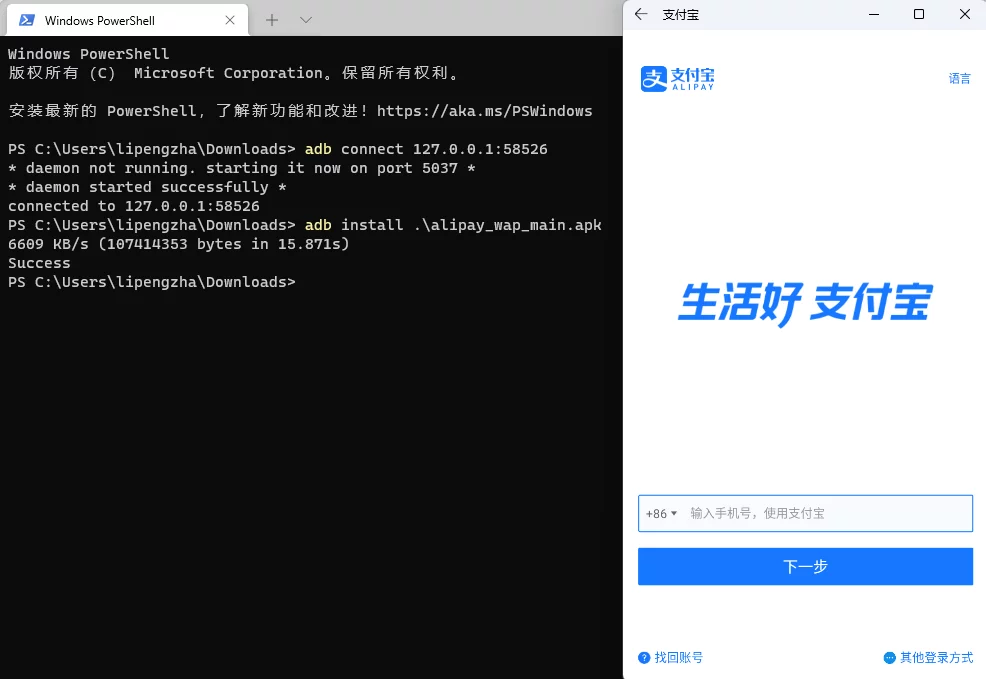
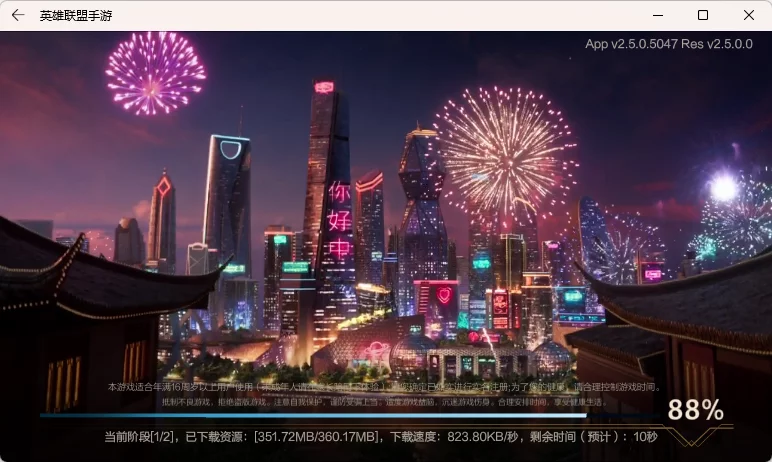
You can even install APK packages produced by UE and run normally:
It can also run LOLM normally:
The Linux kernel version of WSA is 5.10.34.2:
The Android version is Android 11:
1 | windows_x86_64:/ $ getprop ro.build.version.sdk |
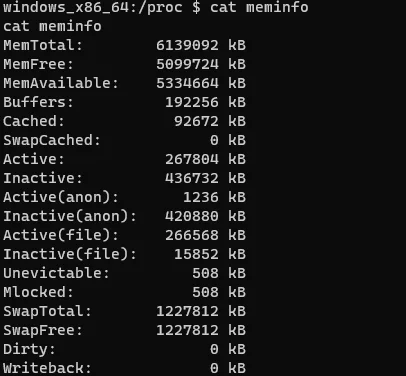
Check the memory:
1 | cat /proc/meminfo |
KMS Activation
Run cmd or powershell with admin privileges:
1 | slmgr.vbs -ipk W269N-WFGWX-YVC9B-4J6C9-T83GX |
Remove Shortcut Icon Arrow
Open the registry location (create Shell Icons if it doesn’t exist):
1 | HKEY_LOCAL_MACHINE\SOFTWARE\Microsoft\Windows\CurrentVersion\Explorer\Shell Icons |
Create a new string value named 29 with the content C:\WINDOWS\system32\imageres.dll,197. Restart to apply changes.
Get Douyin Video Download URL
1 | import requests |
Python Detect File Encoding
1 | import os |
Magic Mouse Speed
The default tracking speed of the system:
1 | defaults read -g com.apple.mouse.scaling |
To set:
1 | defaults write -g com.apple.mouse.scaling 7 |
View Keystore Alias Information
View with keytool command line:
1 | keytool -list -v -keystore fmgame.keystore -storepass xxxxxx |

JetbrainsIDE Log Filtering
You need to install the plugin: Grep Console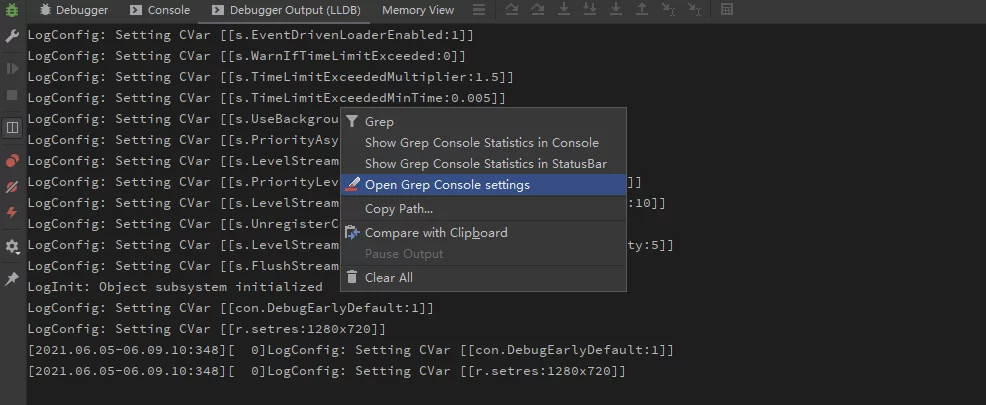
Add filtering settings, and you can also set colors: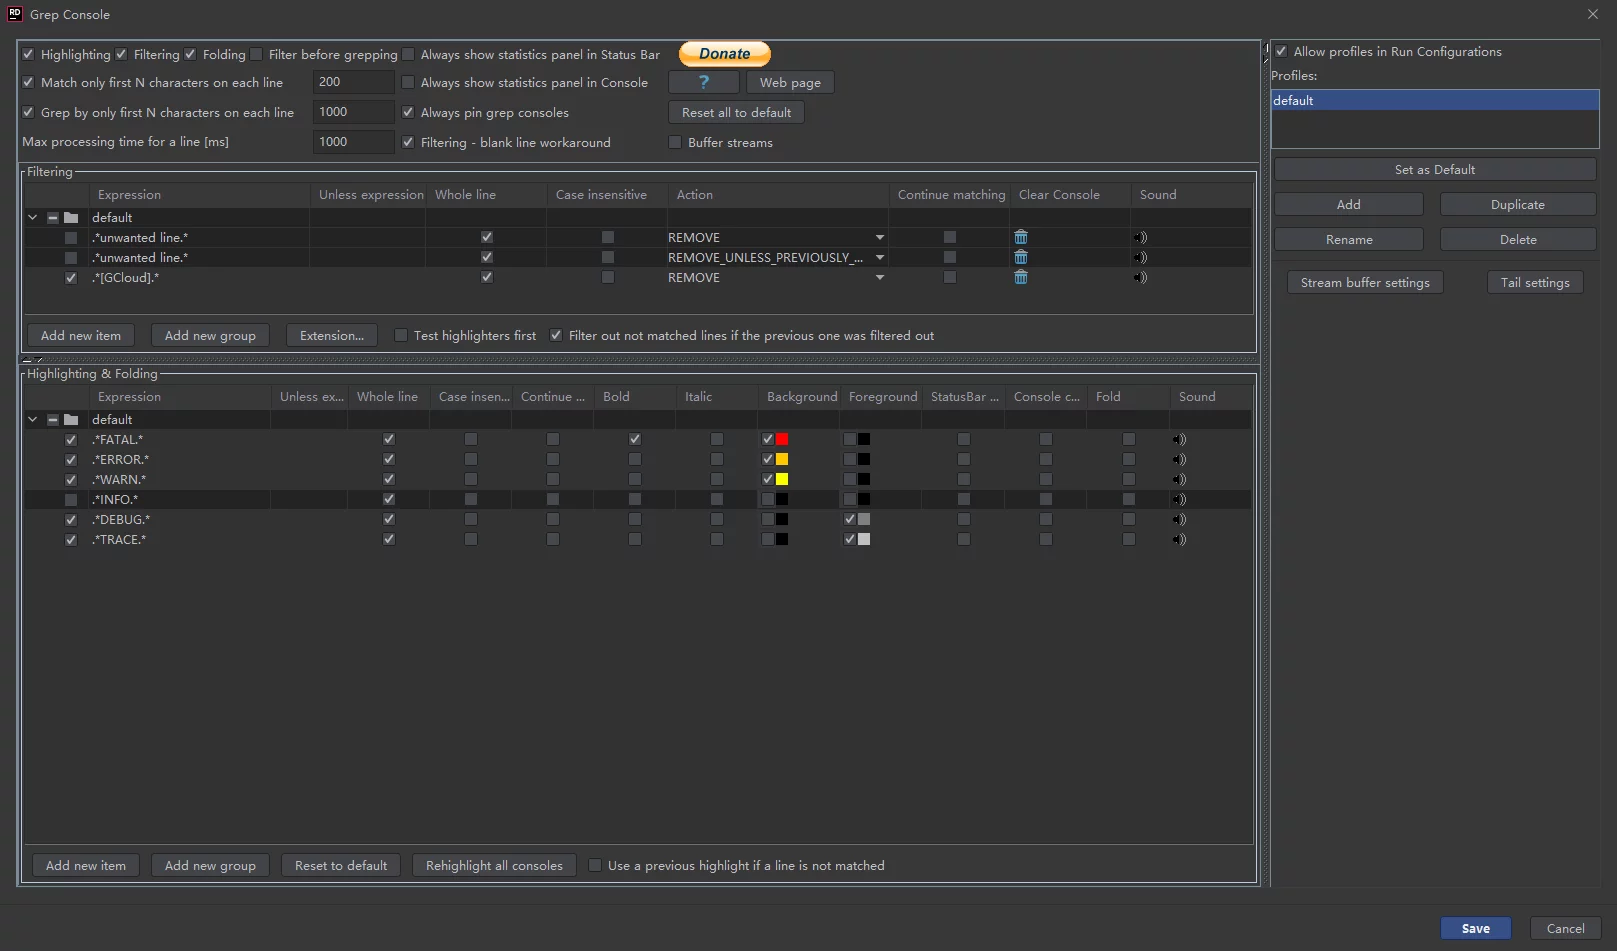
Rider for Unreal add startup parameters
- First, enable the Toolbar in
View-Appearance - Right-click on the ToolBar and select
Customize Menus and Toolbars

3. Under Menus and Toolbars - Main Toolbar - Toolbar Run Actions - Run/Debug, add Edit Configurations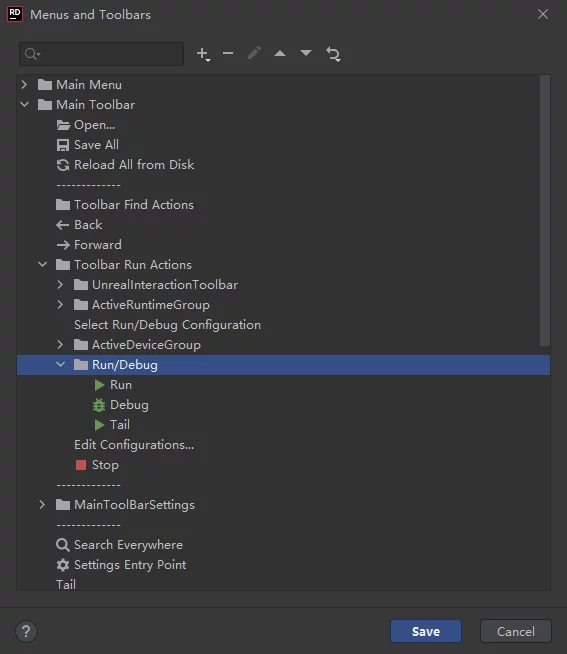
4. After startup, you can add parameters.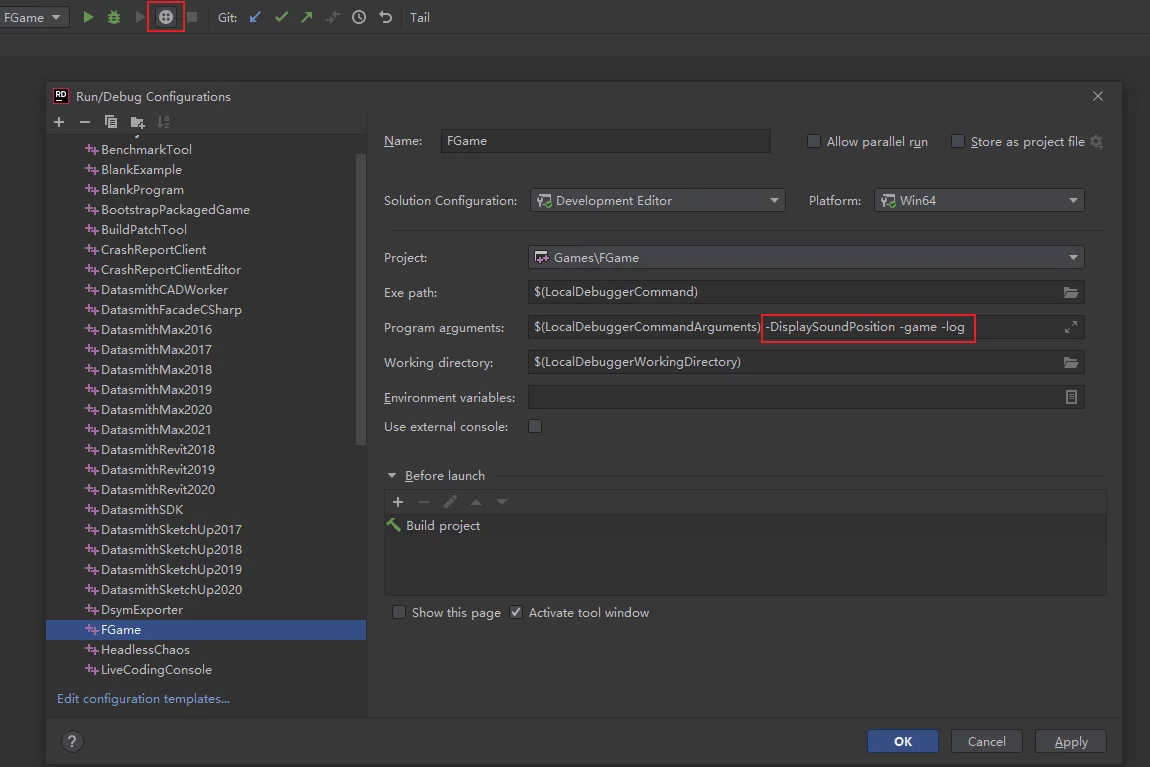
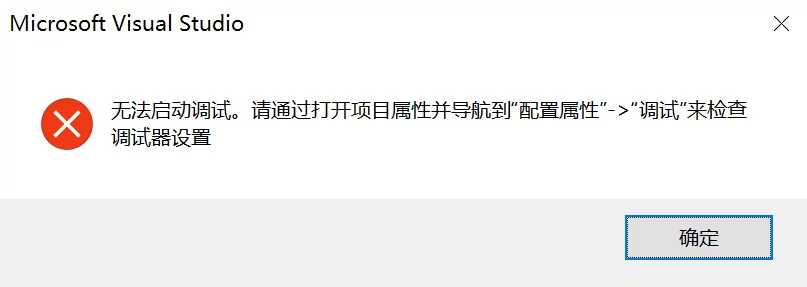
VS launch debugging error
Unable to start debugging. Please check the debugger settings by opening project properties and navigating to “Configuration Properties” -> “Debugging”.
It seems the project’s working directory is not set correctly:
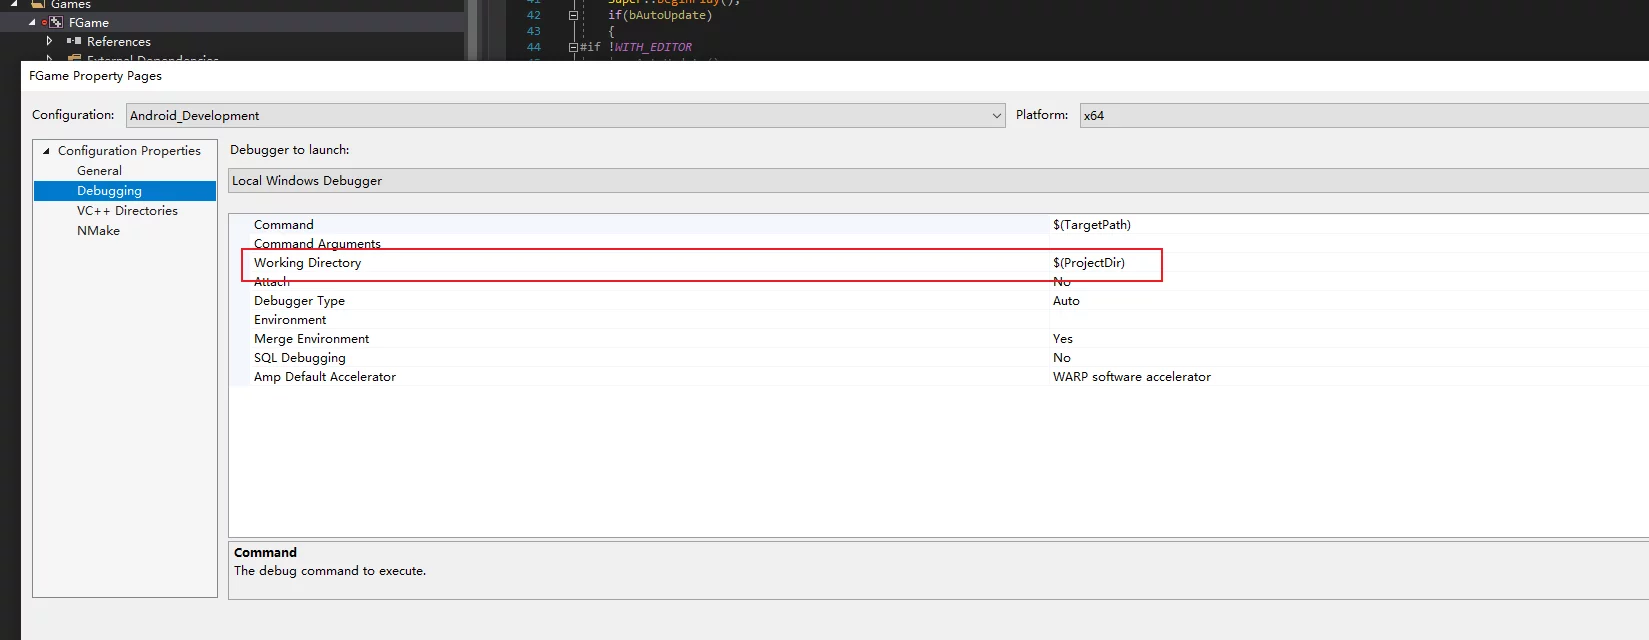
Right-click on the VS project properties, change the working directory in Debugger to $(ProjectDir).
MSBUILD 16.10 using Rider error
Error message when using Rider to compile UE4:
1 | UnrealBuildTool.csproj: [MSB4057] The target "Engine\UE4" does not exist in this project. |
This is a bug in VS2019 MSBUILD 16.10; the official statement says it will be fixed in 16.10.1:
- Building a VS solution file at the command line now causes MSB4057
- Building a subset of a VS solution at the command line causes MSB4057
- MSBuild error MSB4057 after updating to VS 2019 16.10.0
Deploy trojan
First, you need to resolve the domain to the VPS IP address, then execute the following commands in order:
1 | # Install BBR |
View and modify the password for trojan:
1 | nano /usr/src/trojan/server.conf |
Restart the service:
1 | sudo systemctl restart trojan |
Date format matching regex
1 | \d{4}(\-|\/|\.)\d{1,2}\1\d{1,2} |
This rule can match the following content:
1 | 2021-01-06 |
Batch delete Weibo script
Paste the following code into the console of the Weibo page:
1 | ; |
Apple software TCP/UDP ports
CMD add firewall rules
For SwarmCoordinator, you need to open ping and TCP ports 8008/8099:
1 | netsh advfirewall firewall add rule name="Unreal Swarm ICMPv4 In" dir=in action=allow enable=yes remoteip=Any protocol=icmpv4 |
Usage of the netsh command line:
1 | C:\windows\system32>netsh advfirewall firewall add rule |
Win check if a process exists
If it exists, kill the process; if it doesn’t, do not execute the taskkill command:
1 | tasklist | find /i "swarmagent.exe" |
Use tcping to check if a port is open
You can use the tcping tool:
1 | $ tcping 127.0.0.1 10086 |
Windows store environment variables with bat
Set user environment variable:
1 | setx ENV_NAME env_value |
Set system environment variable:
1 | setx ENV_NAME env_value /m |
Windows mount network path
Use the net use command:
1 | net use * \\YourCompanyComputer "password" /user:"username" /persistent:yes |
For example:
1 | net use * \\192.168.1.111\Game "password" /user:"imzlp" /persistent:yes |
You can also check the condition to avoid remounting if already mounted:
1 | if not exist "T:\" ( |
Android P HTTP request error
Using HTTP requests to upload data on Android P will result in the following error message:
1 | 2018-10-10 16:39:21.312 31611-31646/com.xfhy.tinkerfirmdemo W/CrashReport: java.io.IOException: Cleartext HTTP traffic to android.bugly.qq.com not permitted |
You need to configure the specified domain as a whitelist when packaging.
The method is as follows:
Create a network_security_config.xml file in res/xml
Fill in the following content (modify the URL as needed):
1 |
|
Then reference this file in AndroidManifest.xml:
1 | <application android:networkSecurityConfig="@xml/network_security_config"/> |
After repackaging, you will see the following log during run time:
1 | 02-25 21:09:15.831 27760 27791 D NetworkSecurityConfig: Using Network Security Config from resource network_security_config debugBuild: true |
- New features of Android P
- Adapting Bugly for Android P
- Android Developer Network Security Configuration
Hackintosh guide
Check the port occupation of a specific process
Use the netstat command:
1 | C:\Users\lipengzha>netstat -ano | findstr "231096" |
Outguess image steganography
Write some text information into an image: outguess
View class and symbol information in a JAR
You can use JD-GUI to view: JD-GUI
Enable long path support in Win10
Open the Group Policy Editor (gpedit.msc), and navigate to “Local Computer Policy - Computer Configuration - Administrative Templates - System - File System,” then find the “Enable Win32 long paths” setting and set it to “Enabled.”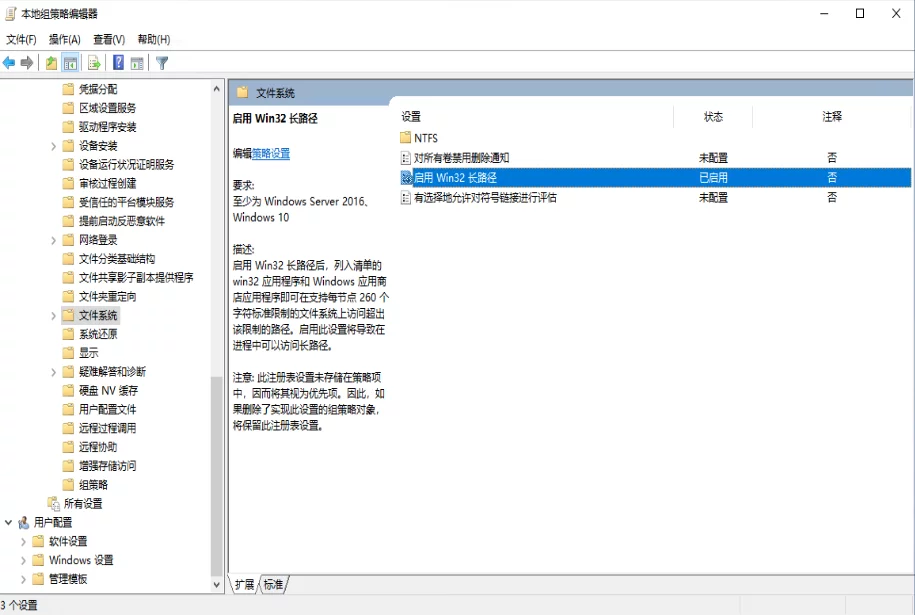
CMD add system environment variables
To add to the user’s environment variable:
1 | rem setx JAVA_HOME "%current_dir_name%\jdk18077" |
To add to the system environment variable, you just need to add the /M parameter after setx.
Creating boot USB drives for images over 4G
Previously, SoftDisk was used to create boot drives, but it uses FAT32, which cannot store files larger than 4G. However, now that Windows 10 is over 4G, files larger than 4G would not be written to the USB drive, causing the creation of the boot drive to fail. You can use a new tool to solve this problem: rufus
Xcode and clang version correspondence
Git file modification times
When using git clone or updating files, the modification time of local files becomes the execution time of the current machine. How can we retain the modification times of these files as they were at the time of submission?
Git has a method to obtain the time of the most recent commit for a file in the current repository:
1 | $ git log -1 --format="%ct" FILE_PATH |
The result is a Unix timestamp, such as 1601541165, which represents the most recent submission time of the current file.
After obtaining this time, you can modify the file’s modification time using touch -d:
1 | $ touch -d "@1601541165" FILE_PATH |
Note: An @ should be added before the Unix timestamp as this is the format accepted by the touch command.
So how can we process the entire repository in bulk? We can use the following script:
1 | $ git ls-files -z | while read -d '' path; do touch -d "$(git log -1 --format="@%ct" "$path")" "$path"; done |
This will change the modification time of all files in the repository to their most recent commit time.
Note: If the local repository depth is 1, all files will have the commit time of this most recent depth.
Git LFS rules issue
When using git lfs, it’s crucial to pay attention to the rules in .gitattributes. If you intend to use lfs to track all files:
1 | *.* filter=lfs diff=lfs merge=lfs -text |
This rule is problematic; it causes all files, including .gitignore and .gitattributes, to be tracked by lfs. When pulling with lfs, these two files will change, causing all files to be detected by git as modified.
A reasonable rule would include all files while excluding .gitignore and .gitattributes:
1 | *.* filter=lfs diff=lfs merge=lfs -text |
LaTex insert symbols
Spaces
| Meaning | Command | Effect | Explanation |
|---|---|---|---|
| Two quad spaces | a \qquad b | $a \qquad b$ | Two m’s width |
| One quad space | a \quad b | $a \quad b$ | One m’s width |
| Big space | a\ b | $a\ b$ | 1/3 m width |
| Medium space | a;b | $a;b$ | 2/7 m width |
| Small space | a,b | $a,b$ | 1/6 m width |
| No spacing | ab | $ab$ | none |
| Tight | a!b | $a!b$ | Shrink 1/6 m width |
\quad,1em,em,mrefer to the width of a character ‘M’ in the current font.
Delimiters
Use \textrm{-} to insert the delimiter - without it being recognized as a minus sign.
1 | declaration\textrm{-}specifiers_{opt} |
The effect is as follows:
$declaration\textrm{-}specifiers_{opt}$
Reset Bitnami Gitlab admin permissions account password
After installing Bitnami, the default password for the GitLab admin account is:
1 | # account |
Login to the Bitnami GitLab image account password:
1 | user: bitnami |
To change the default admin account password for GitLab, execute the following commands in the installed Bitnami environment:
1 | $ sudo gitlab-rails console production |
That completes the modification.
ADB commands
First, download ADB.
ADB install APK
1 | $ adb install APK_FILE_NAME.apk |
ADB close app
1 | adb shell am force-stop PACKAGE_NAME |
ADB start App
The installed renderdoccmd does not have a desktop icon; to start it, use the following adb command:
1 | adb shell am start org.renderdoc.renderdoccmd.arm64/.Loader -e renderdoccmd "remoteserver" |
ADB start App shell command template:
1 | adb shell am start PACKAGE_NAME/.ActivityName |
This method requires knowing the App’s package name and Activity name. The package name is easy to find, but if you don’t know the Activity, you can extract it using the following operations:
First, use a decompiling tool to unpack the APK (you can use the previous apktools):
1 | apktool.bat d -o ./renderdoccmd_arm64 org.renderdoc.renderdoccmd.arm64.apk |
Then open the AndroidManifest.xml file in the org.renderdoc.renderdoccmd.arm64 directory and find the Application entry:
1 | <manifest xmlns:android="http://schemas.android.com/apk/res/android" package="org.renderdoc.renderdoccmd.arm64" platformBuildVersionCode="26" platformBuildVersionName="8.0.0"> |
This contains all registered Activities. If there is not a UI-enabled apk, there will only be one Activity, so the main Activity of renderdoccmd is .Loader.
If it’s a UI-enabled app, there will be multiple Activities; you can find the main Activity by checking the Category in AndroidManifest.xml or by using naming conventions (usually the Activity name contains main).
PS: The main Activity of the game packaged using UE is
com.epicgames.ue4.SplashActivity, which can be started using the following command.
1 | adb shell am start com.imzlp.GWorld/com.epicgames.ue4.SplashActivity |
ADB transfer files
Use ADB to transfer files to the phone:
1 |
|
Transfer files from the phone to the computer:
1 |
|
ADB: Logcat
Use logcat to see the log information from the Android device.
1 | adb logcat |
This will print all information from the current device, but to avoid excessive output while debugging an app, you can use find to filter (case-sensitive):
1 | adb logcat | find "GWorld" |
To filter all logs from the UE packaged APP:
1 | adb logcat | find "UE4" |
If too many logs are accumulated from running multiple times, you can clear them:
1 | adb logcat -c |
ADB: Extract installed APK from the device
Note: When executing the following command, ensure that the phone has developer permissions enabled and allow the fingerprint confirmation prompt on your device.
1 | # Check connected devices |
ADB flash Recovery
Download ADB, then use the following commands according to your situation (if you are currently in bootloader, you do not need to execute the first command).
1 | adb reboot bootloader |
ADB port forwarding
You can specify using adb commands:
1 | # PC to Device |
ADB: Check APK location by package name
You can use the following adb command:
1 | $ adb shell pm list package -f com.tencent.tmgp.fm |
The last parameter is the package name, and the output is the APK path.
ADB: View the current app’s package name
Use the following adb command:
1 | $ adb shell dumpsys window w | findstr \/ | findstr name= |
The string after mAnimationIsEntrance=true mSurface=Surface(name= and before / is the package name of our app.
Switch npm source
Change npm from the official source to the Taobao source:
1 | $ npm config set registry https://registry.npm.taobao.org |
Speed will be much faster in China.
Chrome 79 crashes in Win10
After Chrome automatically updates, all pages look like this:
The solution is to add the -no-sandbox parameter to the Chrome shortcut, but it will prompt You are using an unsupported command-line flag: -no-sandbox. Stability and security will be compromised. Temporarily, I haven’t found a fundamental solution yet; for now, this is the workaround.
Method to prove personal trajectory from the three major operators
- Telecom mobile users proof method
Edit SMS “CXMYD# last four digits of ID card” to 10001, authorize by replying Y to check “roaming location inquiry,” which can query the pathway information of the mobile number in the last 15 days.
- Unicom mobile users proof method
Send on your mobile: “CXMYD# last four digits of ID card” to 10010 to query the national roaming location information for the past 30 days, aiding in work return assistance.
- Mobile user proof method
Compose CXMYD, send to 10086, then enter the last four digits of the ID card as per the reply SMS to query the provinces and municipalities visited in the past month without municipal level specifics.
Everyone can check up to 10 times for free within one day.
npm install error
Encounter the following error when installing npm:
1 | root@VISIONSMILE-PC:/mnt/c/Users/Administrator/Desktop/hexo# npm install hexo-cli -g |
To resolve the issue, execute the following command in bash:
1 | $ npm config set strict-ssl false |
Then rerun the installation.
Install 7z on Linux
1 | $ sudo apt-get update |
7z Command Line
To decompress, use the following command (-y means yes to all prompts):
1 | $ 7z.exe x xxxx.7z -oD:\Extract -y |
You can also specify the format to be decompressed:
1 | $ 7z.exe x xxxx.7z -oD:\Extract *.so -r -y |
To compress, use the following command:
1 | $ 7z.exe a xxxx.7z COMPRESS_DIR |
scp Copy Files
Use the following command to copy files from a remote location to local using ssh:
1 | scp -P 22 buildmachine@xx.xx.xx.xxx:/Users/buildmachine/Client/Binaries/IOS/FGame.dSYM D:\ |
However, there is a drawback that scp cannot specify a password when required.
On Windows, you can use putty‘s pscp to solve this, which can specify the -pw parameter and disable all interactive prompts through -batch:
1 | pscp.exe -batch -pw 123456 -P 22 buildmachine@xx.xx.xx.xxx:/Users/buildmachine/Client/Binaries/IOS/FGame.dSYM D:\ |
Numerous 67 Errors in v2ray
Noticing numerous errors in v2ray like the following:
1 | 2020/04/12 17:31:30 tcp:127.0.0.1:53920 rejected v2ray.com/core/proxy/socks: unknown Socks version: 67 |
The official explanation is that this is due to HTTP proxy settings in the application; after checking, it was because the proxy was enabled in Windows 10 settings. You can disable the system proxy in Windows 10 settings - Network - Proxy.
Chrome Reading Mode
In chrome://flags/, find Enable Reader Mode and turn it on.
Command Line to Install VS
Use the following command to control the installation of VS according to the configuration without starting any foreground programs and wait for the installation to complete:
1 | vs_professional.exe --config="D:\config.vsconfig" --quiet --wait |
- Use Command Line Parameters to Install Visual Studio
- Visual Studio Installation Command Line Parameter Examples
NPM: Specify Package Version
~version“Approximately equivalent to version” See npm semver - Tilde Ranges & semver (7)^version“Compatible with version” See npm semver - Caret Ranges & semver (7)versionMust match version exactly>versionMust be greater than version>=versionetc<version<=version1.2.x1.2.0, 1.2.1, etc., but not 1.3.0http://sometarballurl(this may be the URL of a tarball which will be downloaded and installed locally)*Matches any versionlatestObtains latest release
What’s the difference between tilde(~) and caret(^) in package.json?
Open Folder in Explorer from Command Line
On Windows, you can use the explorer command to open a folder in Explorer:
1 | explorer.exe /e,/root, F:\Test |
Note that the specified path must be a path composed of
\. If it is composed of a backslash, it will not open the correct directory (it will open theuser/documentsdirectory).
When using in UE, I wrote a function to convert paths that replaces all / with \\:
1 | FString ConvPath_Slash2BackSlash(const FString& InPath) |
Windows Tree Command
In the Windows cmd, you can use the tree command to list the directory structure of the current folder. The command format is:
1 | tree [drive][path] [/F] [/A] |
/F: Displays the names of files in each folder/A: Uses ASCII characters rather than extended characters
For example:
1 | D:\recastnavigation\RecastDemo\Contrib\SDL>tree /a |
1 | D:\recastnavigation\RecastDemo\Bin>tree /a /f |
Quickly Run an HTTP File Download Service
You can use nodejs‘s serve to quickly set up a file download service. After installing node, run the following in your directory:
1 | $ npx serve |
You can access it via your browser.
Another method is to download hfs, start it, add a directory, and it’s very simple.
Compile Latest Version of Lua on Windows
First, go to lua.org to download the latest lua code and extract it (currently v5.3.5):
1 | curl -R -O http://www.lua.org/ftp/lua-5.3.5.tar.gz |
Start the MSVC developer command tools in Windows: Start menu - x64 Native Tools Command Prompt, change the directory to the Lua source directory using the cd /d command. Then execute the following commands:
1 | cl /MD /O2 /c /DLUA_BUILD_AS_DLL *.c |
Finally, you should have lua.exe / luac.exe / lua535.dll / lua535-import.lib / lua535.lib.
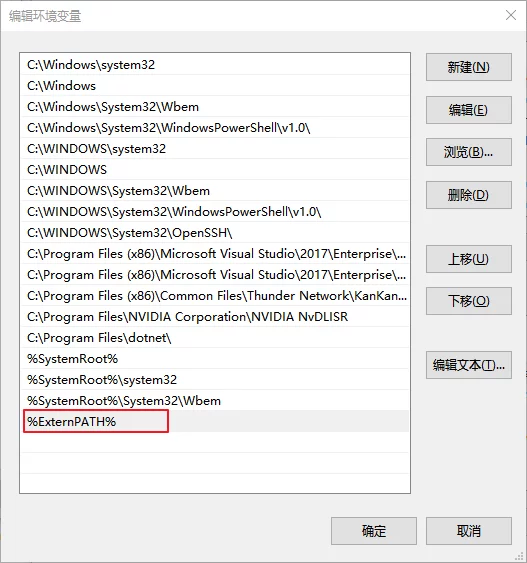
Windows Environment Variable Length Exceeds Limit
Today I added a new path to the system’s PATH, and it prompted me that it was too long to save.
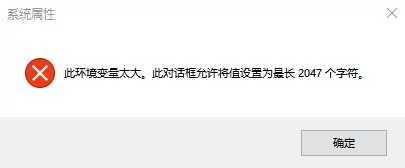
This was really troublesome, but after studying it, I found that it’s possible to add an additional environment variable value to the system’s Path.
That is, create a new environment variable, such as %ExternPATH%, in the system, and then add this environment variable to PATH; the values in ExternPATH can also be accessed.
Epic Account Change Country/Region
The Epic Store is region-locked, and some content is not available for domestic accounts. Additionally, Epic Store requires that the billing address matches the Epic account information, meaning that a USD account cannot pay in the domestic region. After linking payment information and purchasing content on the Epic Store, you cannot directly modify it on the web; you need to contact customer service.
First, visit Epic Games | Support Center to submit a request to contact customer service. Describe the issue in English, stating that you want to change the account’s country and region from China to the USA, after which customer service will send you an email requesting several pieces of information.
- Email address associated with your Epic Games account
- Current Epic Games account display name
- First and last names of Epic Games account holder
- External account currently connected to your Epic Games account, if applicable.
- This includes Google, Facebook, Twitch, PSN, Xbox, and Switch accounts.
- Include the platform AND display name of any external accounts.
After directly replying to this information in the email, they will send a verification link to the email linked to your Epic account. After verification, reply to their email stating that the verification was successful, and they will change it for you.
Note: After the country is changed, previously linked payment information, such as PayPal account, will be cleared.
PS: The customer service contact channel for Epic is really hard to find…
CMD Add Environment Variable
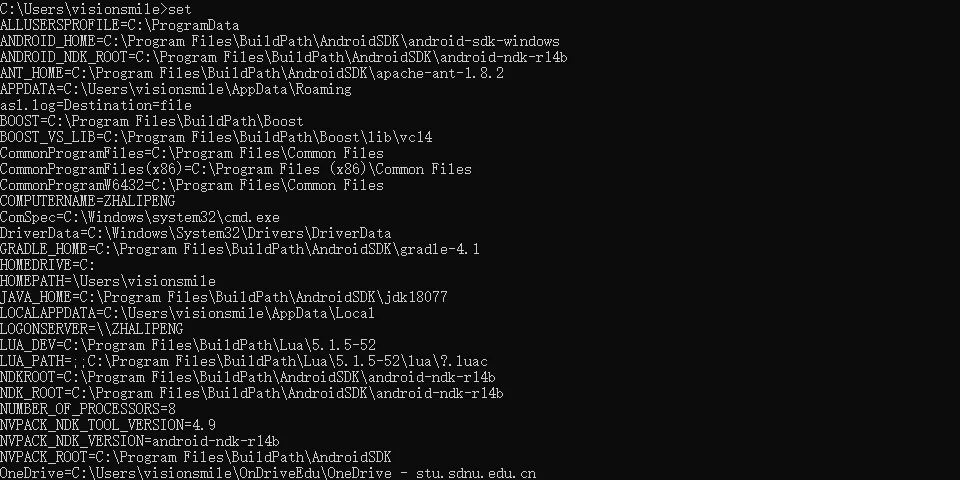
To view the system’s environment variables in cmd, type set:
To add execution paths to the system’s PATH, use setx:
1 | setx Path "%PATH%;C:\BuildPath\Adb"; |
To add a custom environment variable:
1 | setx ANDROID_HOME "%current_dir_name%\android-sdk-windows" |
To get the current directory in cmd:
1 | set "current_dir_name=%cd%" |
Here’s a bat to add AndroidSDK environment:
1 | @echo off |
Automatically Start bat with Administrator Privileges
Write commands that require administrator privileges to start after Admin.
1 | @echo off |
CMD Kill Process
In Linux, you can use kill PID to terminate a specific process.
In cmd, you can use taskkill to end a process:
1 | taskkill /f /t /im PROCESS_NAME.exe |
For example:
1 | taskkill /f /t /im qq.exe |
Batch Ping
Sometimes you need to ping a bunch of domains and IPs to see which ones are unreachable. You can use the following command (put all the IPs and domains in ip.txt):
1 | $ for /f %D in (ip.txt) do (ping %D -n 1 && echo %i>>ok.txt || echo %D >>no.txt) |
Change Page Turn Direction in Epub Books
We are used to flipping pages from left to right, but some books published in Hong Kong and Taiwan flip from right to left, which is quite uncomfortable. Today I encountered a book like this and discovered how to change the flip direction to left to right. First, extract the target epub file, find the content.opf file, open and edit it, look for the following content:
1 | <spine page-progression-direction="rtl" toc="ncx"> |
The issue lies in page-progression-direction="rtl", where rtl stands for right to left. Change it to ltr (left to right), then compress all files back into a zip file and rename the zip extension to epub.
Lossless Conversion from AZW3 to EPUB
Calibre’s default conversion from AZW3 to EPUB is lossy. You can install a plugin for Calibre to achieve lossless conversion. In Calibre’s preferences under plugins, search for KindleUnpack and install it. After installation, restart Calibre, and you’ll see a KindleUnpack button in the toolbar.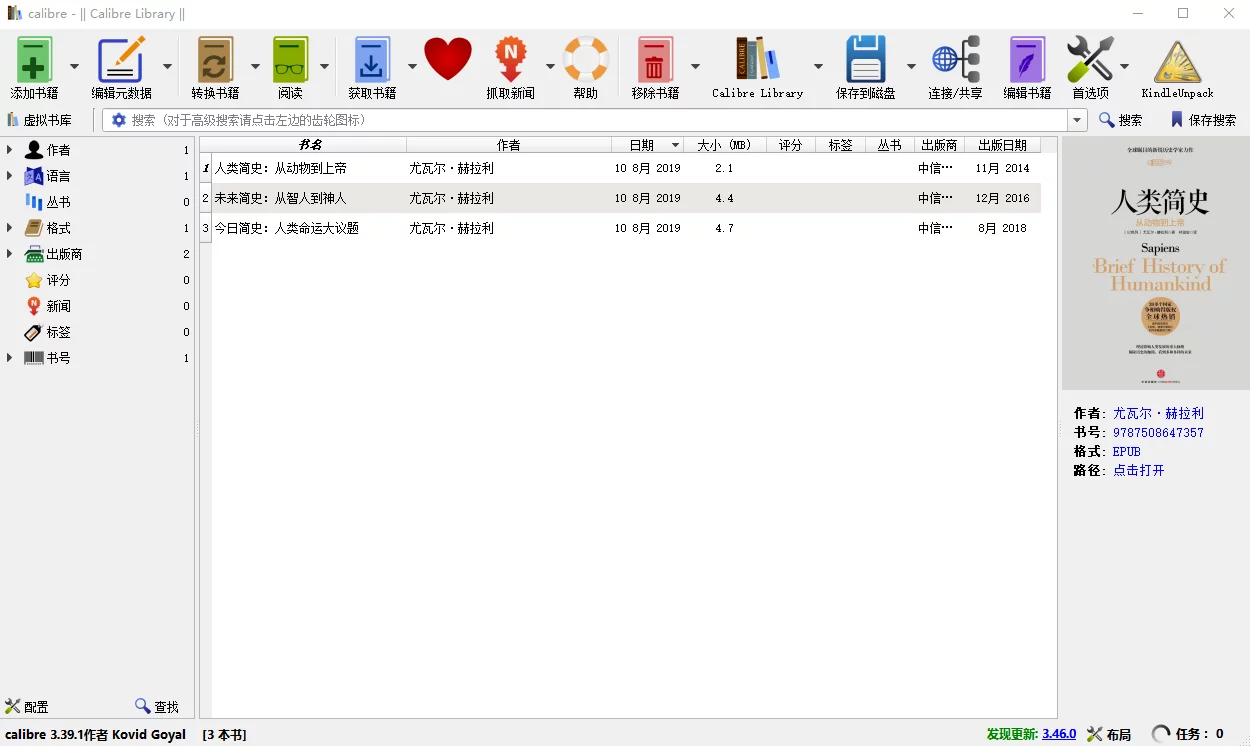
Select the book and click the KindleUnpack button in the toolbar, then choose AZW3 - UnpackAZW3: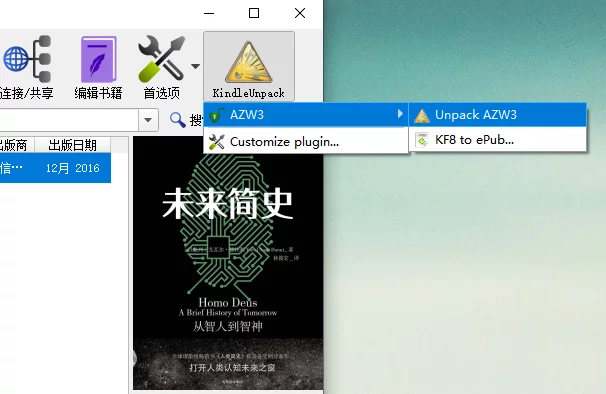
Router Cascading: Making Two Routers in the Same Network Segment
Today there was a requirement to connect several computers that are connected to a separate router A with computers connected to another router B into the same local area network. The method is to turn off DHCP on router A and connect a network cable from the LAN port of router B to the LAN port of router A. Other devices still connect to the LAN port of router A. After setting the IP in the router or computer’s network settings, router A and devices connected to router B are in the same local area network.
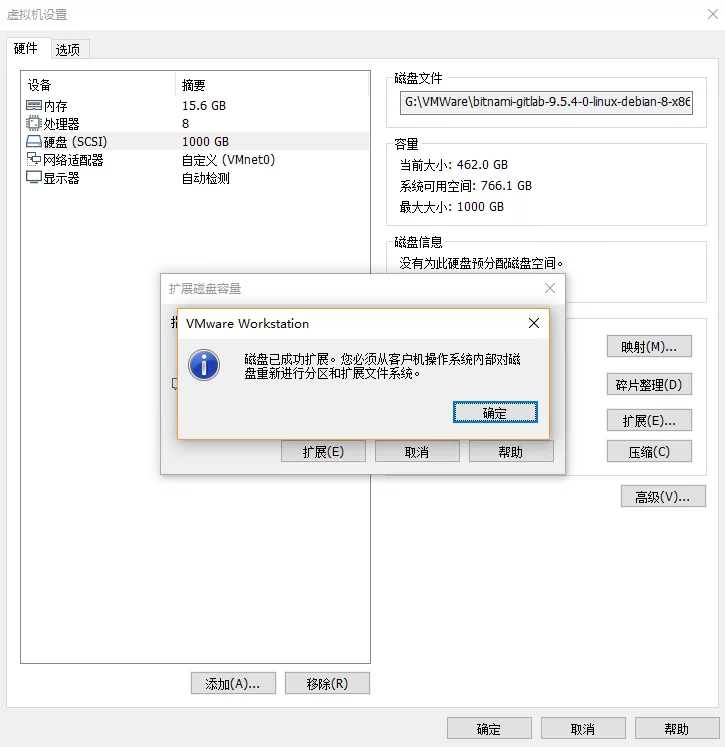
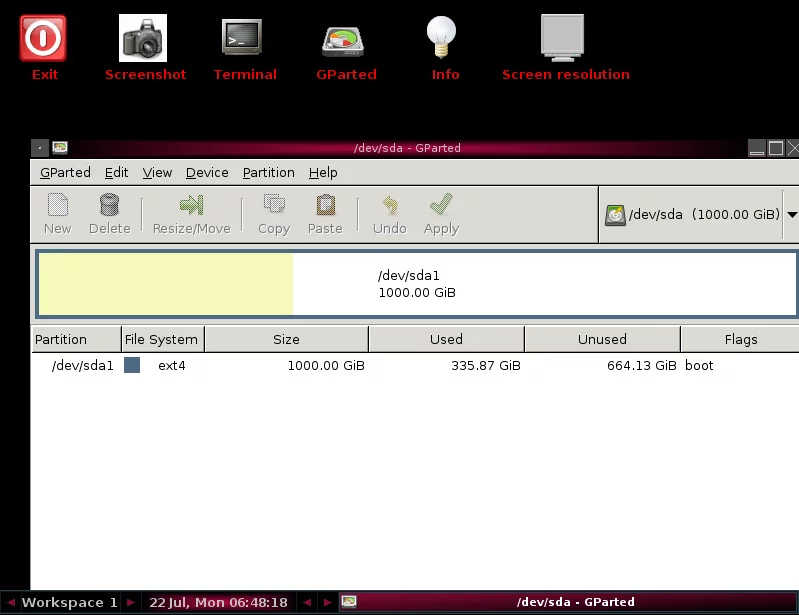
VMWare Expand Linux VM Disk
First, before starting the virtual machine (while it is powered off), adjust the size of the virtual machine’s disk:

After a long wait…
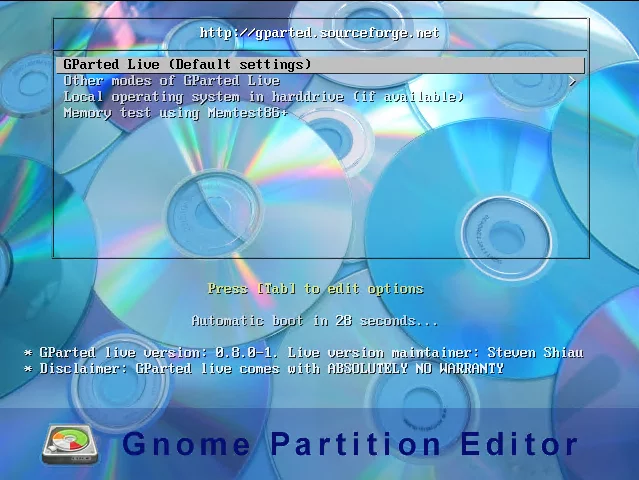
Unlike other methods found online, I won’t list a pile of commands. Instead, there’s a simple method.
That is to add CD/DVD hardware in the virtual machine settings, mount the GParted image. After selecting the CD-ROM, you will enter a graphical partition tool, which is very convenient.
Boot menu:
After booting:
Check File System Type in Linux
You can check the file system type using the following command:
1 | $ df -Th |

Chrome Pauses Sync After Restart
Open chrome://settings/content/cookies and uncheck Keep local data only until you quit your browser. Restart Chrome to fix the issue.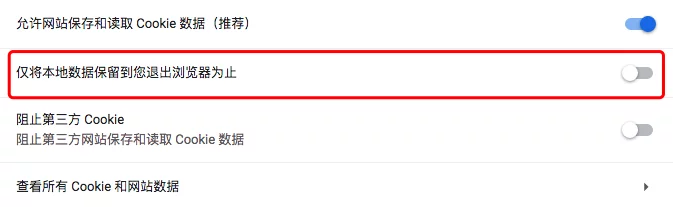
Hide the Black Window of Bat
1 | @echo off |
Save as .bat, and write the actual commands you need to execute after begin.
MBR Lossless Migration to GPT
Previously, the system used an MBR partition table, but recently I wanted to explore Hackintosh features, which only boot with UEFI, so it’s necessary to be on a GPT partition table. However, I didn’t want to format and reinstall completely. After some research, I found that it’s possible to migrate losslessly. First, you need a USB drive that can boot and has GHOST tools.
- Enter PE and use GHOST to back up the current MBR C drive.
- After backing up, delete all partitions of the original C drive, modify the partition table to GPT and create the partitions.
- Use GHOST in PE to restore the backed-up system to the GPT partitions.
- Boot the original system image (put
boot/,efi/,bootmgr,bootmgr.efiin the completed recovery partition). - Restart into the original image’s installation mode and use system repair tools to rebuild the EFI system boot, and complete the repair.
Note: Steps 4-5 can use other boot repair tools as replacements.
Windows Window Switching Shortcut Keys
Win+Shift+Left/Right: Can control the window to move left or right across multiple monitors;Win+Shift+Up: Maximizes the window while maintaining its width;Win+Shift+Down: Minimizes the window;
PS: Win+Shift+S is for screen capture.
Create Symbolic Links in Linux
1 | $ ln -s $TargetPath $SoftLinkPath |
Add PATH in Linux
You can view the current PATH list in Linux using export:
1 | $ export |
Or:
1 | $ echo $PATH |
To add a PATH directly in the terminal (this is only effective for the current environment and loses effectiveness upon exiting):
1 | $ export PATH=$PATH:ADD_PATH |
To add a PATH for the current user, open ~/.profile and add the following content:
1 | export PATH=$PATH:ADD_PATH |
It takes effect after restarting.
Check Program Network Connections in Windows
First, display the PID of the process in the task manager, then execute the command in cmd:
1 | netstat -ano|findstr PID |
Just replace PID with your process ID.
apt-get update error: Unable to Verify Signature
If apt-get shows the following error:
1 | root@gyvrhost:~/downloads/onedrive# sudo apt-get update && sudo apt-get -y --allow-unauthenticated |
If this error is not fixed, issues would arise when installing or upgrading software packages because APT has a set of trusted keys to determine whether a package can be authenticated, thereby deciding whether it can be installed on the system. You can perform the following actions to add the missing key to the APT key manager: The error above indicates that the key EBCF975E5BA24D5E is missing. Use the following command to add the key:
1 | $ sudo apt-key adv --keyserver keyserver.ubuntu.com --recv-keys EBCF975E5BA24D5E |
Once executed, the error should be resolved.
Chrome Browser Managed by Organization
To resolve this, delete:
1 | HKEY_LOCAL_MACHINE\SOFTWARE\Policies\Google\Chrome |
The EnabledPlugins folder and then restart Chrome.
CMD Command: Copy Folders
To copy multi-level directories in Windows, you can use xcopy.
1 | xcopy /y/i/s/e ..\..\..\Content\Slate UE4Launcher\Engine\Content\Slate |
CMD Command: Create Multi-Level Directories
1 | md 123\456\789 |
tar.gz Compression and Decompression
1 | # Compression |
Use Calibre to Convert Traditional to Simplified Chinese
First, import the original traditional book (epub/mobi) into Calibre, and then perform the conversion: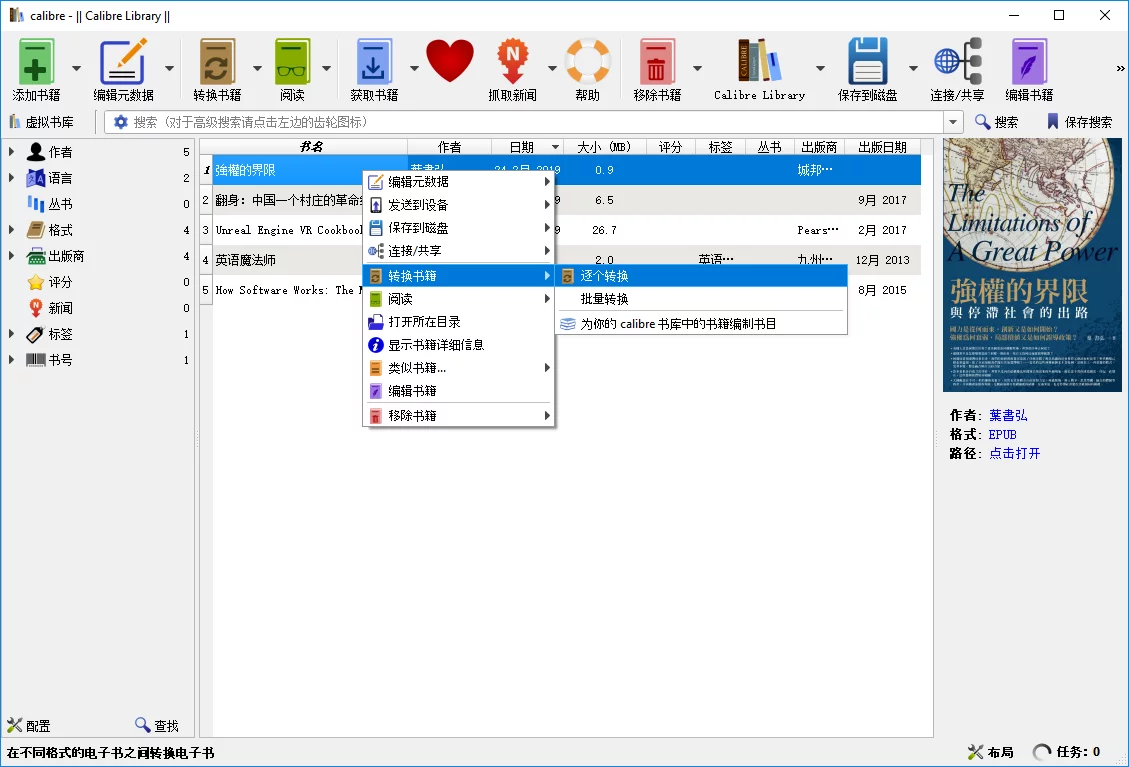
In the pop-up interface, select Search & Replace, load a text replacement rule: Calibre Traditional to Simplified Conversion Rule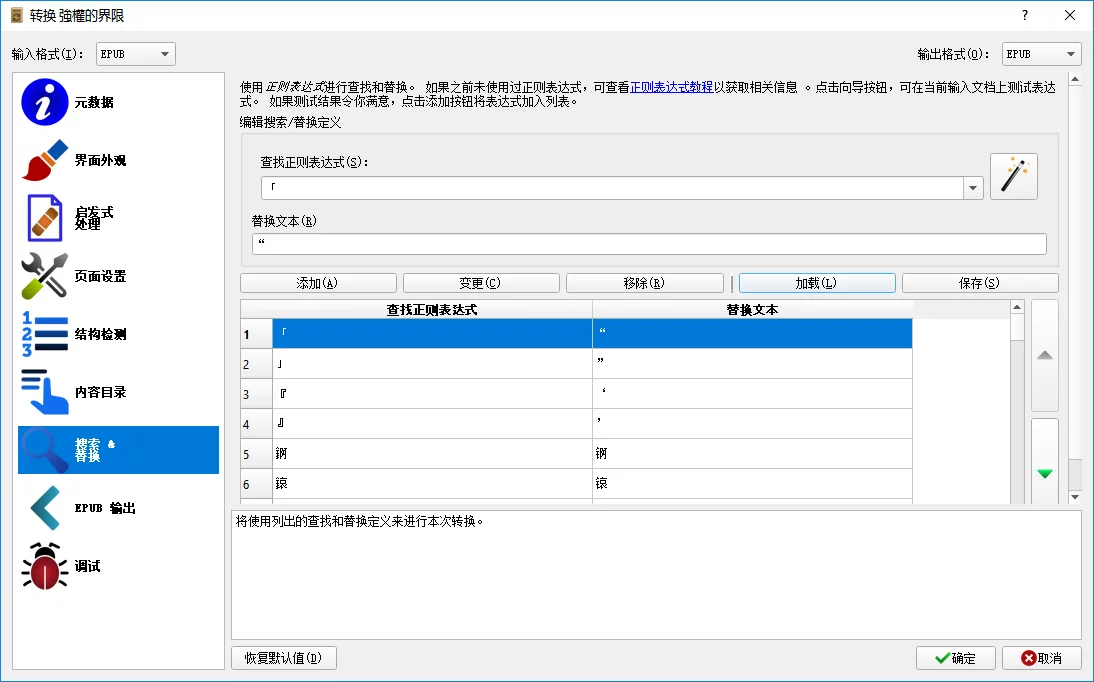
Then select Metadata to choose the output format and file information; finally, click OK to start the conversion.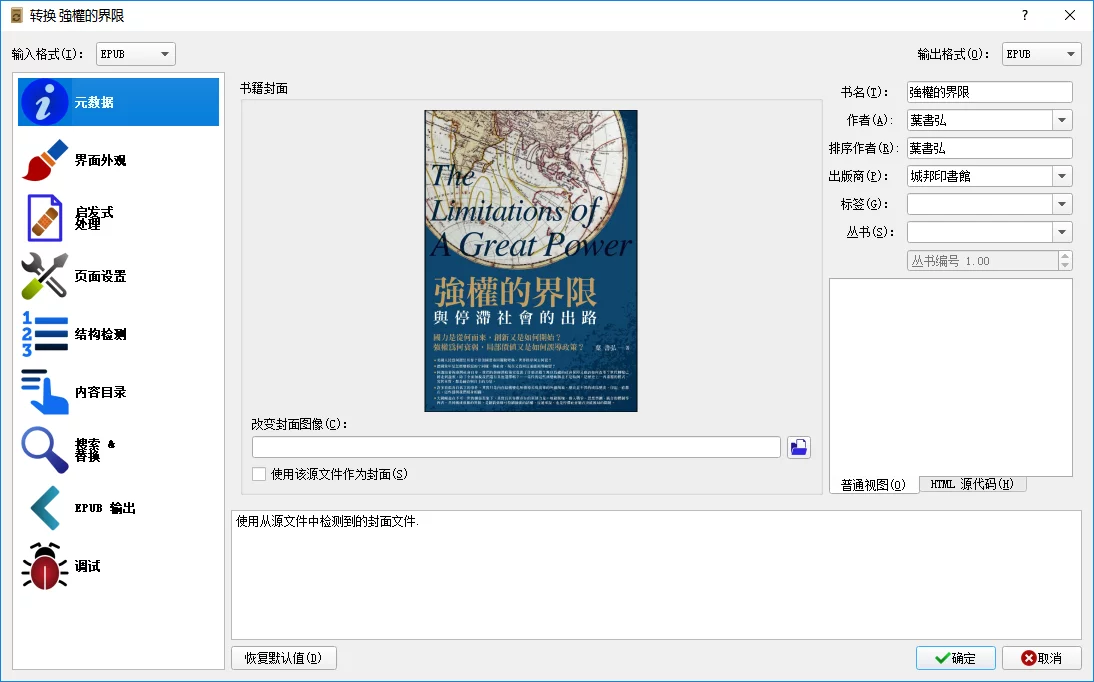
Download Books from Google Play and Remove DRM
Reading from Google Books is inconvenient. I tried to find a way to download purchased books from Google Play.
First, open play.google.com/books, find the book you purchased, and click download: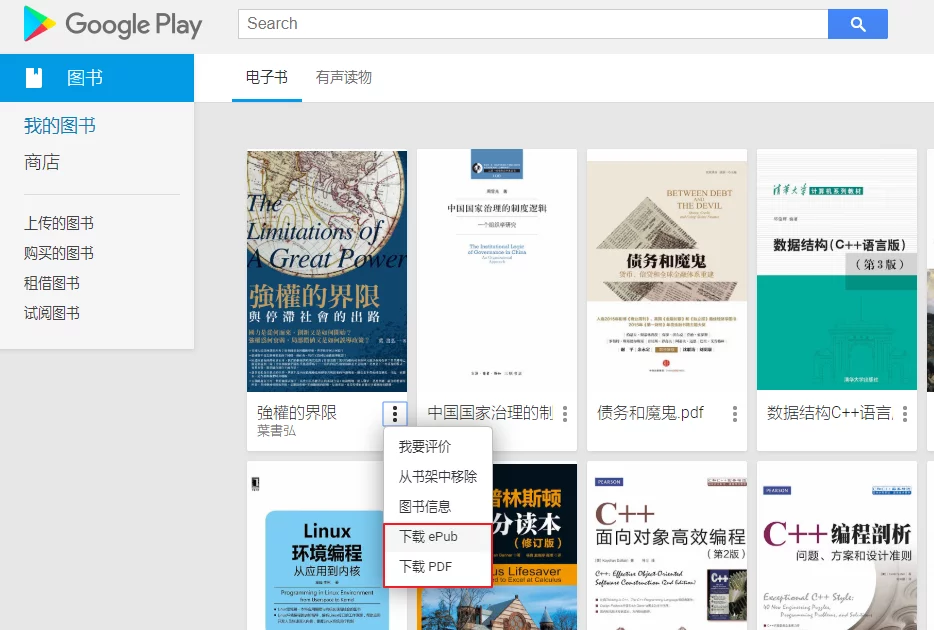
This doesn’t actually download the book but downloads a *.ACSM file instead.
You then need to download Adobe Digital Editions to open it. After installation, drag the *.ACSM file into the Adobe Digital Editions window, and a dialog will pop up: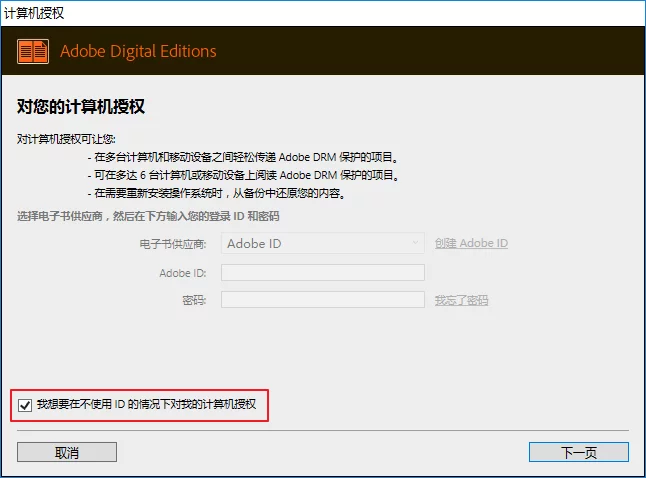
Please select I want to authorize my computer without using an ID, and then click Next: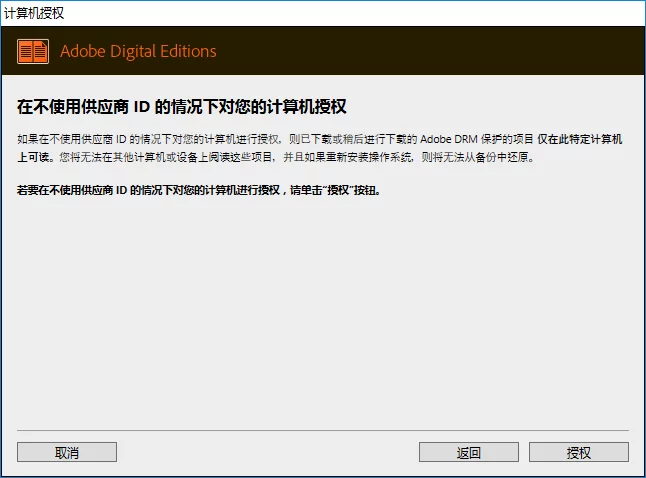
Click Authorize.
It will automatically download the book and open it in Adobe Digital Editions, but these book files are protected by DRM and cannot be opened in other readers. You need to remove DRM before they can be opened by other readers. The tools you need are Calibre and the DeDRM plugin for Calibre DeDRM_tools.
After downloading and installing Calibre, extract the DeDRM_tools package.
Open Calibre’s Preferences - Plugins: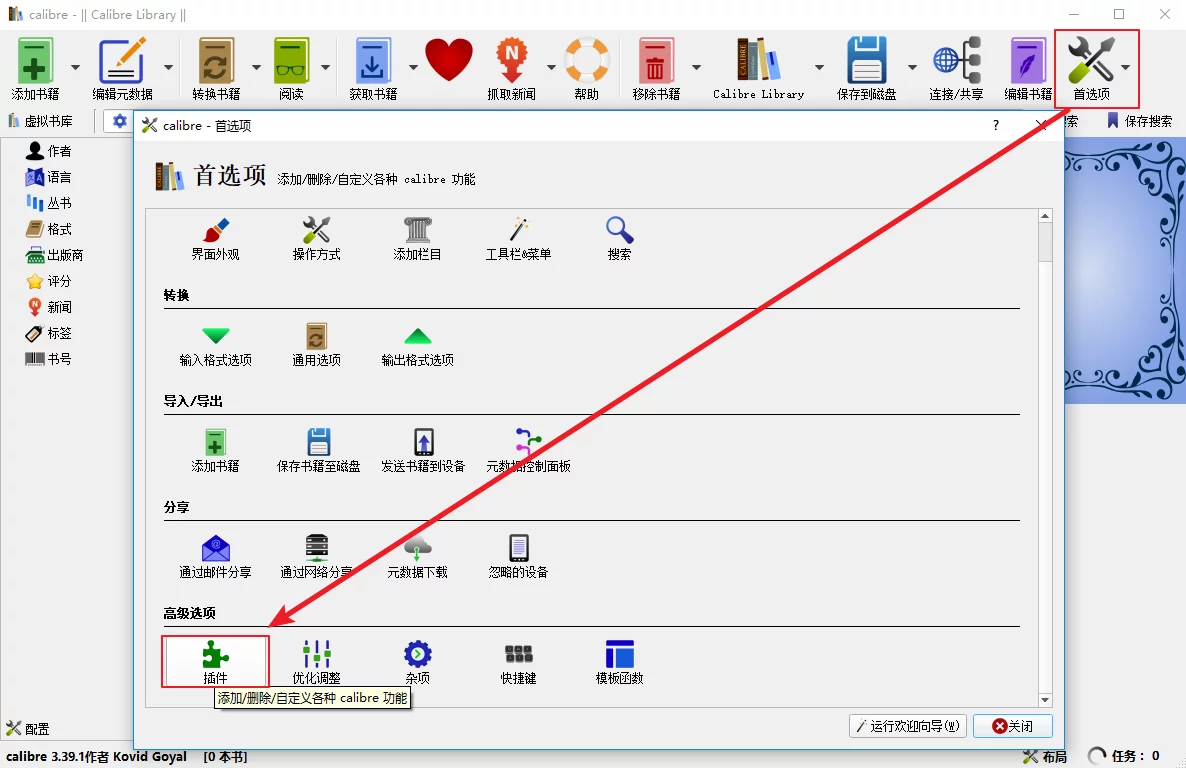
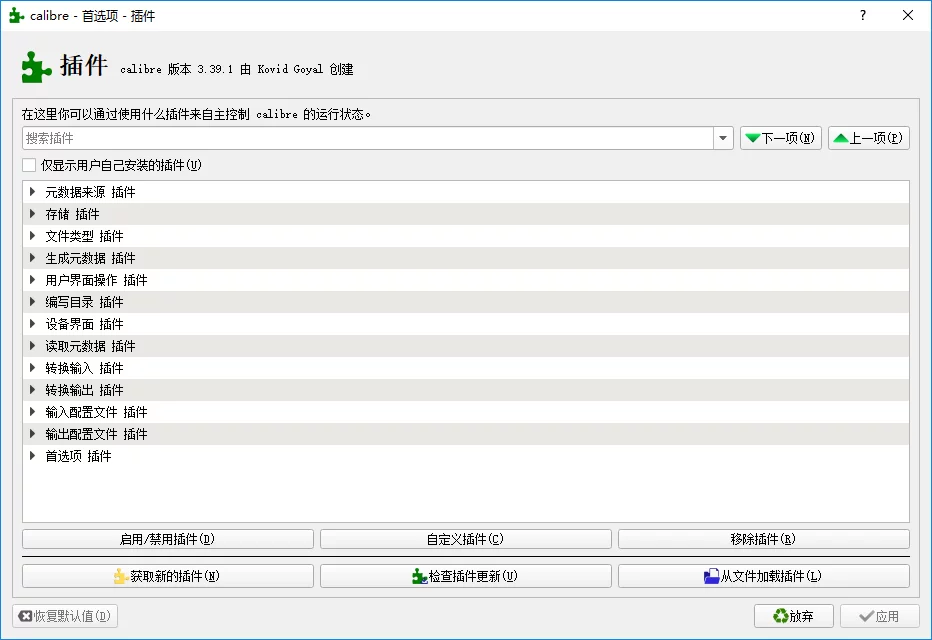
Click to load the plugin from a folder and select DeDRM_plugin.zip: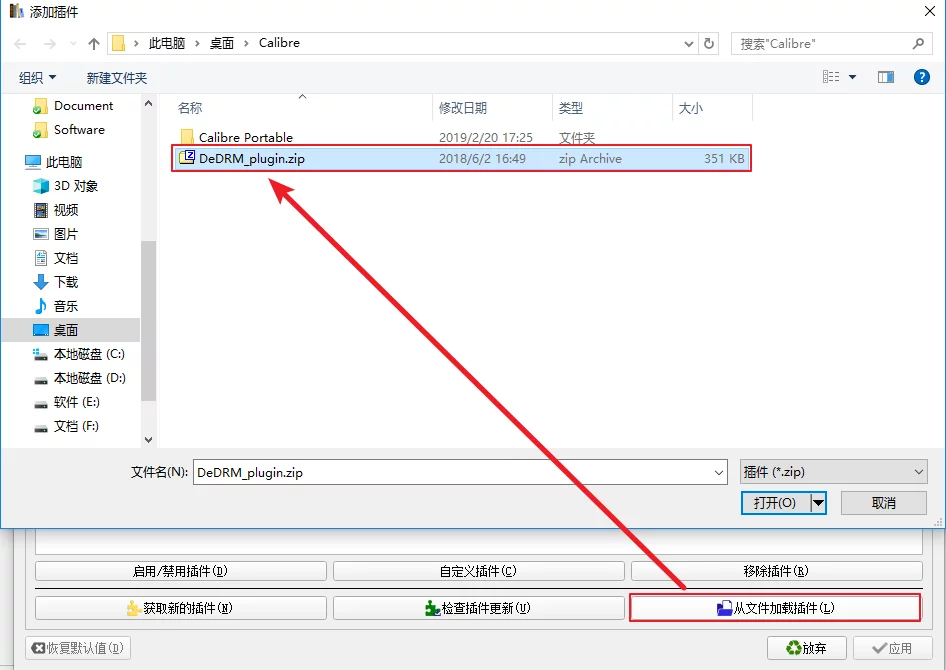
After installation, select File type Plugin, and click the custom plugin: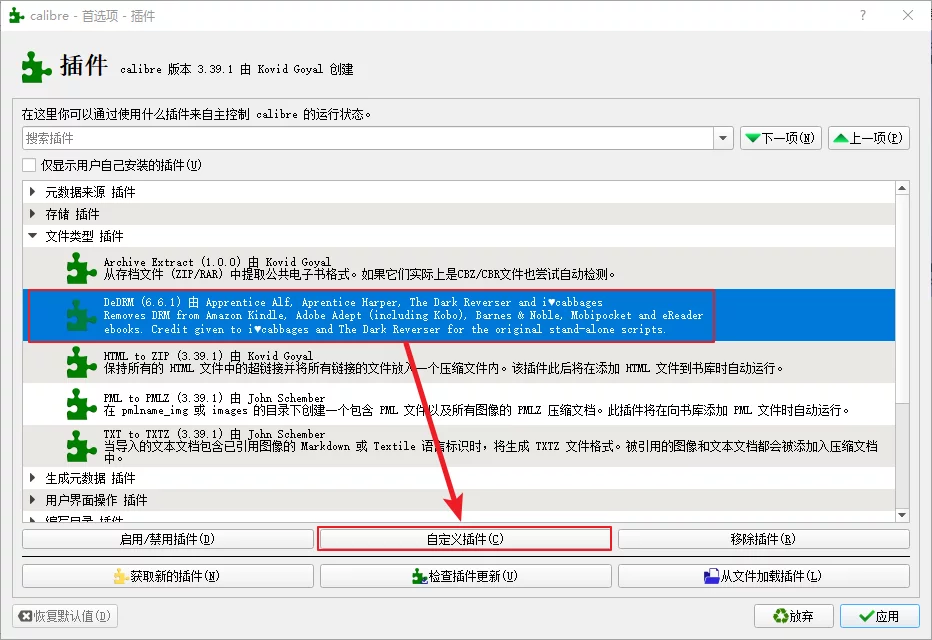
Add a key for ADE: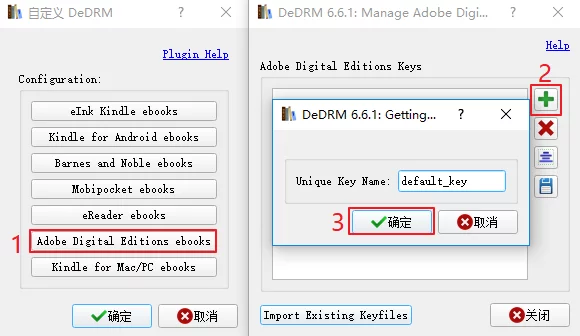
Then restart Calibre.
Finally, drag the DRM-protected book files downloaded from ADE into Calibre to remove DRM (resulting in book files generated in the Calibre Library).
Windows Unable to Access Share Network Resource
If Windows prompts when accessing a shared folder:
Unable to access. You might not have permission to use this network resource. Contact the administrator of this server to find out if you have access permissions.
Solution: Add Windows credentials.
In the Control Panel, display all control panel items, search for Credential Manager, enter it, click on Windows Credentials, and then add a Windows Credential.
Create it based on the IP and account information needed to access the shared resources.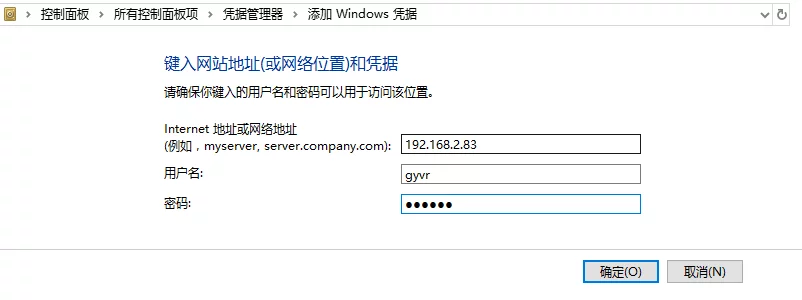
Solving the Problem of Ugly Chinese Fonts in Windows with English Language
When I replaced the YaHei font under the Chinese language because it looked less blurry, I found that the Chinese fonts looked very blurry when I switched the system language to English. I looked up some methods for replacing Chinese fonts under the English language and recorded them here.
In the English version of Windows, the default fonts are usually Segoe UI, Tahoma, and Microsoft Sans Serif, none of which have a Chinese character set. Therefore, when displaying Chinese characters, various unattractive visual effects appear. The solution is to use “Font Linking” technology: that is, when using English fonts, if a character is not found in that font, it will look in the corresponding registry location to find the linked font.
The default font for Windows 7 English version is Segoe UI, which is a pure English font. So when displaying Chinese, it will look for its linked font. To open the registry address:
1 | HKEY_LOCAL_MACHINE\SOFTWARE\Microsoft\Windows NT\CurrentVersion\FontLink\SystemLink |
In here, you will find the linking information for various fonts. Under this key, you will find the links for commonly used English fonts such as Segoe UI and Tahoma. Checking the value of Segoe UI, its first line is Tahoma.TTF, which means that when it encounters Chinese characters, it defaults to looking in the Tahoma.TTF file. If it doesn’t find the character there, it will look under the second line.
Double-clicking to edit the Segoe UI key, you can see the order of YaHei’s links in the middle position. What we need to do is to move YaHei’s order to the very front: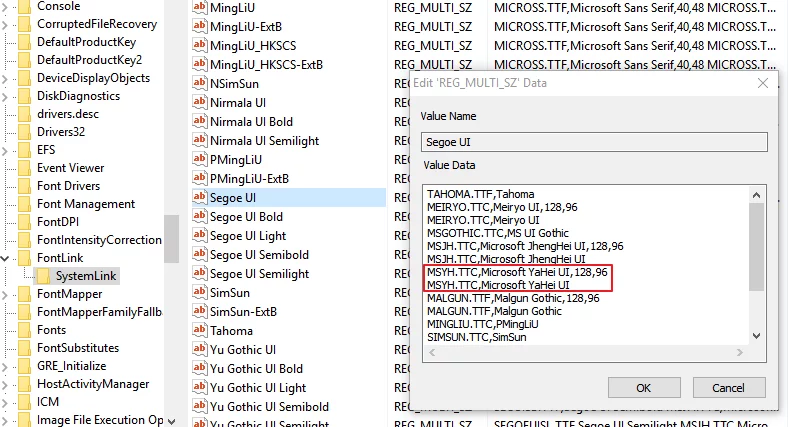
After replacing: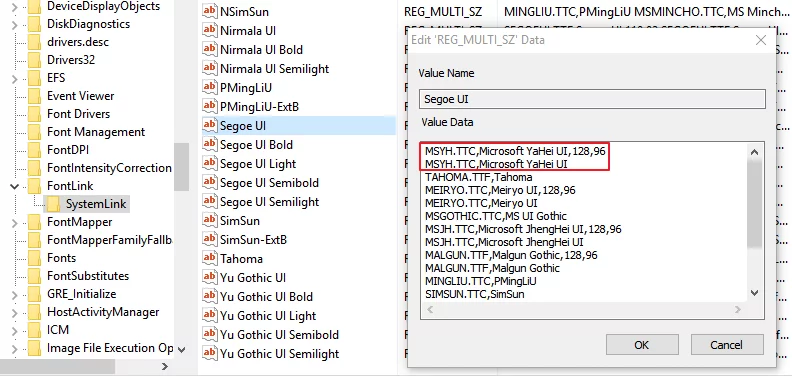
Then restart.
In case the original link becomes invalid, the above content is extracted from the following article as a backup for this site. To learn more specific content, you can read this article: Solving the Issue of Unsightly Chinese Fonts in the English Version of Windows
Modify Android’s DNS
Edit /system/build.prop and add the following lines:
1 | net.rmnet0.dns1=1.1.1.1 |
Save and exit (it’s best to restart or toggle airplane mode).
tracert Command
Trace routing to see the path chosen by the data packets to access the target. The Tracert command uses the IP Time to Live (TTL) field and ICMP error messages to determine the route from one host to other hosts on the network.
Disable MIUI Update Notifications
Root the phone and install the RE file manager. Open RE, find the path /system and open build.prop to edit:
1 | ro.build.version.incremental=V9.5.8.0.OCAMIFA |
Change it to a higher version number:
1 | ro.build.version.incremental=V99.5.8.0.OCAMIFA |
Save and reboot.
Enhance Scanned PDFs
- First, download ImageMagick and install it, making sure to check
Install legacy components (convert.exe etc). - Then install Ghostscript (for using the convert command).
- Convert the PDF to images.
Assuming the original file name is origin.pdf, and the target file name is target.pdf, replace the convert below with the actual path.
1 | $ convert -density 400 origin.pdf output/%03d.webp |
The density parameter refers to pixel density; the higher the number, the higher the image quality and larger the file size. If the PDF contains text, set it above 300. This is an important parameter that affects the final effect. If it is too low, the subsequent operations won’t have a good effect; if too high, it will lead to overly large file sizes. This command will convert the entire PDF into multiple images page by page, where %03d.webp indicates names like 001.webp, 002.webp…. (if there are more than 1000 pages, change to %04d.webp). This step of converting to images is to obtain interim products for testing and adjustments, usually only a portion of the pages needs to be captured (as capturing one page may take several seconds).
1 | # Capture pages 11 to 21 |
- Test the conversion effect
1 | $ convert -level 60,97% -quality 50 output/010.webp preview010.webp |
The level parameter adjusts the image channel level, where 60,97% indicates that grayscale below 60% becomes black, and above 97% becomes white. The values for 60 and 97 need to be adjusted repeatedly to reach the best effect, which is the most important parameter in the whole process. By adjusting this parameter, you can achieve contrast adjustments. The quality parameter determines the output jpg file quality (compression ratio); values from 1-100 indicate that the higher the number, the higher the quality and larger the file size. For the sake of reducing PDF file size, this parameter should be adjusted appropriately (for example, a jpg file at density 400 might be 1.4M, compressed down to 700K, resulting in the final PDF file size differing by a factor of two, while the visible effect on the page remains virtually unchanged).
Binarization of Images
Scanned PDFs often have yellowing, affecting the viewing experience. You can use ImageMagick to process images into black and white:
1 | convert 0020.webp -threshold 55% threshold0020.webp |
After testing, a threshold around 140 (255*55%) yields good segmentation results. Pixels with grayscale values above this threshold become 255 (white), and those below become 0 (black).
- Convert to PDF
Once the values for density, level, and quality have been determined, you can execute the conversion from the original PDF:
1 | $ convert -density 400 origin.pdf -level 40,97% -quality 50 target.pdf |
You can also convert from previously generated jpg files:
1 | $ convert -level 60,97% -quality 50 output/* target.pdf |
If directly converting from the directory to PDF causes display issues, batch process the exported files before merging them using software like Foxit:
1 | find . -name "*.webp"|xargs -I {} convert -level 60,97% -quality 50 {} {}_.webp |
This will enhance all .webp files in the current directory and save them as *.webp_.webp. Then move them to a separate directory (the -I {} parameter is to replace {} with the arguments):
1 | $ mkdir finalOutput |
Then use Foxit to merge them into a PDF file (which can also do OCR).
Compiling LLVM with MinGW on Windows
First, download LLVM and Clang source code, and unzip them. Rename the Clang source directory (cfe-6.0.1.src) to clang and place it in the LLVM source tools directory ($LLVM_SRC_ROOT/tools/clang). Right-click in the LLVM source directory to open the Git Bash terminal, and execute the following commands:
1 | $ mkdir build |
After installation, you should see the compiled LLVM and Clang in the specified directory from CMAKE_INSTALL_PREFIX. Add it to the system Path. I compiled version (currently latest LLVM 6.0.1), compilation environment is MinGW64-x86_64-6.2.0-posix-seh-rt_v5-rev1, downloadable here.
Note: Other details can be found in the INSTALL.TXT file under the Clang source directory.
- 2018.09.27 Recently LLVM released version 7.0.0, as expected from the version emperor. I compiled a version 7.0.0, with the same compilation environment as above: Download here.
Resolving Cmder Chinese Garbled Code
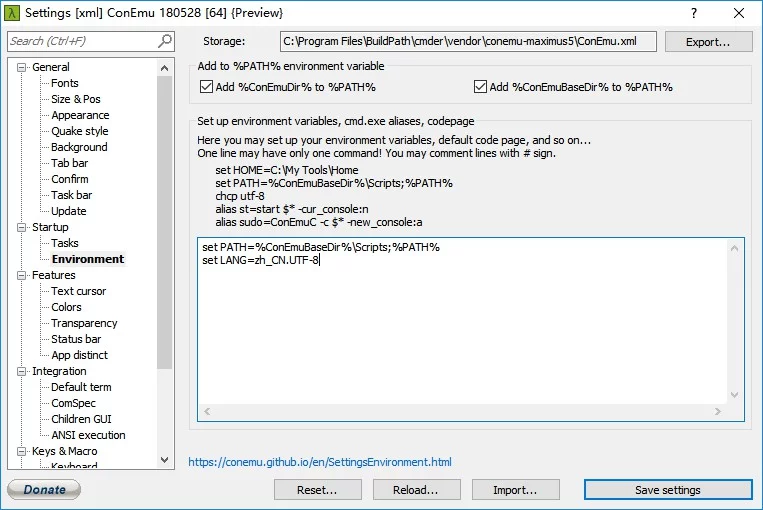
Open cmder, go to Startup -> Environment, and add set LANG=zh_CN.UTF-8.
APK Decompilation and Signing
- Install the Java environment, jdk download.
- Download the latest version of apktool.jar, and rename it to apktool.jar.
- Save the following script as apktool.bat:
1 | @echo off |
Then place apktool.bat and apktool.jar in the same directory. Alternatively, directly download my packaged apktool.
1 | # Decompile apk |
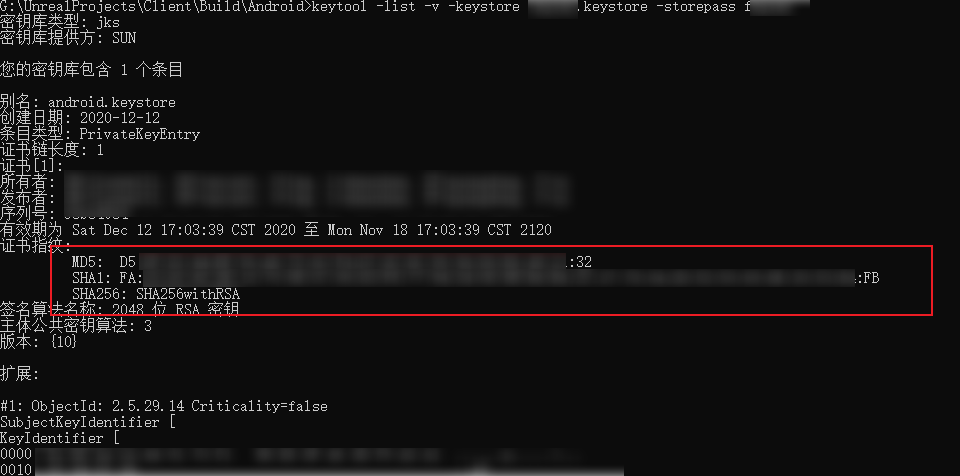
Check Keystore Certificate Fingerprint
1 | keytool -list -v -keystore xxxx.keystore -storepass PASSWORD |
Raspberry Pi Command-Line Configuration for Wifi Connection
On the Raspberry Pi, the WiFi connection information is saved in the /etc/wpa_supplicant/wpa_supplicant.conf file:
1 | ctrl_interface=DIR=/var/run/wpa_supplicant GROUP=netdev |
Fill in the ssid and psk according to the information in the network section.
Note: The priority of connection is determined by the order of configuration. If you want a specific AP to connect first, move its configuration to the top.
Disable Windows Hibernate to Free Up Disk Space
The hibernation file hiberfil.sys on Windows is usually quite large, often several tens of GB, and since I rarely use the hibernation function, I can disable it using the command below. Run cmd with administrator privileges:
1 | powercfg -h off |
Restart the system, and the space occupied by hiberfil.sys will be released.
Remote Control to Switch Window to Another Screen
Some VNC tools have poor support for multi-screen setups and can only display window contents on one screen. If all opened windows are defaulted to another screen, then the software won’t be operable at all. The shortcut key to move a window in Windows is:
Press Alt + Space to bring up the menu, then press M to enter the move function. You can use the mouse or arrow keys to move the window to a screen that can be seen remotely.
Windows Window Shortcut Keys
Maximize: Press: Alt+Space+X
Minimize: Press: Alt+Space+N
Wget to Download a Website
1 | $ wget -c -r -np -k -L -p api.unrealengine.com/INT/API/ |
The parameters are as follows:
-c Resumes broken downloads
-r Recursively download all files in a specified webpage directory (including subdirectories)
-nd When recursively downloading, does not create multiple tiers of directories, instead downloads all files to the current directory
-np When recursively downloading, does not search the upper directory, for example, wget -c -r www.xxx.org/pub/path/
If the -np parameter is not added, it will also download other files in the upper-level directory pub
-k Converts absolute links to relative links, useful for offline browsing after downloading the entire site; this parameter is recommended
-L When recursively downloading, does not enter other hosts, for example, wget -c -r www.xxx.org/
If there is a link like www.yyy.org and the -L parameter is not added, it will recursively download www.yyy.org site as if there was a big fire
-p Downloads all files needed for the webpage, such as images, etc.
-A Specifies the list of file types to download, multiple types can be separated by commas
-i Followed by a file, indicating the URLs to be downloaded
View nohup.out in Linux
1 | $ tail -fn 50 nohup.out |
Change Source in WSL
WSL’s Ubuntu uses Ubuntu 16.04 version; you can check it using lsb_release -a:
1 | $ lsb_release -a |
Backup /etc/apt/sources.list, and then replace the contents with the domestic Aliyun source:
1 | $ sudo cd /etc/apt |
Fill the following content, save, and exit:
1 | deb-src http://archive.ubuntu.com/ubuntu xenial main restricted #Added by software-properties |
Then update:
1 | $ sudo apt-get update |
Clear Mstsc’s History Records
Clearing the history records in mstsc only requires deleting the records in the following registry entry:
1 | [HKEY_CURRENT_USER\Software\Microsoft\Terminal Server Client\Default] |
Modify the Default Port for Remote Connection in Win10
Recently, I’ve been using frp for inner network penetration, and can access internal computers from the company using mstsc. However, using the default port (3389) feels insecure (there are always malicious scanners around). I researched how to modify the default remote connection port in Win10, the specific operations are as follows.
Open the following two registry entries and sequentially execute the following operations:
1 | HKEY_LOCAL_MACHINE/SYSTEM/CurrentControlSet/Control/Terminal Server/Wds/rdpwd/Tds/tcp |
On the right side of these two registry entries, find the PortNumber record, which has a default value of 3389, modify it to the desired port (<65535) (for example, 11111), and remember to use decimal.
Then, you also need to modify the firewall to allow the new port. Since Windows remote connection defaults to port 3389, that port is already permitted in the firewall by default. However, the port we modified above is not, so adjustments are needed as follows.
Open these two registry entries sequentially and perform the following operations:
1 | HKEY_LOCAL_MACHINE/SYSTEM/CurrentControlSet/Services/SharedAccess/Defaults/FirewallPolicy/FirewallRules |
On the right side of these two registry entries, find these two records: RemoteDesktop-UserMode-In-TCP and RemoteDesktop-UserMode-In-UDP:
The default values are similar to this:
1 | v2.28|Action=Allow|Active=FALSE|Dir=In|Protocol=6|LPort=3389|App=%SystemRoot%\system32\svchost.exe|Svc=termservice|Name=@FirewallAPI.dll,-28775|Desc=@FirewallAPI.dll,-28756|EmbedCtxt=@FirewallAPI.dll,-28752| |
We only need to change LPort in these two records to the port we modified above (11111).
Then you can click Refresh under Control Panel/System and Security/Firewall/Advanced Settings/Inbound Rules to see the modified port (my port has been redacted):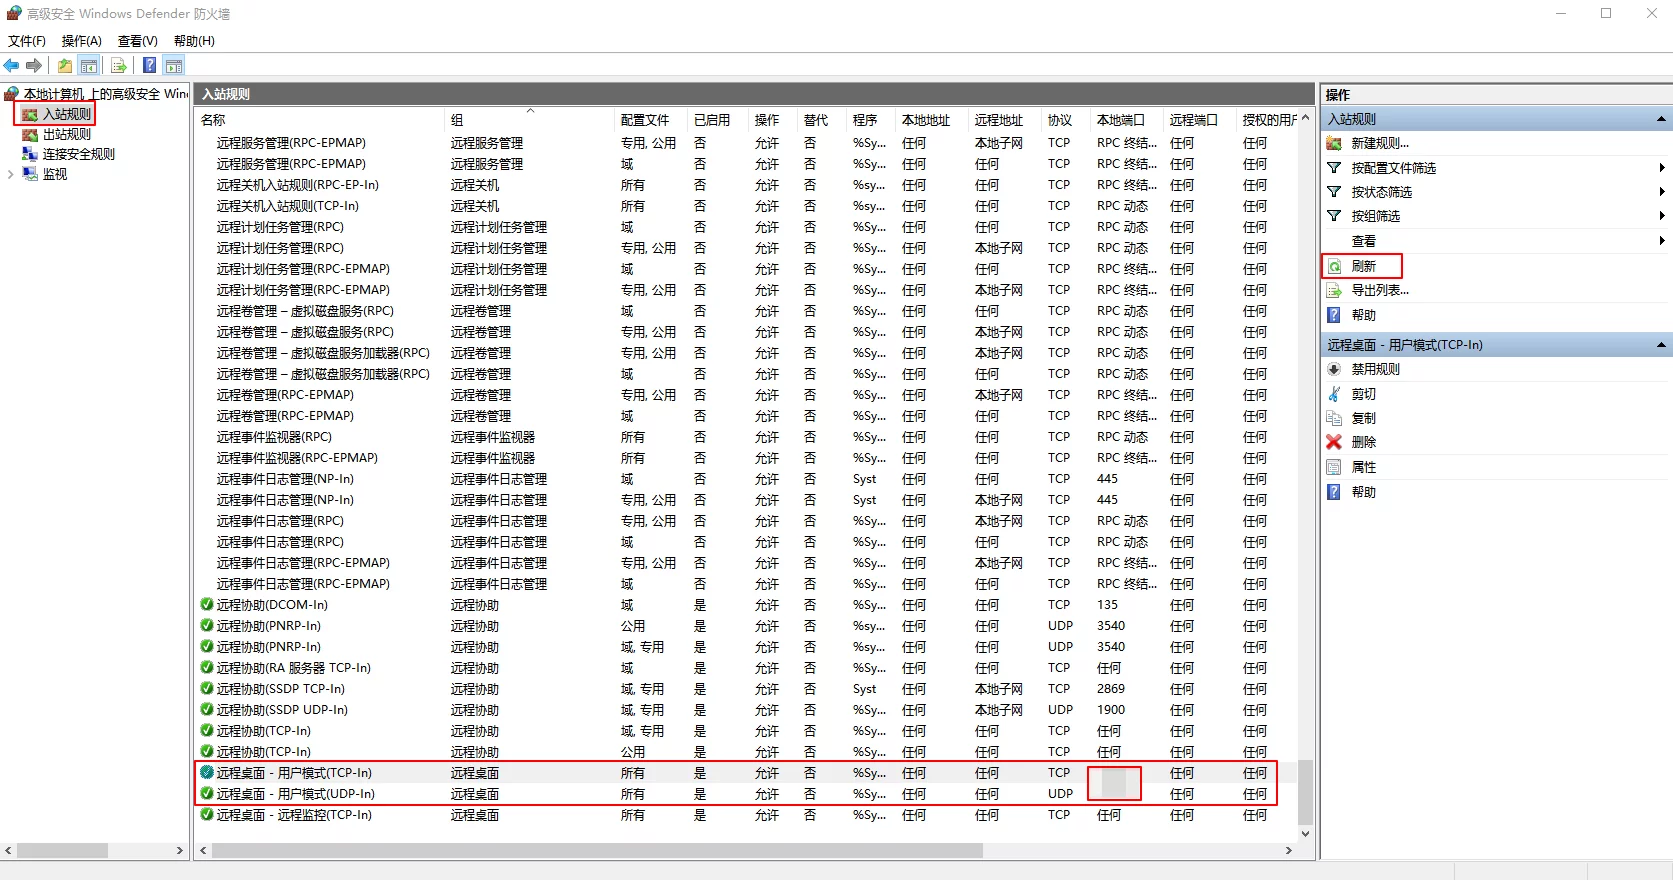
List All Services on Linux System
1 | $ service --status-all |
Note: In my system version (ubuntu 16.04.3 LTS), the iptables service is ufw.
Allow Ports Through Firewall on Linux
If using the ufw service, you can use the following methods:
1 | $ ufw allow 6060/udp |
Allow a specific range of ports to pass through the firewall. When specifying a port range with UFW, you must specify the protocol applicable (tcp or udp), as shown in the following examples:
1 | $ ufw allow 10000:10100/tcp # Allow TCP for ports 10000~10100 |
If using the iptables service, you can use the following methods:
1 | # Accept inbound UDP connections from port 6060 |
For more uses of ufw: Ubuntu 18.04 Using UFW to Set Up the Firewall
Iptables parameters:
1 | iptables v1.4.21 |
Some parameter abbreviations:
--sportis short for--source-port--dportis short for--destination-port
Recursively Delete Specific Files in Linux
If we want to recursively delete all Binaries folders under the current directory, we can use the following command:
1 | $ find . -name "Binaries" | xargs rm -rf |
This command first finds all Binaries folders under the current directory using find, then constructs the parameters and runs the rm -rf command using xargs.
Running SS and KCP in WSL
Recently, the company disabled the process of shadowsocks-windows. The ss-qt version has many issues and is very inconvenient. I wanted to continue using other SS Windows clients while it was temporary, so I ran shadowsocks-python in Win10’s WSL, and it feels much more stable than the Windows client…
Note: The KCP client can also run in WSL; just download the linux-amd64 version directly from kcptun/release, see ./client_linux_amd64 -h for usage parameters.
1 | # Start KCP |
Note: The
-bparameter of shadowsocks is 0.0.0.0, which allows connections from the local area network (be sure to turn off the firewall).
Thus there’s no need to read the configuration files, but be sure to change all parameters to your own configuration values.
Plugins and Configuration for IDA
Note: Using IDA 7.0 Pro version
My IDA color scheme plugin zyantific/IDASkins and theme: ida_skin, effect as follows: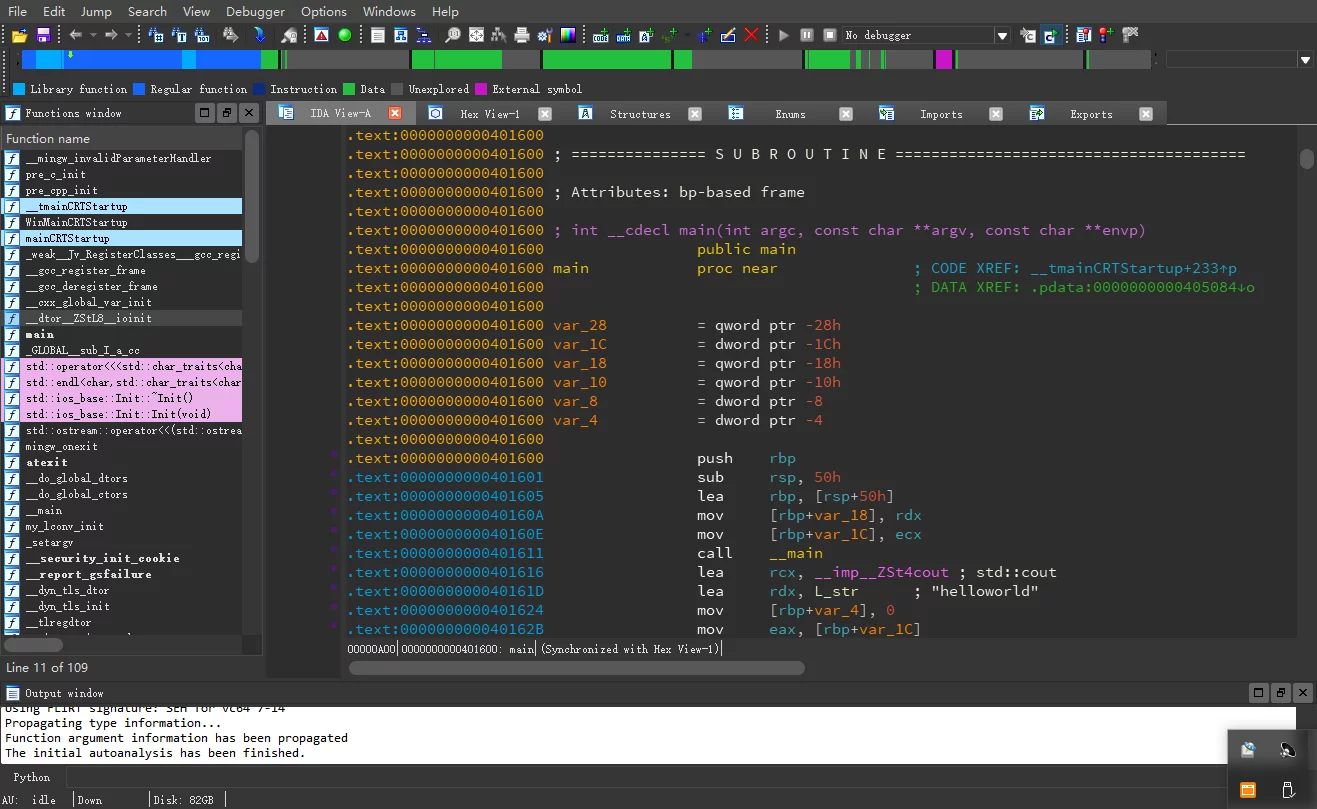
Also, I compiled support for IDA 7.0 for REhints/HexRaysCodeXplorer: ida7_HexRaysCodeXplorer.
Installing findcrypt for IDA
1 | # You may need to update pip first |
Then place the findcrypt2.py and findctypr3.rules files from the findcrypt-yara repository into the IDA/plugins directory, and open IDA to see the findcrypt under the plugins directory.
Delete Lines Containing Certain Characters
In Linux, you can use the sed command:
1 | # Delete all lines containing the string "ABC" in abc.txt and write to log.txt |
The -e parameter’s ABC can also be replaced with a regular expression.
Enable Chrome’s Automatically Disabled Plugins
Use Run -> gepdit to enter Group Policy.
In Computer Configuration -> Administrative Templates, right-click to select Add/Remove Templates(A), and import Chrome.adm.
Then under Administrative Templates, you will find Classic Administrative Templates (ADM), and expand Google -> Google Chrome -> Extensions; double-click on the right side Configure the list of allowed extensions, enable it and enter the IDs of the extensions you want to enable (you can view the extension IDs in Chrome -> Extensions). Save the changes, and reopen Chrome, and the plugin will be enabled.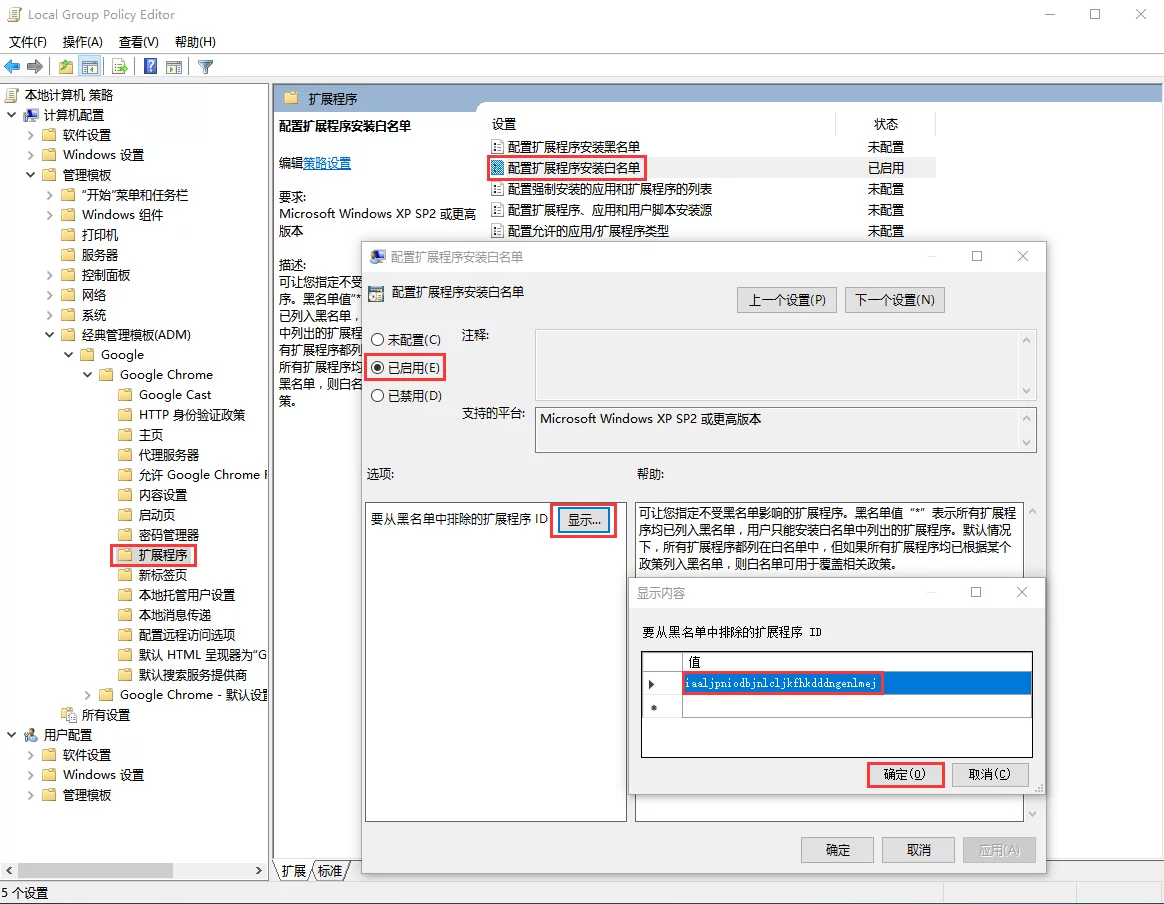
Note: Set Cortana’s default search to use Chrome and Google.
Make Cortana use Google as its search engine with this plugin: CortanaUseGoogle.crx (must add the plugin to allowed extension list using the method above). Additionally, pairing with EdgeDeflector allows changing Cortana’s default browser from Edge to Chrome.
Error When Attaching to Process in VS
Today I encountered an error while using Debug->Attach to Process in VS:
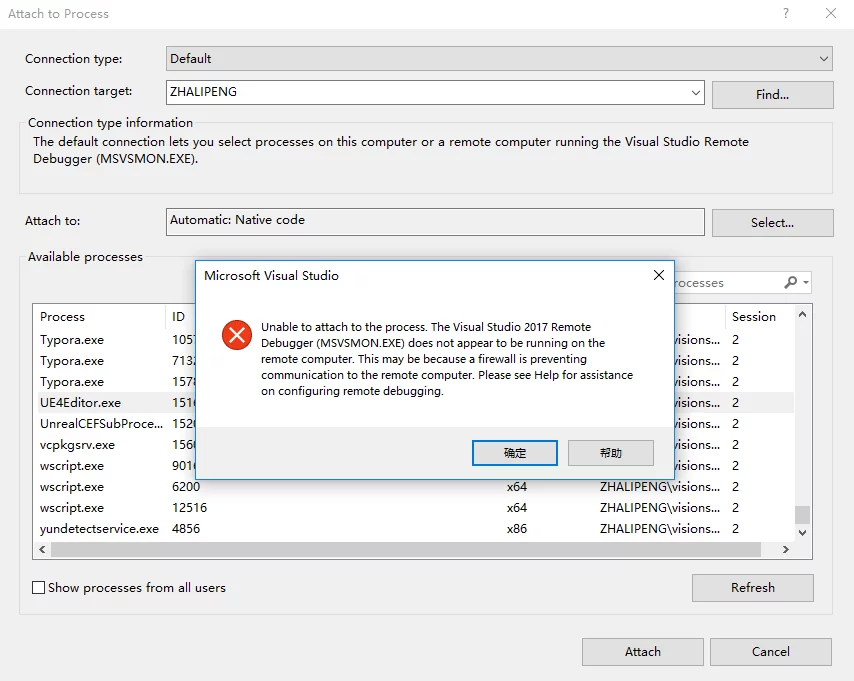
1 | Unable to attach to the process. The Visual Studio 2017 remote Debugger (MSVCMON.EXE) does not appear to be running on the remote computer. This may be because a firewall is preventing communication to the remote computer. Please see Help for assistance in configuring remote debugging. |
Initially, I thought it was a configuration issue with VS. I later discovered that I had redirected all traffic on my computer through SS in Proxifier. I didn’t expect that local debugging with VS would also use the network; when the traffic goes through the proxy, it fails to connect back to the local machine, causing the issue. Global proxies should be used cautiously.
Separate Memory Location
[ISO/IEC 14882:2014 §1.7.5] A structure declared as:
1 | struct { |
contains four separate memory locations: The field a and bit-fields d and e.ee are each separate memory locations and can be modified concurrently without interfering with each other. The bit-fields b and c together constitute the fourth memory location. The bit-fields b and c cannot be concurrently modified, but b and a, for example, can be.
Increase SWAP Size in Linux
Sometimes, the actual memory allocated for a virtual machine cannot meet its needs. You can temporarily increase SWAP size as follows.
1 | # Create a file of size 1G (/swap_file is the specified storage path and file name) |
Static IP Settings in Linux
The file path to modify is /etc/network/interface.
1 | # The loopback network interface |
Some CMD Command Tips
You can run several commands simultaneously in the CMD command:
1 | start cmd.exe /c "" |
Enter the commands to be executed within the double quotes above and save them as a .bat file; executing it will simultaneously open two command line windows./c after cmd means close the command window after executing; to not close after execution, you can use /k.
To execute commands in the background without blocking subsequent commands in CMD (similar to adding & after a Linux command):
1 | start /b cmd.exe /c "" |
By adding /b to start, these two commands will not block (the second command won’t wait for the first one to finish before executing).
For .bat to run in the background, if we want it to start at boot without popping up the black box, we can use the following .vbs script to execute the .bat.
1 | DIM objShell |