The main content of this article introduces the deployment of the UE development environment on Mac, configuration of iOS remote packaging, the application of UPL on iOS (intervening in the ipa packaging process), tools and development skills, as well as analysis of related engine code, documenting some pitfalls encountered in the project. It is primarily compiled from my previous notes, and related Mac and iOS content will also be updated in this article in the future.
Remote Build for iOS
UE can directly package Android and Windows builds on Windows (Android requires configuring JDK/SDK/NDK/Gradle and other environments). Packaging iOS requires a Mac. If every time packaging iOS you have to perform operations on a Mac, it is essentially the same as on Windows, but the process cannot be reused, making it cumbersome, especially when the engine is modified. You need to first update the engine code and compile it, then update the project and execute packaging. Fortunately, UE provides remote iOS build capabilities, allowing packaging for Win/Android/iOS to be done in the same build process.
Pre-requisites:
- One computer running MacOS on the intranet (white or black)
- Apply for a p12 certificate and mobileprovision
- The PC and Mac need to be able to access each other on the network (in the same subnet)
IOS Certificate Application
Before packaging iOS, you need to apply for an iOS developer account to create certificates, which can be applied at developer.apple.com. You need to obtain the p12 certificate and mobileprovision, which should then be imported into UE’s project settings. Note that you must match whether the created certificate is a Developer or Distribution certificate during packaging; otherwise, packaging will fail.
There are many articles on the internet detailing the certificate application process. Here, I will simply record the process I followed, and the steps are not the most detailed, only for reference.
Firstly, export a certificate on the Mac:
Open the software Keychain Access - Certificate Assistant - Request a Certificate from a Certificate Authority: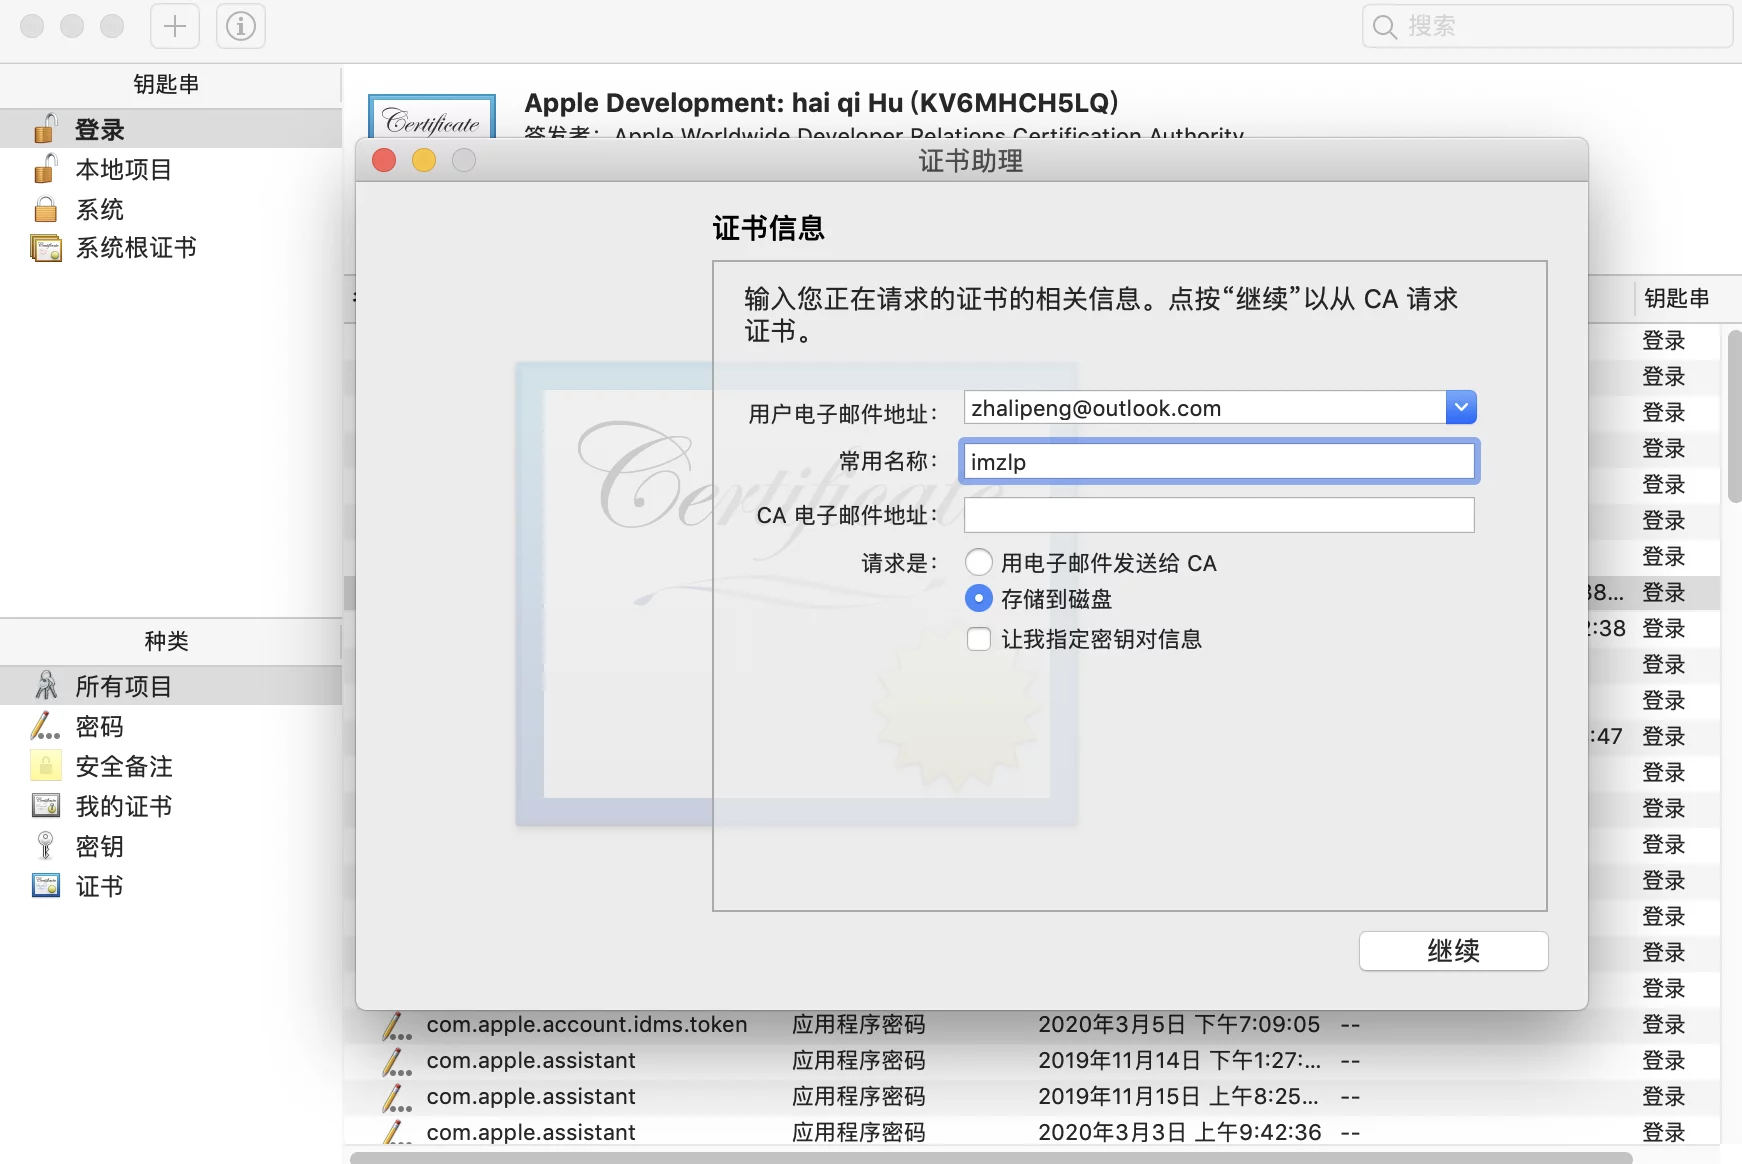
Choose to save it to disk, which generates a file named CertificateSigningRequest.certSigningRequest.
Then log in to Apple Developer, go to Account - Certificates: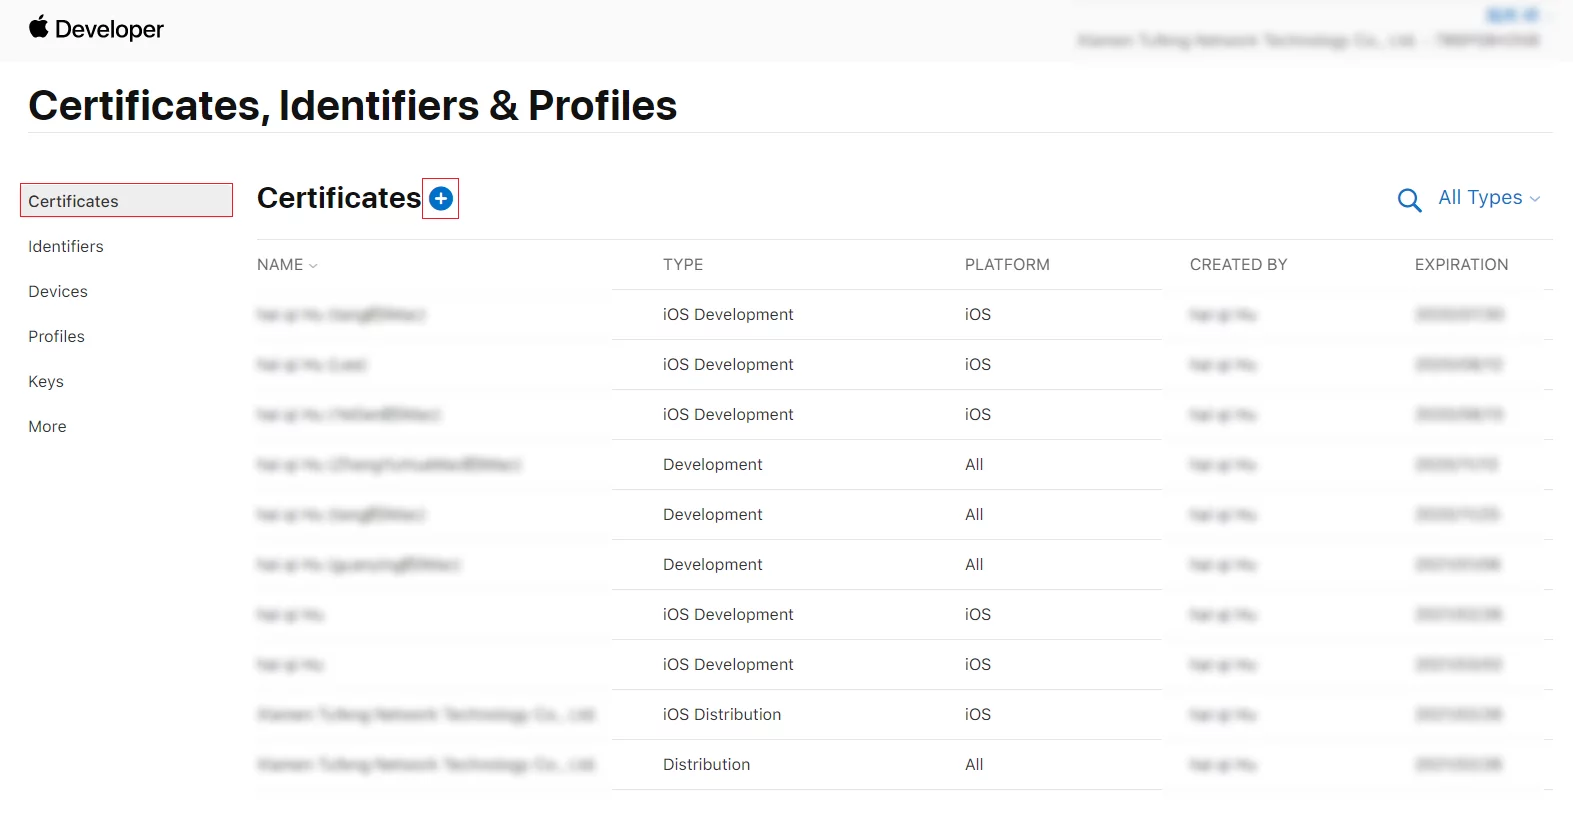
After entering, create Apple Development or iOS App Development, and during the creation process, upload the CertificateSigningRequest.certSigningRequest file generated above.
Add devices:
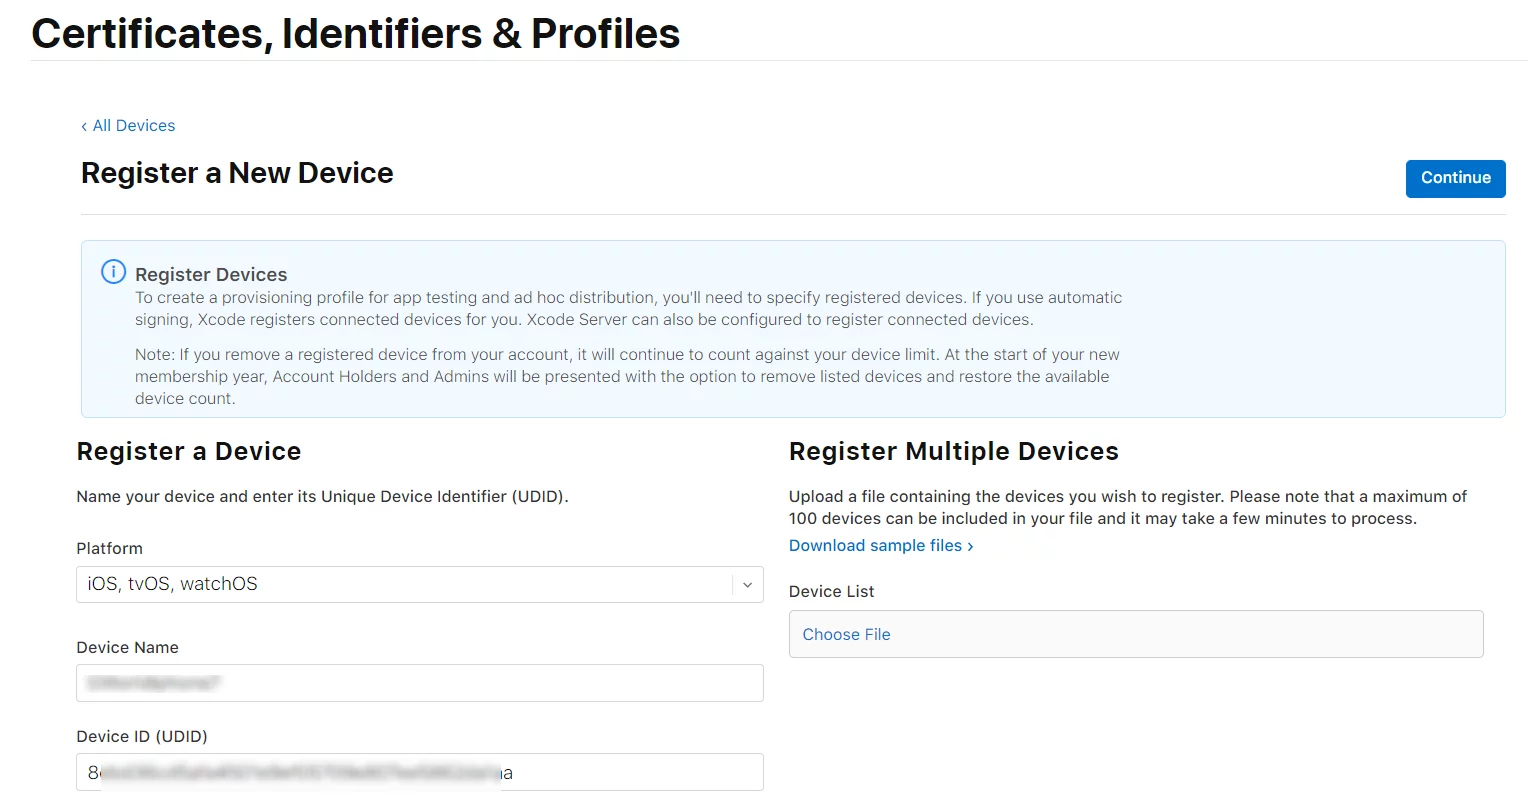
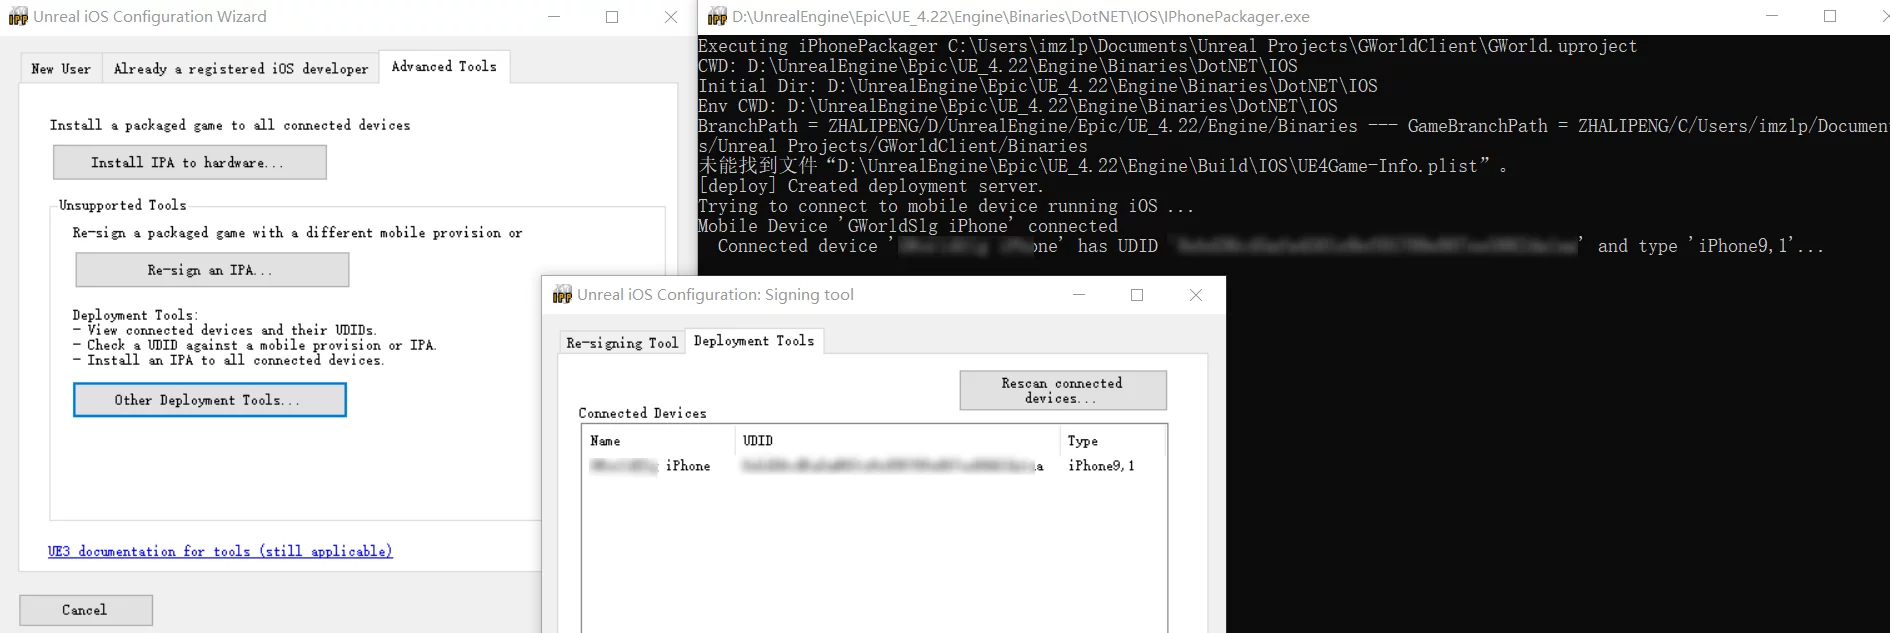
You can use UE’s IPhonePackager.exe to check the uuid of iOS devices:
Generate Provision:
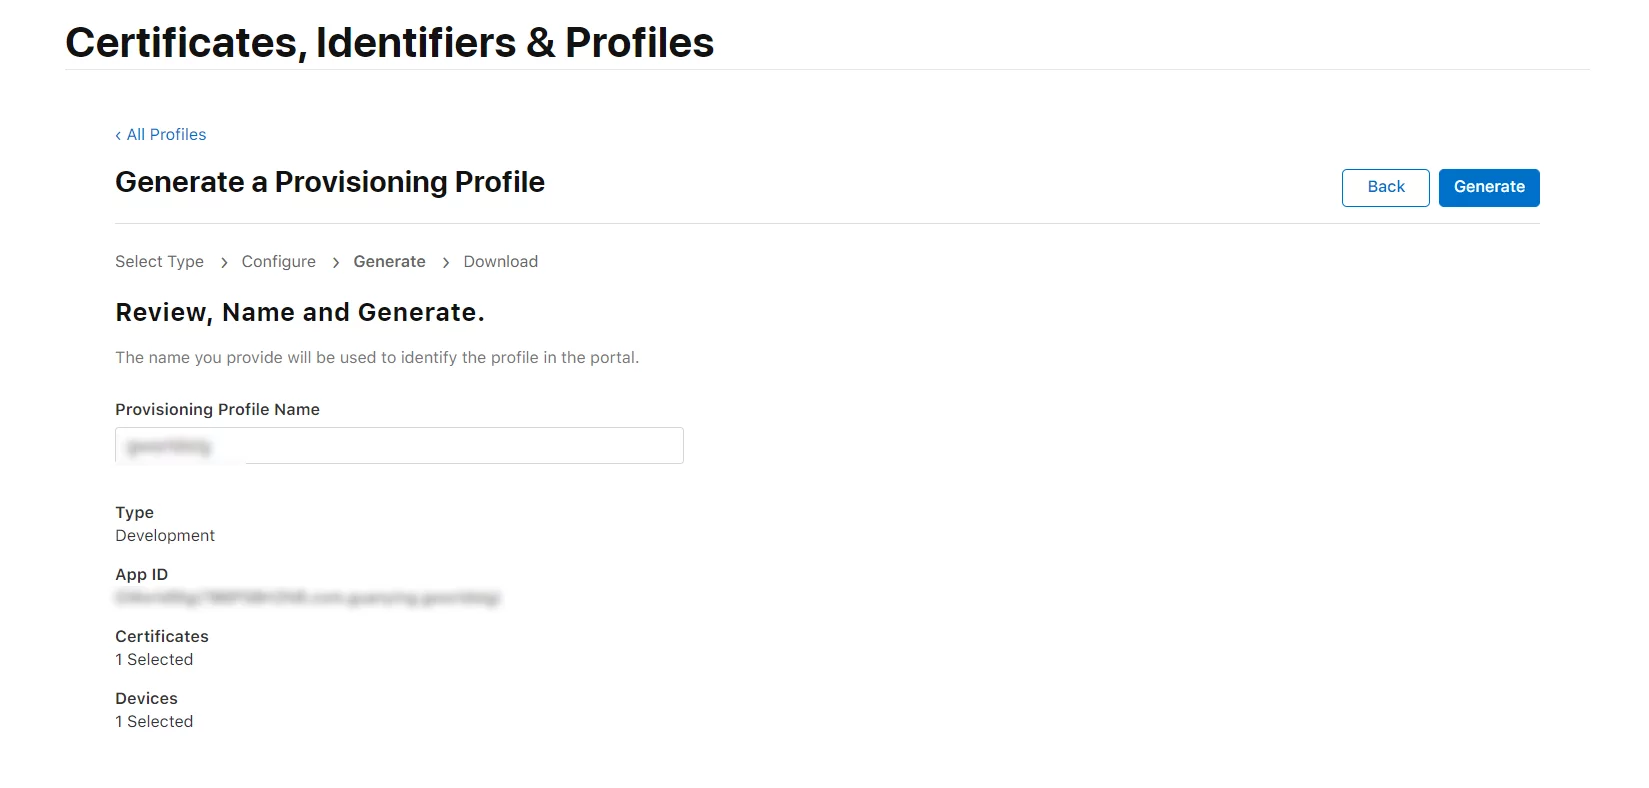
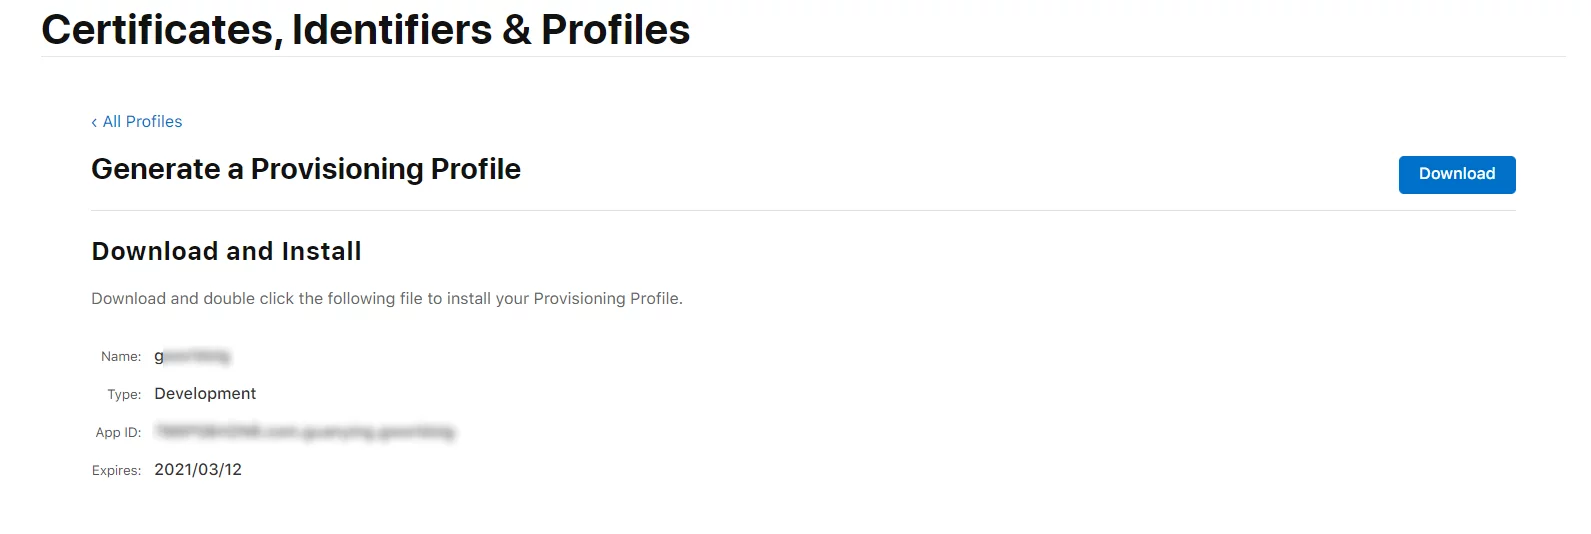
After generating it, download the provision file:
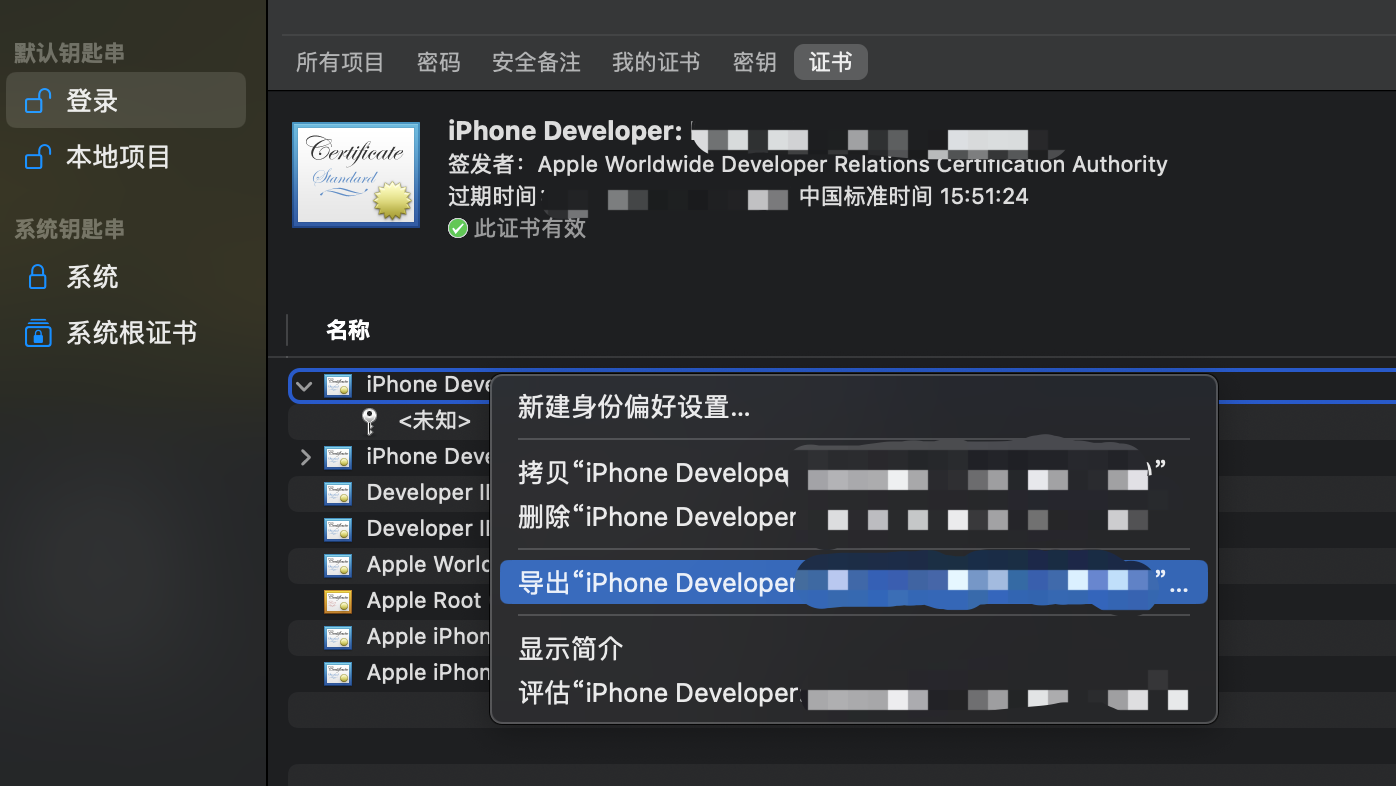
In Apple Developer, only the cer certificate can be downloaded, but the engine requires a p12. You need to import the cer certificate into the Mac’s Keychain, then export it as a p12 certificate:
Note: Make sure to select under the “Certificates” category; otherwise, the p12 option will be grayed out.
Configuration for Remote Build
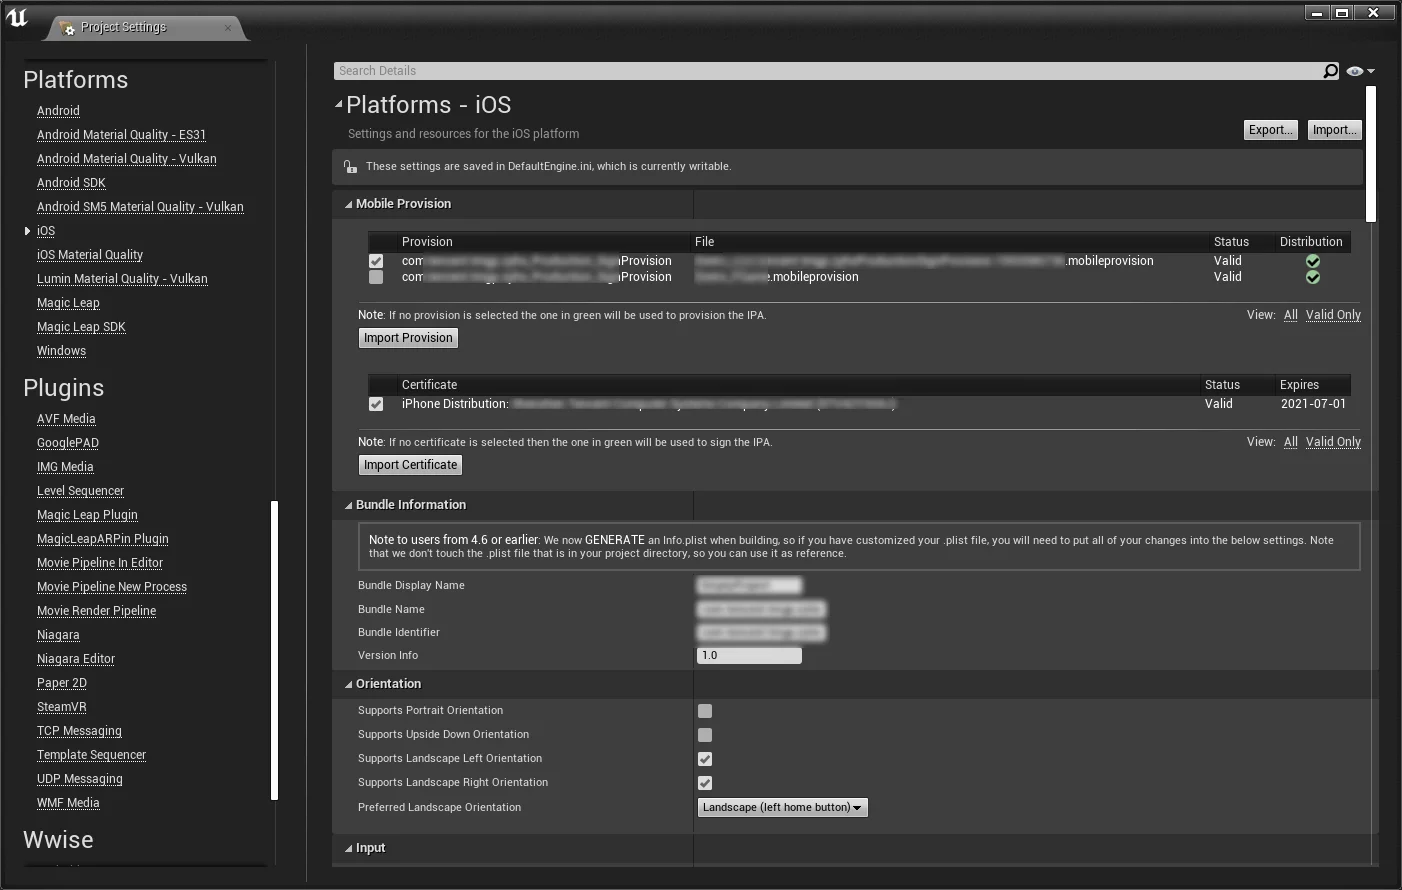
Packaging iOS with UE requires importing the certificate and provision in the project settings, and setting the BundleName and Bundle Identifier to the Bundle ID configured on the Apple Developer website, formatted as com.xxxxx.yyyyyy.
After importing the p12 certificate and mobileprovision, it should appear as in the figure:
Once the certificate is imported, you can start configuring remote packaging.
First, enable remote login in Mac’s System Preferences - Sharing: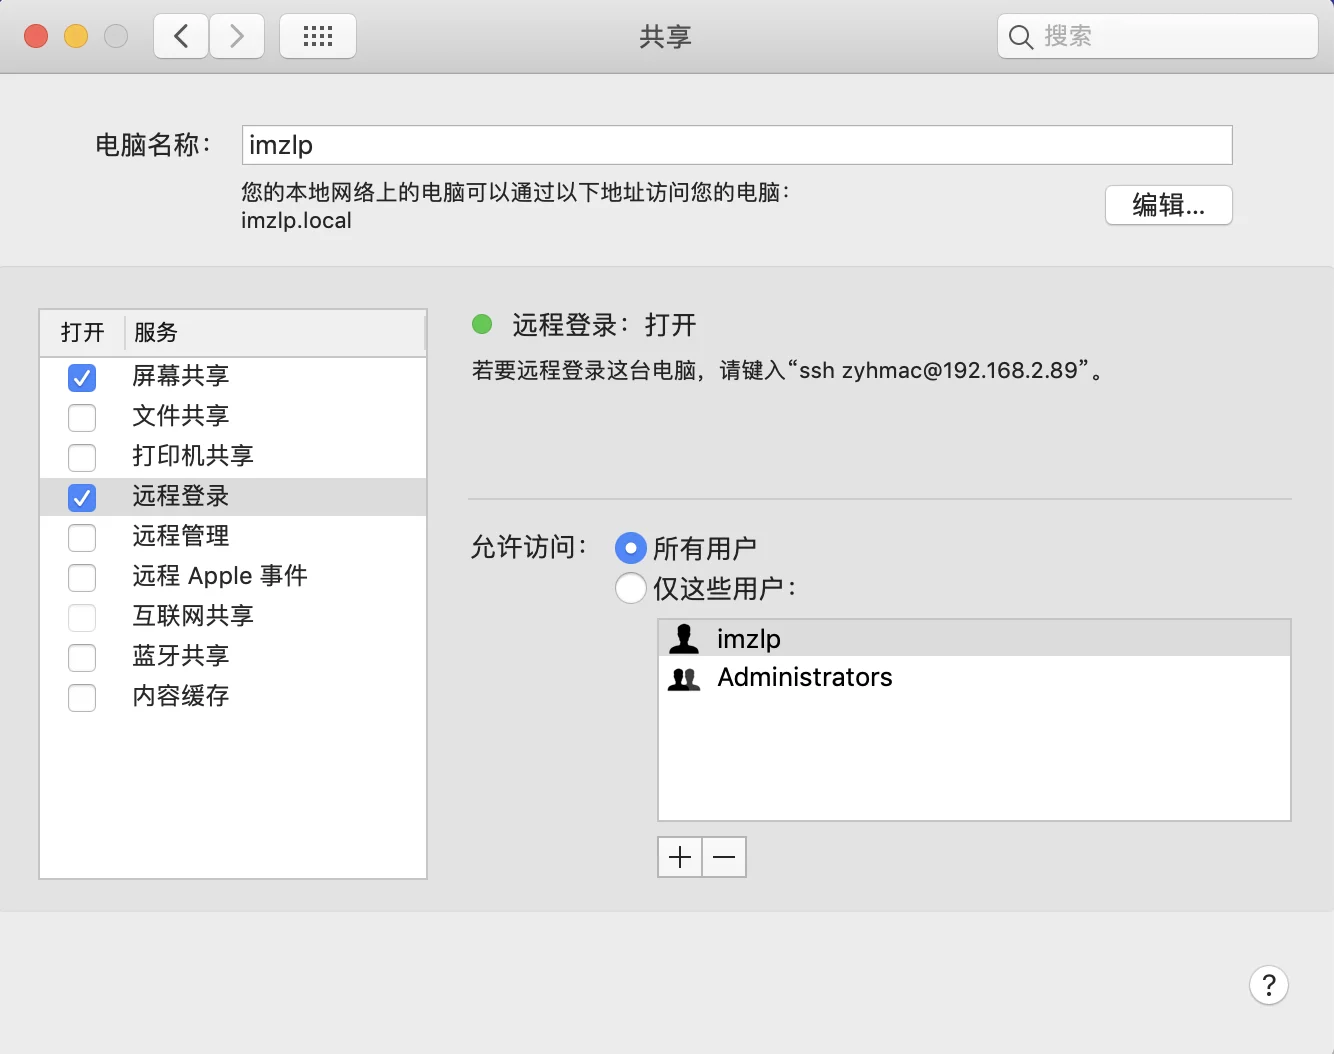
Then on Windows, add the mobileprovision to the project and set the BundleName and Bundle Identifier.
Next, scroll down to find IOS - Build under Remote Build Options: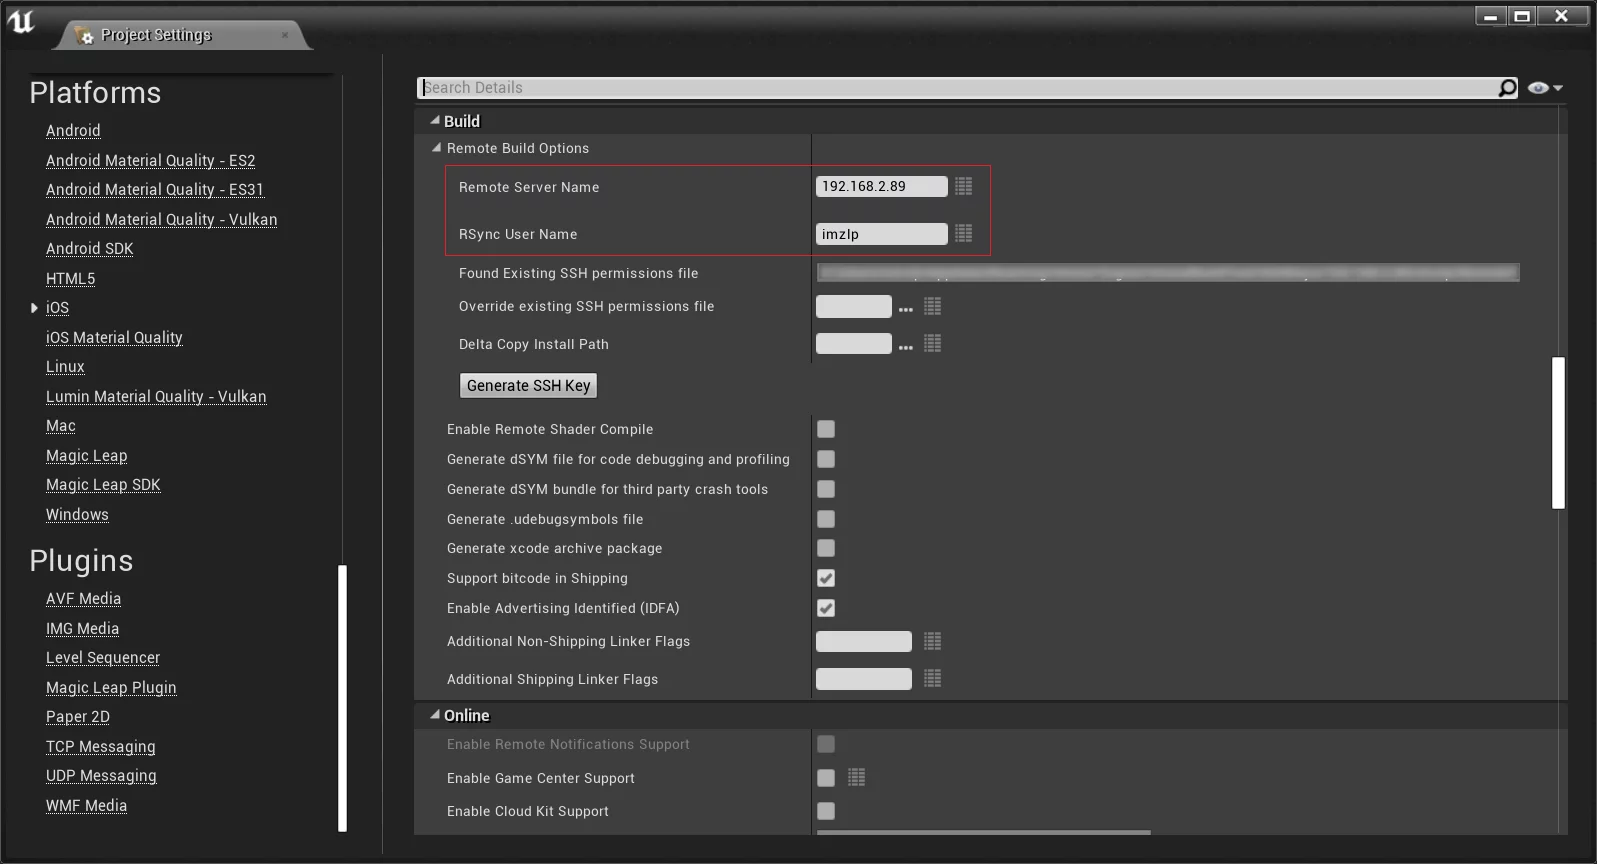
Enter the IP address of the target Mac (if no port is specified, the default is 22; if specifying a port, use the format xx.xx.xx.xx:2222 with a colon separating them) and username.
Then click Generated SSH Key, and a window will pop up: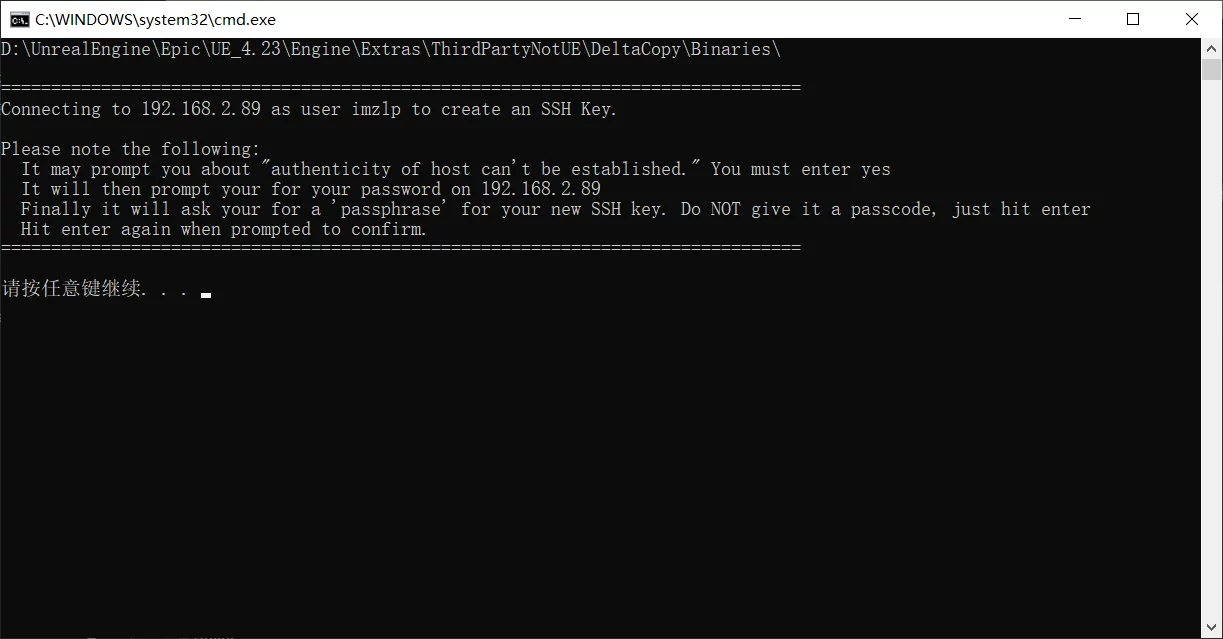
Press any key to continue.
You will be prompted to enter a password; enter it as instructed. Then you will be asked to enter the password for the MAC computer, and after entering, it will prompt:
1 | Enter passphrase (empty for no passphrase): |
This asks you to input the password for the generated ssh Key, which you can normally skip by just pressing Enter.
Pressing Enter continuously will inform you that the ssh key has been successfully generated: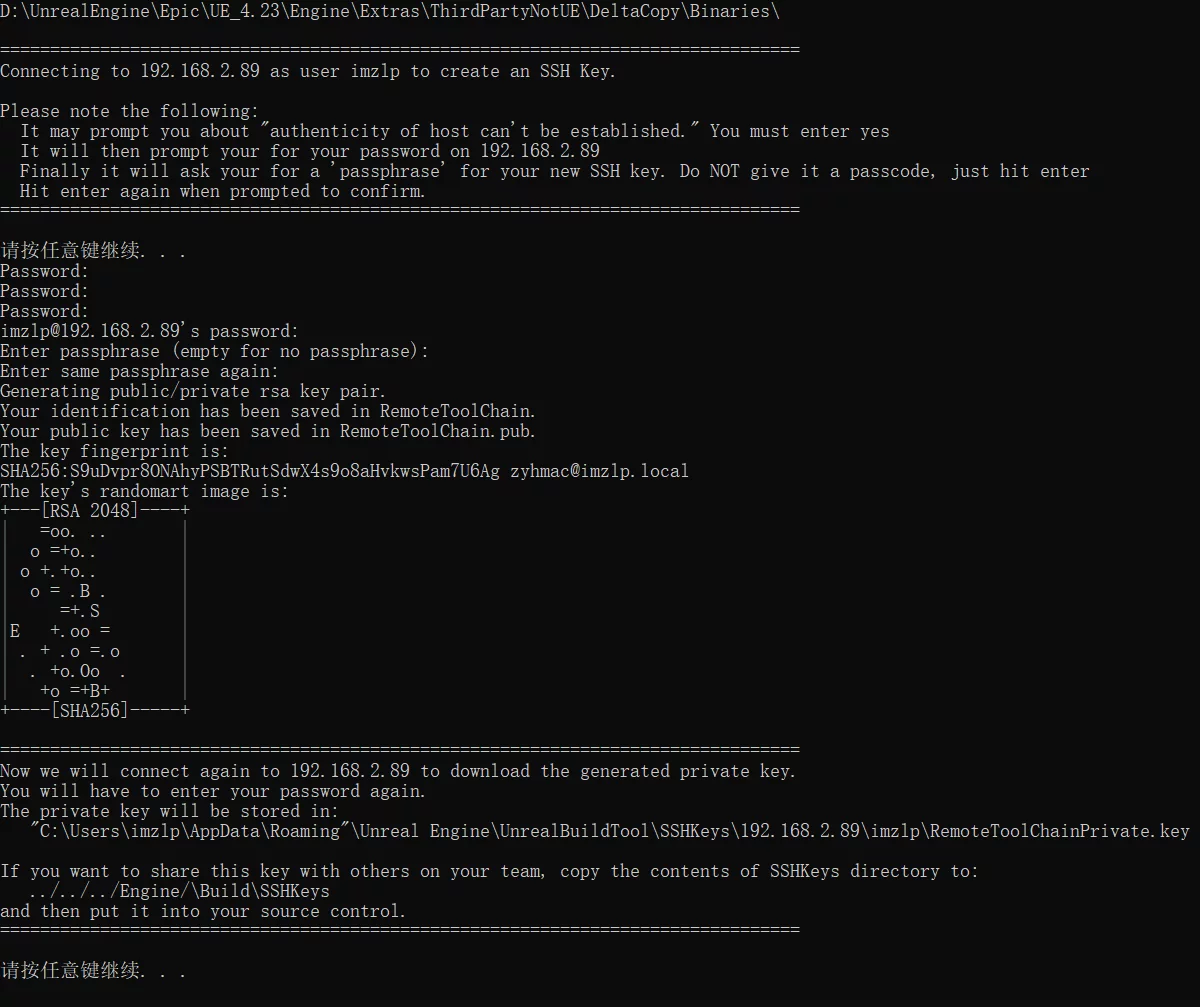
Then you will be asked to enter the first set password and the password for the target MAC machine, and after completion, it will indicate there are no errors, which is good:
The path where the generated SSH Key is stored is:
1 | C:\Users\imzlp\AppData\Roaming/Unreal Engine/UnrealBuildTool/SSHKeys/192.168.2.89/imzlp/RemoteToolChainPrivate.key |
If you want to share it with other members in the group, share the RemoteToolChainPrivate.key, and have them set IOS - Build - RemoteBuildOptions to use the Override existing SSH Permissions file path pointing to RemoteToolChainPrivate.key.
After this, you can package just like packaging for Windows or packaging iOS on Win:
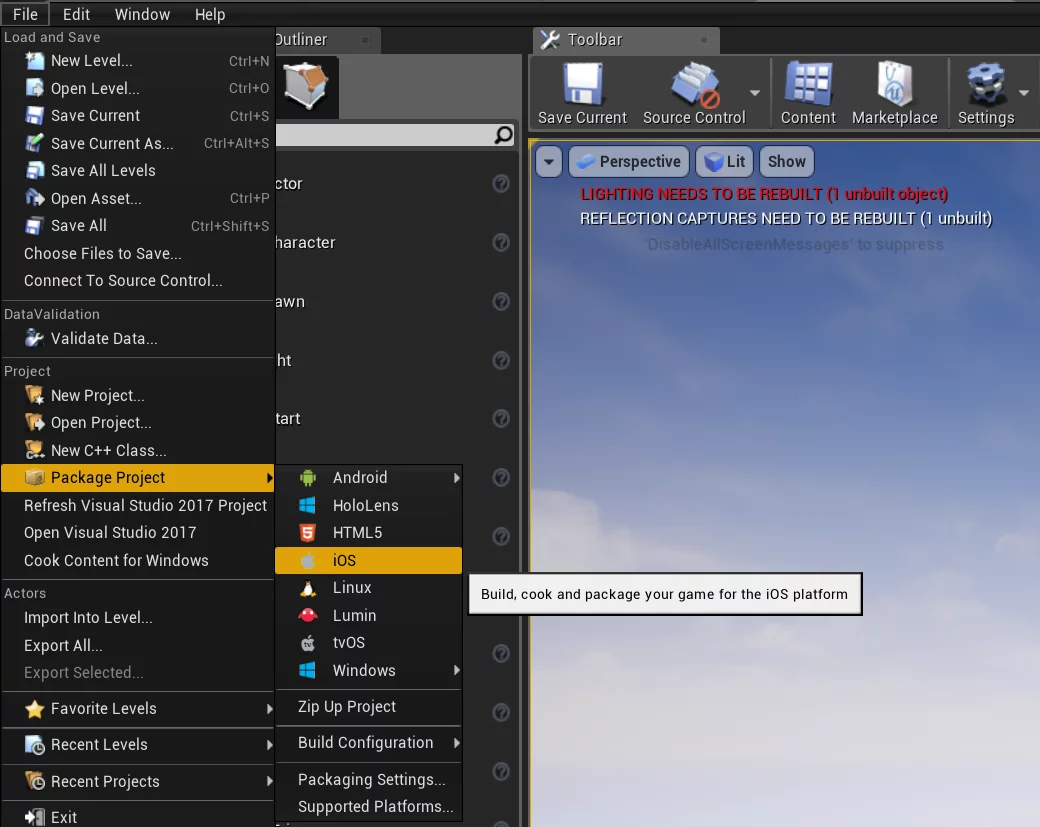
Remote Mac packaging goes through several stages:
- Upload the engine and project code from your local machine to Mac
- Execute compilation on Mac
- After compilation is complete, generate the ipa package on Mac (but excluding Cooked resources)
- Pull back the generated ipa package to the local machine, unpack, Cook art resources, and merge into ipa
For the first step, uploading the local engine and project code to Mac is achieved using rsync; the Engine\Build\Rsync directory contains filters for files that need to be uploaded to the target machine during remote construction.
For projects, you can create the <ProjectDir>/Build/Rsync/RsyncProject.txt file in the project directory and add your desired file filtering for uploading to Mac, which can solve the problem of some files being overlooked during remote packaging.
The default RsyncProject.txt filter used during uploads by UE includes both engine and project directories; for the specific code, see: UnrealBuildTool/ToolChain/RemoteMac.cs#L927
SSH Key Login Failure
If you receive the following error when making the SSH connection:
1 | lipengzha@192.168.31.55: Permission denied (publickey,password,keyboard-interactive). |
You may modify the Mac’s SSH configuration (/etc/ssh/sshd_config):
1 | RSAAuthentication yes |
Then reload the configuration:
1 | sudo launchctl unload /System/Library/LaunchDaemons/ssh.plist |
iOS Packaging Certificate Configuration Error Issue
When adding Provision and Certificate in UE’s project settings, the Bundle Identifier must correspond to the certificate; however, after setting up, if you try to package, you may receive the following error:
1 | Provision not found. A provision is required for deploying your app to the device. |
If such a situation arises after configuring the certificate and Provision, check whether the certificate is Development or Distribution. By default, the project setting does not check Distribution. If the imported certificate is a distribution certificate, it can only package as Shipping and must check Distribution.
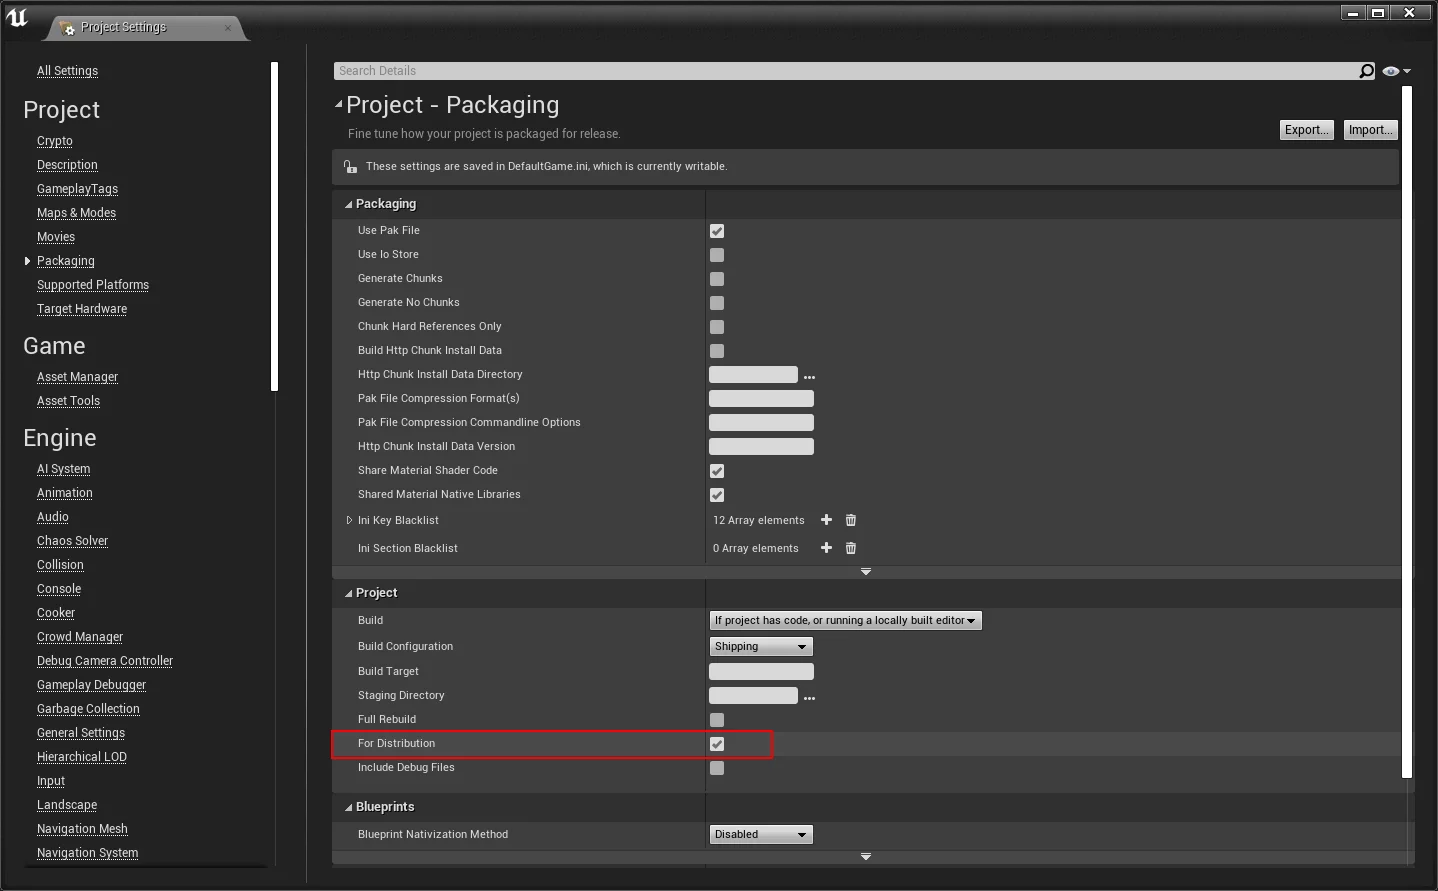
If you use a distribution certificate without checking For Distribution, you will encounter the following error during packaging:
1 | Check dependencies |
SSH Key Path Lookup Bug
Previously mentioned in Project Settings - Platforms - iOS, you can specify the SSH Key in Override Existing SSH Permissions file; if not specified, it defaults to using the engine lookup path. By default, it searches for the following paths:
1 | const FString DefaultKeyFilename = TEXT("RemoteToolChainPrivate.key"); |
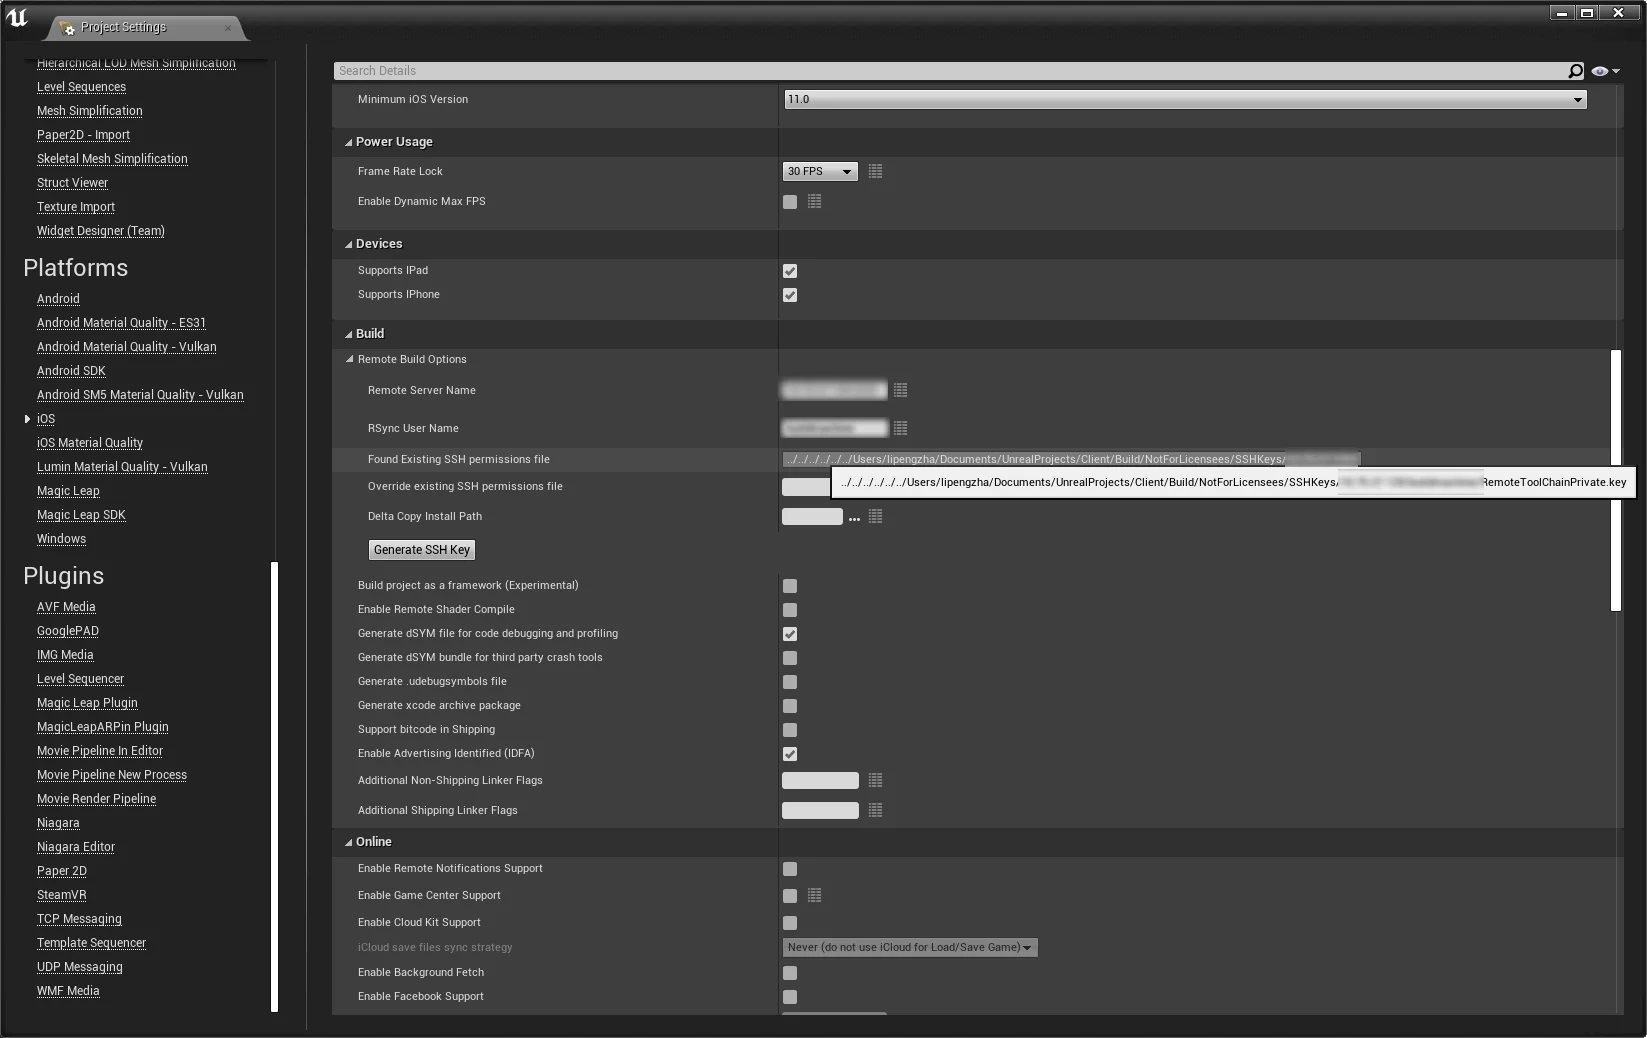
However, when the RemoteServerName includes a port, there is a bug in UE’s implementation when hoping to use the engine lookup path.
1 | void UIOSRuntimeSettings::PostInitProperties() |
This code has bugs on Windows because when RemoteServerName includes a specified port, the SSH Key cannot be found under Windows since paths on Windows cannot contain a colon. Therefore, there will be issues when looking for the Key path, which requires modifications in the engine to resolve.
Modify the above code:
1 | SSHPrivateKeyLocation = TEXT(""); |
Recompiling the engine can resolve this.
Remote Shader Compilation Key Lookup Bug
Note: Since version 4.26 and later, the engine version supports compiling Metal shaders on Windows, details can be found in the documents:
In Project Settings - Platforms - IOS, enabling Enable Remote Shader Compile, if the build machine address includes a specified port, there will be issues in searching for the SSH Key:
1 | // Developer/Apple/MetalShaderFormat/Private/MetalShaderCompiler.cpp |
As you can see, the Key path is directly concatenated using GRemoteBuildServerHost, but if a port is specified in the configuration, the value of GRemoteBuildServerHost will be in the format xxx.xx.xx.xx:1234. However, on Windows, directory names cannot contain :, resulting in failure to locate the Key.
In the same file, in the ExecRemoteProcess function, there is no processing for cases involving a specified port:
1 | bool ExecRemoteProcess(const TCHAR* Command, const TCHAR* Params, int32* OutReturnCode, FString* OutStdOut, FString* OutStdErr) |
This needs to be handled:
1 | bool ExecRemoteProcess(const TCHAR* Command, const TCHAR* Params, int32* OutReturnCode, FString* OutStdOut, FString* OutStdErr) |
Signing Errors
Developer Signature Expired
If you see the following logs during packaging, it indicates that the iOS certificate has expired:
1 | /Users/buildmachine/UE4/Builds/lipengzha-PCb/C/BuildAgent/workspace/FGameEngine/Client/Intermediate/ProjectFilesIOS/FGame.xcodeproj: error: No certificate for team '6H9S4KQ3C9' matching 'iPhone Developer: Created via API (7ZQD4FUW73)' found: Select a different signing certificate for CODE_SIGN_IDENTITY, a team that matches your selected certificate, or switch to automatic provisioning. (in target 'FGame' from project 'FGame') |

Simply updating the certificate will resolve the issue.
Apple Intermediate Certificate Expired
If the following error appears when packaging on Windows:
1 | IPP ERROR: Application exception: System.Security.Cryptography.CryptographicException |
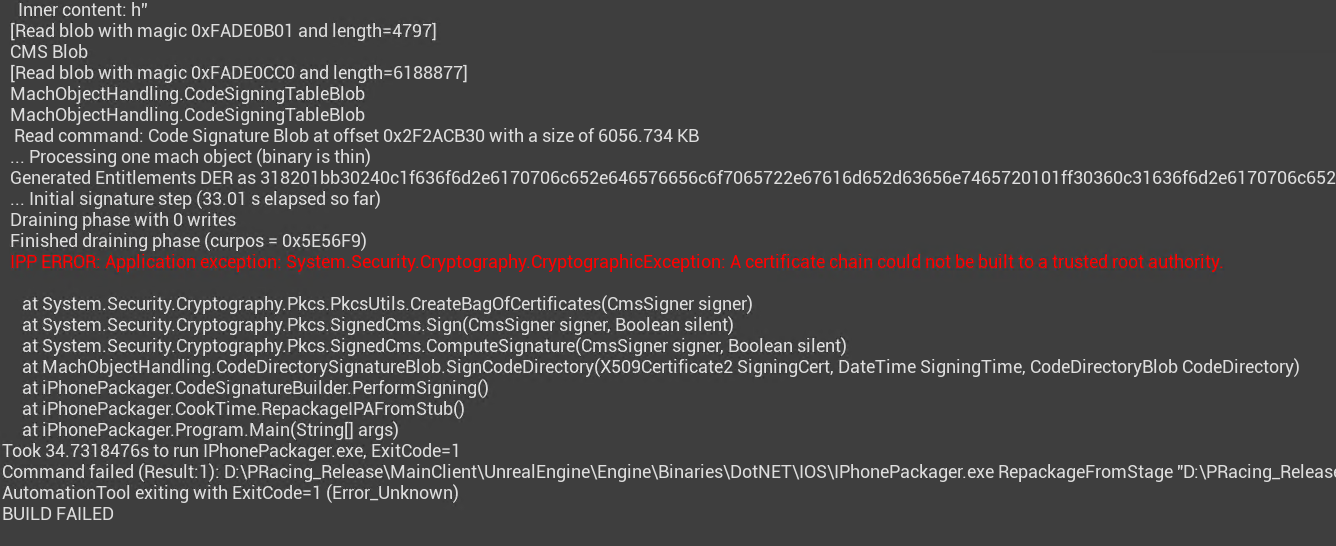
This is also caused by the expiration of an Apple intermediate certificate; updating it will suffice. See: BuildGraph: Building a binary engine supporting multi-platform packaging
Notes
When conducting remote iOS builds on Windows, several constraints apply:
- The individual file size within the IPA cannot exceed 2G, such as Pak files.
- The total size of the IPA cannot exceed 4G.
Otherwise, you may encounter the following error:
1 | IPP ERROR: Application exception: Ionic.Zip.ZipException: Compressed or Uncompressed size, or offset exceeds the maximum value. Consider setting the UseZip64WhenSaving property on the ZipFile instance. |
Mac Development Environment
Installing UE on MacOS
UE requires the partition format of MacOS to be case-insensitive (otherwise, EpicLauncher cannot install), and the engine installation requires the system version to be greater than 10.13.5; otherwise, there may be crashes and unsupported situations (attempting to ignore errors may not result in successful installation).
Compiling relies on Xcode, similar to how it depends on VS, necessitating the installation of the compilation environment.
If an error message appears while creating a project after installing UE and Xcode:
1 | An error occurred while trying to generate project files. |
You should install Xcode Command Line Tools, and then execute the following command:
1 | $ sudo ln -s /Applications/Xcode.app/Contents/Developer/Platforms /Library/Developer/CommandLineTools/ |
Modify SSHD Default Port on Mac
Sometimes internal networks have port restrictions, and ports below xxxx are not typically open, so how to conduct remote builds when port 22 is restricted? Modify the default port for SSH!
Edit the ssh port in the /etc/services file:
1 | $ vim /etc/services |
Change the SSH port to another value:
1 | ssh 22/udp # SSH Remote Login Protocol |
Change to:
1 | ssh 2222/udp # SSH Remote Login Protocol |
Save and exit. You will also need to reload the configuration to make the new port effective:
1 | sudo launchctl unload /System/Library/LaunchDaemons/ssh.plist |
Then test if the port is connectable:
1 | ssh localhost -p 2222 |
Enable Multi-threading Compilation for Xcode
First, check the Mac’s hardware configuration:
1 | sysctl machdep.cpu |
Find the field machdep.cpu.core_count, where the value is the number of cores on the Mac.
Then you can enable multi-threading for Xcode, with the number being cores * 2; for instance, if you have 8 cores, you can enable 16 threads:
1 | defaults write com.apple.Xcode PBXNumberOfParallelBuildSubtasks 16 |
Built-in Frameworks in Mac System
Sometimes it is necessary to introduce system frameworks in UE modules. What are the default frameworks included in Mac? You can check in the following way. I am using system version 10.15.2, which can be checked with sw_vers:
1 | buildmachine@LIPENGZHA-MC0 ~ % sw_vers |
The built-in frameworks are located in the following directory:
1 | /System/Library/Frameworks |
The 10.15.2 version includes the following frameworks:
1 | AGL.framework ColorSync.framework CoreVideo.framework GameKit.framework |
After setting CommandLineTools, you may encounter a message during packaging:
1 | ERROR: Invalid SDK MacOSX.sdk, not found in /Library/Developer/CommandLineTools/Platforms/MacOSX.platform/Developer/SDKs |
This is because, after setting it as CommandLineTools via xcode-select, the libraries in Xcode are no longer found during packaging. The solution is to create a symbolic link for the Platforms directory from Xcode in the CommandLineTools directory:
1 | sudo ln -s /Applications/Xcode.app/Contents/Developer/Platforms /Library/Developer/CommandLineTools/Platforms |
actool Error
1 | UATHelper: Packaging (iOS): xcrun: error: unable to find utility "actool", not a developer tool or in PATH |
This error occurs because, after setting CommandLineTool as the default command line tool, the CommandLinTool/use/bin directory does not contain tools like actool. This is a frustrating problem; using Xcode as the default command line tool leads to cooking failures, while using CommandLineTool creates issues during compilation. My workaround is to link /Applications/Xcode.app/Contents/Developer/usr/bin to /Library/Developer/CommandLineTools/usr:
1 | # Of course, back up CommandLineTool/usr/bin first |
Remove Restrictions on macOS Installed Software
- Allow any source, run third-party applications
1 | sudo spctl --master-disable |
- Install grayed-out dmg
1 | hdiutil attach #dmg filename# |
- Open macOS Sierra to allow “any source” option, run third-party applications
- Unable to install gray mac dmg files
macOS Read/Write NTFS
After installing macOS, I found that macOS could read NTFS files but could not write to them, which is quite frustrating. It was said that this is due to Microsoft’s restrictions, but macOS itself has the read/write capability, which is just disabled. You can enable it via the following method.
First, execute diskutil list in the terminal to view disk information:
1 | visionsmile$ diskutil list |
You need to note the NAME information of the NTFS disk; here I have three NTFS partitions: windows/Documents/Documents2.
Next, execute the command to update the fstab file:
1 | sudo nano /etc/fstab |
Enter the following content and replace what comes after LABEL= with the names of the partitions recorded above:
1 | LABEL=Windows none ntfs rw,auto,nobrowse |
After rebooting, you will be able to write to the NTFS partitions. Note: After rebooting, the removable disk will not display on the desktop; you must open Finder to see it.
Issues Encountered in UE4 Projects on Mac
Cook Errors
When encountering an error during cooking, the error message is:
1 | CookResults: Error: Package Native Shader Library failed for MacNoEditor. |
This is caused by the setting in Project Settings-Packing-Shared Material Native Library. Turning this off will resolve the issue.
PS: I saw a similar bug submission in UE’s issue tracker, but it was marked as fixed in 4.18: UE-49105. I don’t know why this issue still exists.
UPL Application in iOS
Unreal Plugin Language is a XML-based language provided by UE to control the process of building Apk and ipa, such as modifying AndroidManifest.xml or info.plist.
Analysis of plist Generation Process
In the UEDeployIOS.cs file, the GeneratePList function constructs the UPL object using the incoming UPLScripts:
1 | public virtual bool GeneratePList(FileReference ProjectFile, UnrealTargetConfiguration Config, string ProjectDirectory, bool bIsUE4Game, string GameName, bool bIsClient, string ProjectName, string InEngineDir, string AppDirectory, List<string> UPLScripts, VersionNumber SdkVersion, string BundleID, bool bBuildAsFramework, out bool bSupportsPortrait, out bool bSupportsLandscape, out bool bSkipIcons) |
In the final call of GeneratedIOSList, it constructs the default plist content, reads from Additional Plist Data, and calls UPL to handle the plist content, with UPL being processed last.
It is important to note that in the GeneratedPList function, all UPL.xml files added across all modules are fetched via GeneratedIOSList, with these XML files merged together. The merge order is based on the order of AdditionalProperties, with the last added UPL executing last. If multiple UPL operations are used in a project, you need to pay attention to the order.
Intervening in the IPA Generation Process: Operating Plist
The ipa package for iOS always contains a plist file, which can be used to configure certain properties of the app. Apple’s developer documentation provides detailed descriptions of each supported key: iOS Keys
The default packaging in UE 4.25.1 generates a plist file like the following: info.plist. In some special requirements, elements need to be added, modified, or deleted from this plist.
In UE’s project settings, elements can be added to the plist. In Project Settings-Platform-iOS-Additional Plist data, a string can be entered, which will be inserted into the plist file:
1 | <key>AdditionalElementAAA</key>\n<string>this key is a test element.</string> |
The \n in the middle is a formatting code used for a new line.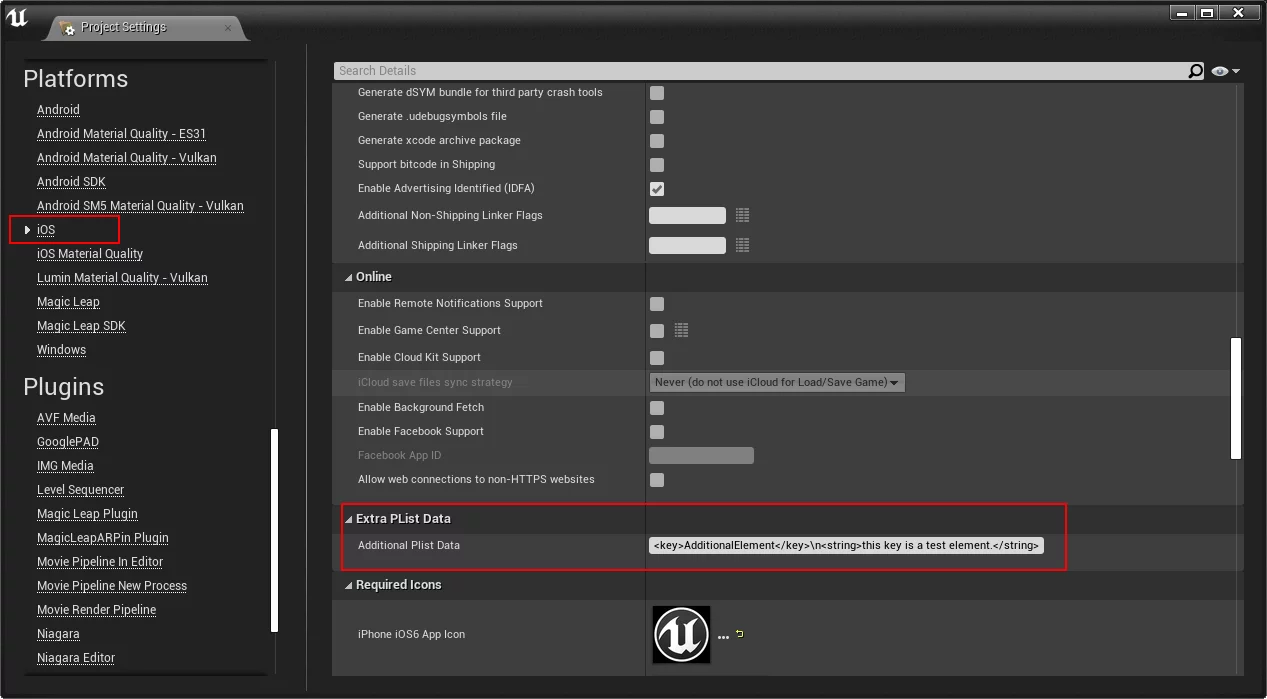
If you want to modify or delete elements in the plist, you need to write logic using UPL (of course, UPL can also be used to add elements; this approach is recommended).
1 |
|
The above is used to add elements, and the content is the same as directly writing to Additional Plist data.
Iterating through the keys in plist:
1 |
|
Note: The current element is referenced by tag = "$".
During compilation, the following log will appear:
1 | UPL: /Users/buildmachine/UE4/Builds/lipengzha-PC1/C/BuildAgent/workspace/PackageFGameClient/FGame/Plugins/UPLExample/Source/UPLExample/ThirdParty/IOS/IOS_UPL.xml |
Adding new elements is relatively simple, but deleting and modifying is more troublesome, requiring a traversal of all nodes and deleting the current element based on a match (note that the plist consists of key-value pairs; each <key></key> corresponds to a value element that must also be deleted, or the packaging will fail):
1 | <key>BuildMachineOSBuild</key> |
I wrote a convenient process to delete elements from the plist, allowing for multiple groups of elements to be easily removed:
1 |
|
At the beginning of the script, two elements pairs are added, followed by the deletion code, with the following three lines being important to note:
1 | <setString result="NeedDeleteKey_1" value="AdditionalElementA"/> |
The first two lines contain the variables for the elements to be deleted, where the values are the strings of the keys to be deleted. Note that the naming rule must start with NeedDeleteKey_.
The third line creates a variable named loopSumNum to keep track of how many element pairs need to be deleted. Here, I test deleting two, so its value is 2.
When packaging and building, this script will execute and produce the following output:
1 | UPL: /Users/buildmachine/UE4/Builds/lipengzha-PC1/C/BuildAgent/workspace/PackageFGameClient/FGame/Plugins/UPLExample/Source/UPLExample/ThirdParty/IOS/IOS_UPL.xml |
As long as deletion is possible, the deleted elements can be re-added using addElements, thus achieving the modification purpose. ### Adding Frameworks for iOS
The Framework on iOS is somewhat similar to a static linked library, equivalent to a collection of .a + .h + resources packaged together. For a more specific description of the differences, see: Difference between iOS Library .a and .framework
In UE, using the example of integrating the iOS SSKeychain that operates the Keychain, PublicAdditionalFrameworks is used in the Module’s build.cs to add:
1 | PublicAdditionalFrameworks.Add( |
The first parameter for constructing the Framework is the name, the second is the framework path (relative to the Module), and the third is the bundle path of the Framework after extraction (if the framework does not have a bundle, this parameter can be ignored, and even if there is a bundle but this third parameter is not written, it seems like it also doesn’t cause any problems).
This can be verified by opening the SSKeychain.embeddedframework.zip file:
1 | SSKeychain.embeddedframework |
The path relative to the .framework must be filled in correctly; otherwise, it cannot be used because the packaging process will extract this zip and copy it to the package. If the path is specified incorrectly, it will not be copied.
1 | [2020.05.14-11.04.48:324][988]UATHelper: Packaging (iOS): [2/183] sh Unzipping : /Users/zyhmac/UE4/Builds/ZHALIPENG/C/Users/imzlp/Documents/UnrealProjectSSD/MicroEnd_423/Plugins/PlatformUtils/Source/PlatformUtils/ThirdParty/IOS/SSKeychain.embeddedframework.zip -> /Users/zyhmac/UE4/Builds/ZHALIPENG/D/UnrealEngine/Epic/UE_4.23/Engine/Intermediate/UnzippedFrameworks/SSKeychain/SSKeychain.embeddedframework |
Note: Do not introduce the same third-party framework file simultaneously in two different modules; otherwise, the following error may occur (for example, if I introduced SSKeychain.embeddedframework.zip in plugin A, then introduced it in another plugin B within the same project):
1 | Unable to merge actions producing SSKeychain.embeddedframework.extracted: prerequisites are different. |
Common Issues for Testing iOS Packages
iOS UE4App Data Directory
Accessing the iOS program’s documents directory requires the App to enable file sharing. This can be enabled in UE’s Project Settings-Platform-IOS-File System:
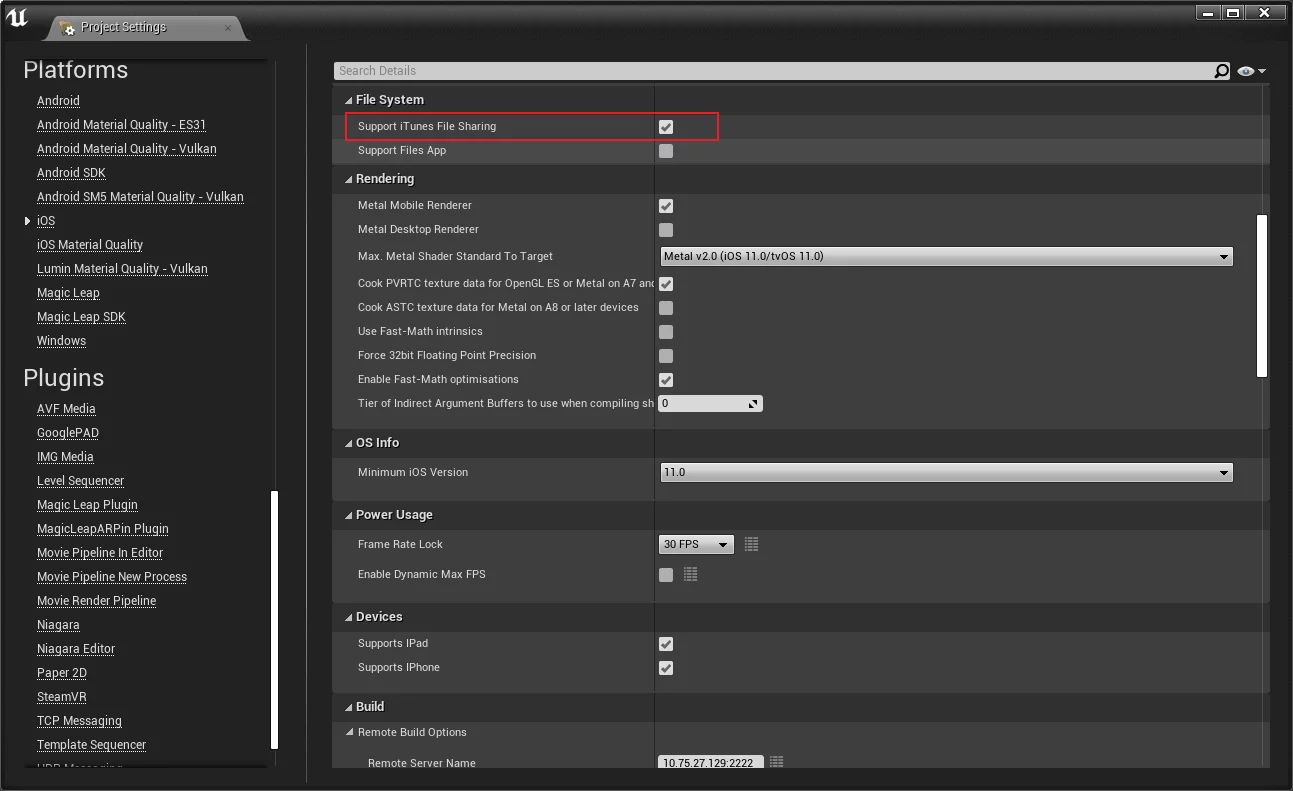
Only after this is enabled can you access the application’s documents directory following packaging.
You can use iMaZing to access the iOS app’s documents directory, allowing you to create folders, copy files, etc., which is quite convenient.
UE has this directory structure on Win and Android platforms:
1 | +---Engine |
On Windows, it is relative to the packaging directory, while on Android, it defaults to <Sdcard>/UE4Game/PROJECT_NAME/.
On iOS, this structure is relative to the App’s documents directory (these folders were manually created; there are no logs during Shipping):

If you want to mount pak, just place it in the corresponding directory structure, and you can access it through the FPaths API in the program.
Viewing iOS Device Logs on Windows
For Android devices, you can use adb logcat to capture logs, but it’s quite troublesome to view iOS logs since it requires a Mac.
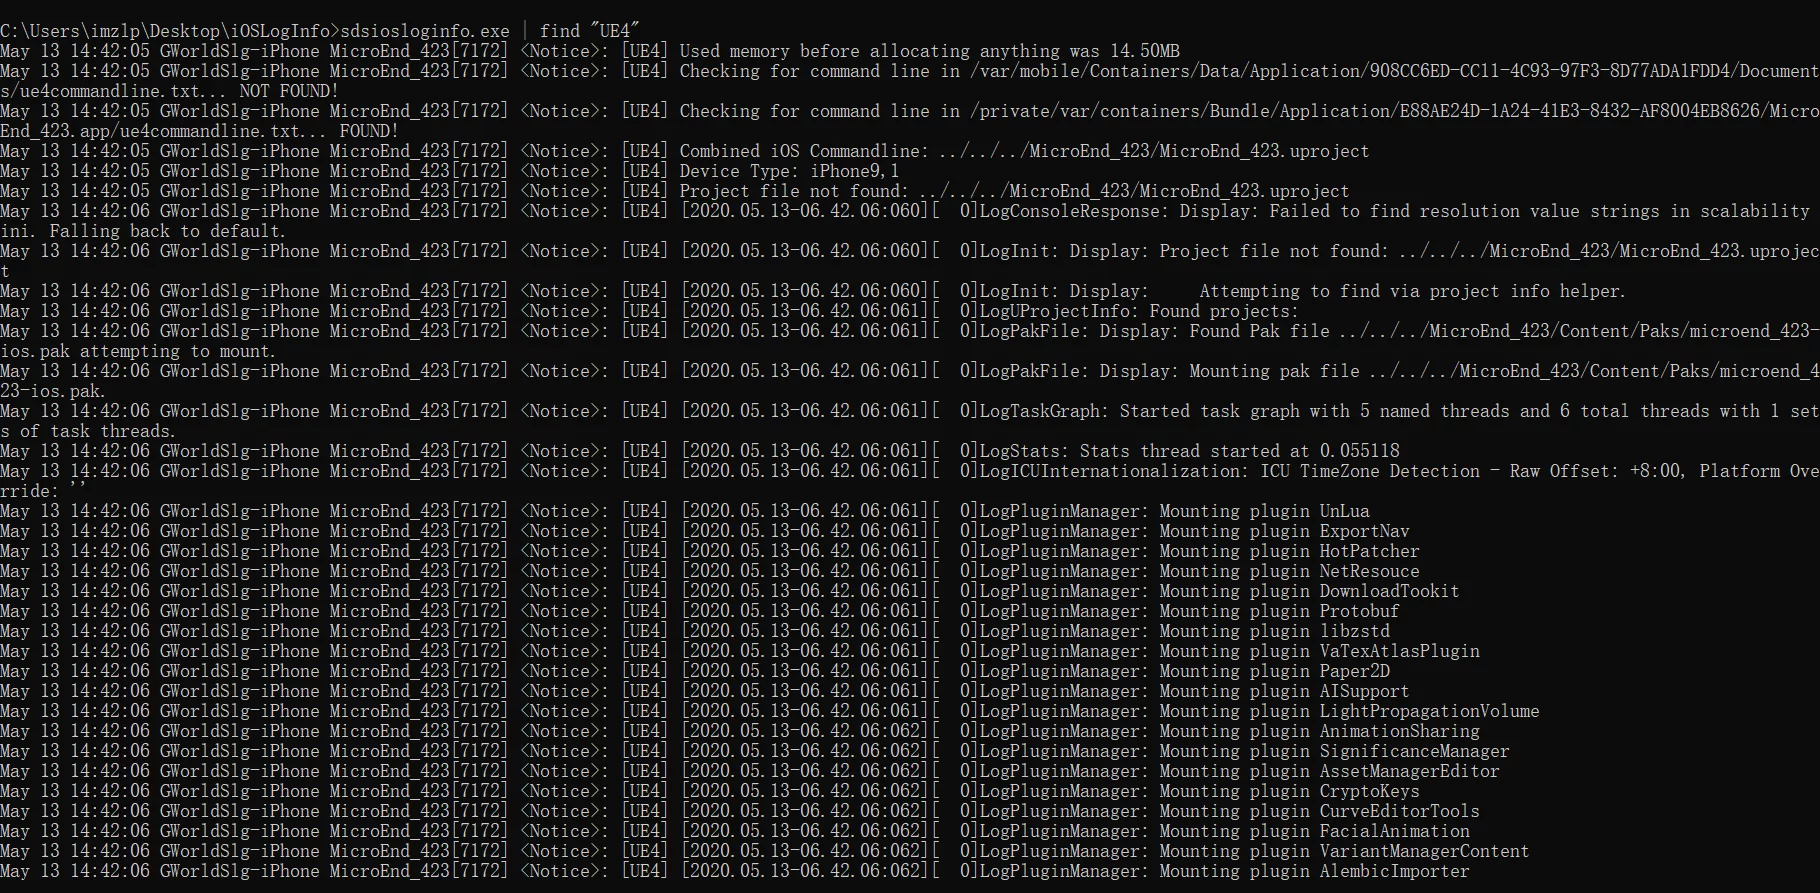
However, after a bit of searching, I found a tool that allows you to view the current device logs in real-time on Windows: IOSLogInfo
After downloading, extract it, and executing sdsiosloginfo.exe will display output similar to logcat logs. If you have a Git bash environment, you can also use | for filtering.
Log Location for UE Projects on Mac
The log location for opening UE projects on MacOS is
~/Library/Logs/Unreal Engine/ProjectName, Locating Project Logs
Paklist Location for Packaging on Mac
The location of the Paklist generated during IPA packaging on Mac is ~/Library/Logs/Unreal Engine/LocalBuildLogs/BuildCookRun, which differs from Windows packaging.
Relevant Links
- UE4 Mobile Device Development Guide
- Building for iOS on Windows
- A tool similar to logcat for iOS: iOS Console
