Oculus Quest is the new generation of all-in-one VR headset released by Oculus, supporting 6DoF, with no need for a PC connection or additional positioning base stations. It also supports Guardian; when the user walks out of the positioning boundary while wearing the headset, real-world visuals will immediately display in the headset to prevent accidental mishaps.
The Oculus Quest features two Pentile OLED screens, with a single-eye resolution of 1440x1600 and a refresh rate of 72Hz, powered by a Qualcomm Snapdragon 835 processor based on the arm architecture, which is the same as the flagship processors from two years ago (such as Xiaomi 6, Samsung S8).
Quest employs the Oculus Insight (inside-out tracking) positioning solution, using four cameras located at the four corners of the headset panel for positional tracking.
The introduction of Oculus Insight during the release event: Oculus Insight VR Positional Tracking System (Sep 2018)
And a video of a user’s test of Quest’s tracking range abroad: Quest Distance Test.
The 64G storage version of Oculus Quest is priced at $399, while the 128G version costs $499, with tax-excluded prices roughly around 3500; compared to HTC’s similar new product (HTC Vive Focus), it is significantly cheaper, and it offers even greater advantages over PC-Based VR since it does not require a high-performance host. I believe that 6DoF all-in-one VR devices must be the trend of the future!
Before the National Day holiday at OC6, Oculus announced two technologies: Oculus Link and finger tracking, both are impressive and promising.
The entire Quest device is about the same size as a 10.5 inch iPad, making it easy to carry in a small bag: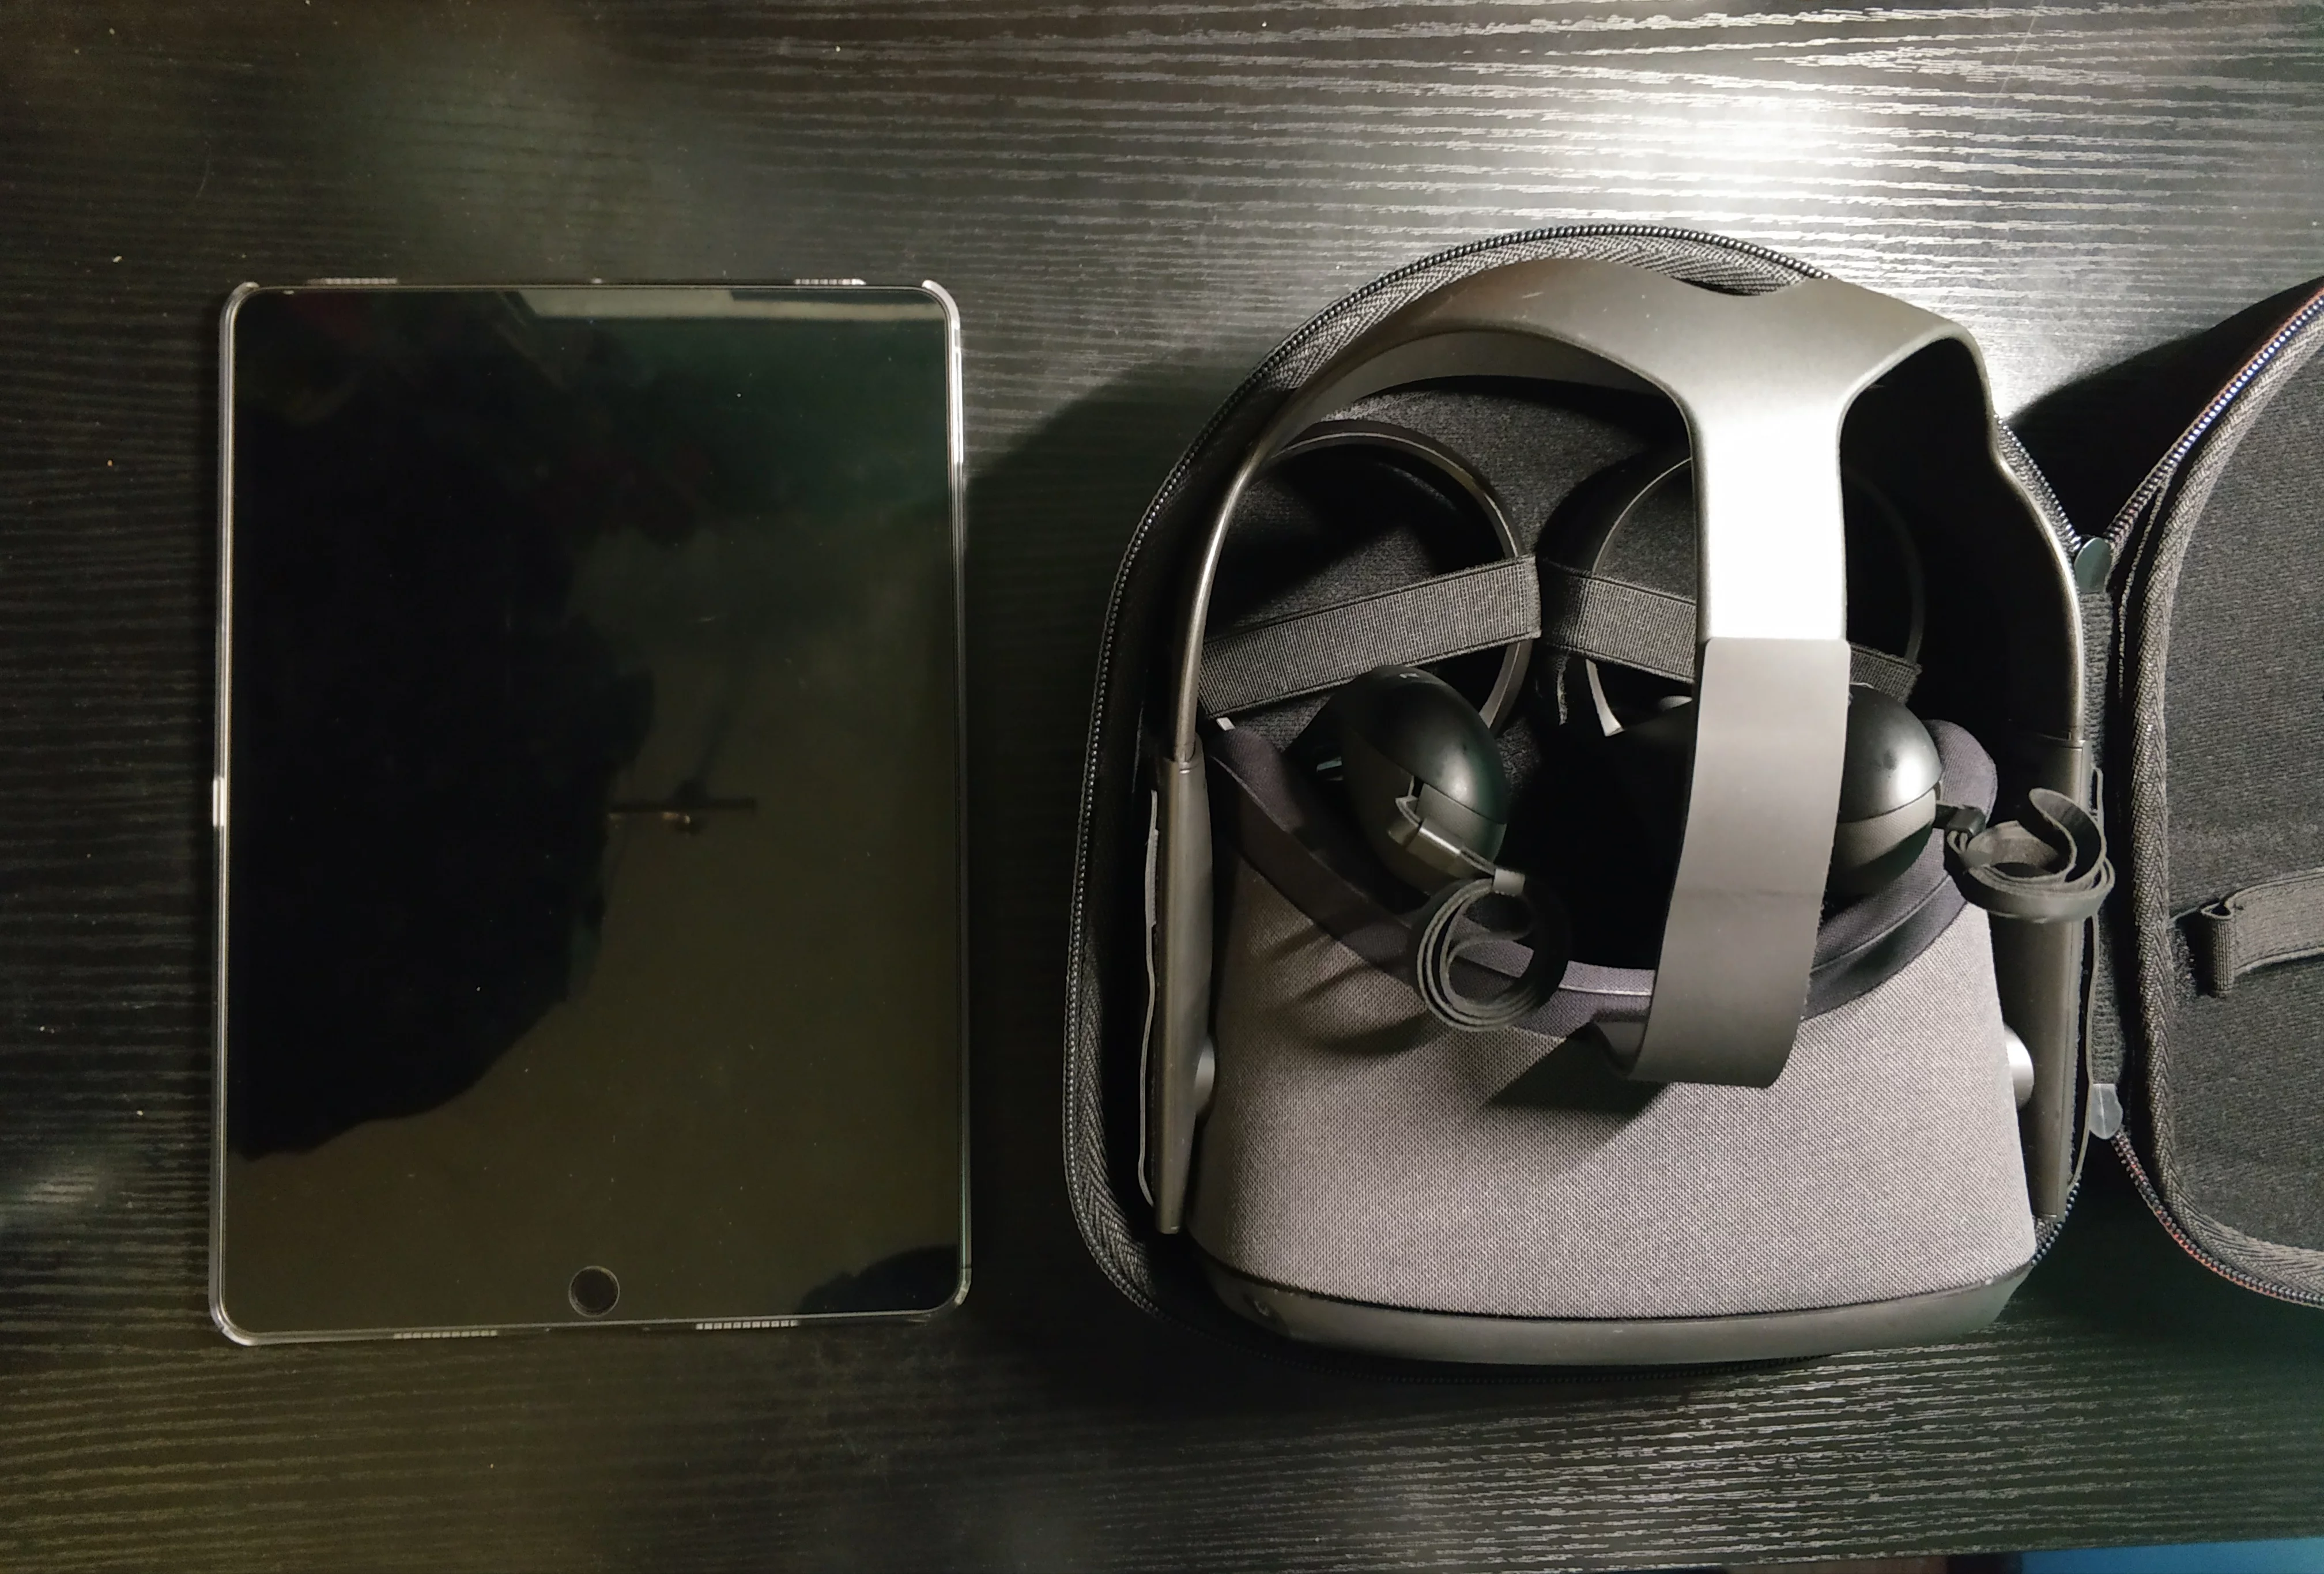
There’s no need to elaborate on the specifications of the Quest device; the main content of this article will focus on the environment setup, development documentation, debugging tools, and additional considerations when using UE to develop Quest projects, which will be updated continuously.
First, to package and test applications on Quest, you need to enable Developer Mode on the Quest.
Connect the Quest to a PC using a Type-C data cable, and the headset will prompt whether to allow USB debugging. Check ‘Allow’.
You can then use Adb on your PC to connect to the Quest. The system on Quest is based on Android, and you can use Adb for debugging.
1 | adb shell |
This connects you to the Quest device, allowing you to view the device information by checking /system/build.props. I exported a copy: build.props.
You can also directly use adb to install an apk:
1 | adb install xxxx.apk |
Additionally, you can use the open-source tool SideQuest to manage Android-based VR devices on your PC, and it is also applicable to Quest, allowing for software installation or uninstallation.
Oculus Developer Mode
Before setting up the actual development environment, you need to enable Developer Mode on the Quest. The prerequisite for setting Developer Mode is joining or creating a developer organization on the Oculus Dashboard.
Then, log into the mobile Oculus App using an Oculus account that has a developer organization:
- The iOS version can be installed from the App Store: Oculus for iOS
- The Android version can be installed from Google Play: Oculus for Android. For those without the GMS environment in China, you can directly install from the apk I downloaded: Download link.
After installation, log in, find the Quest device associated with your account, and select More Settings: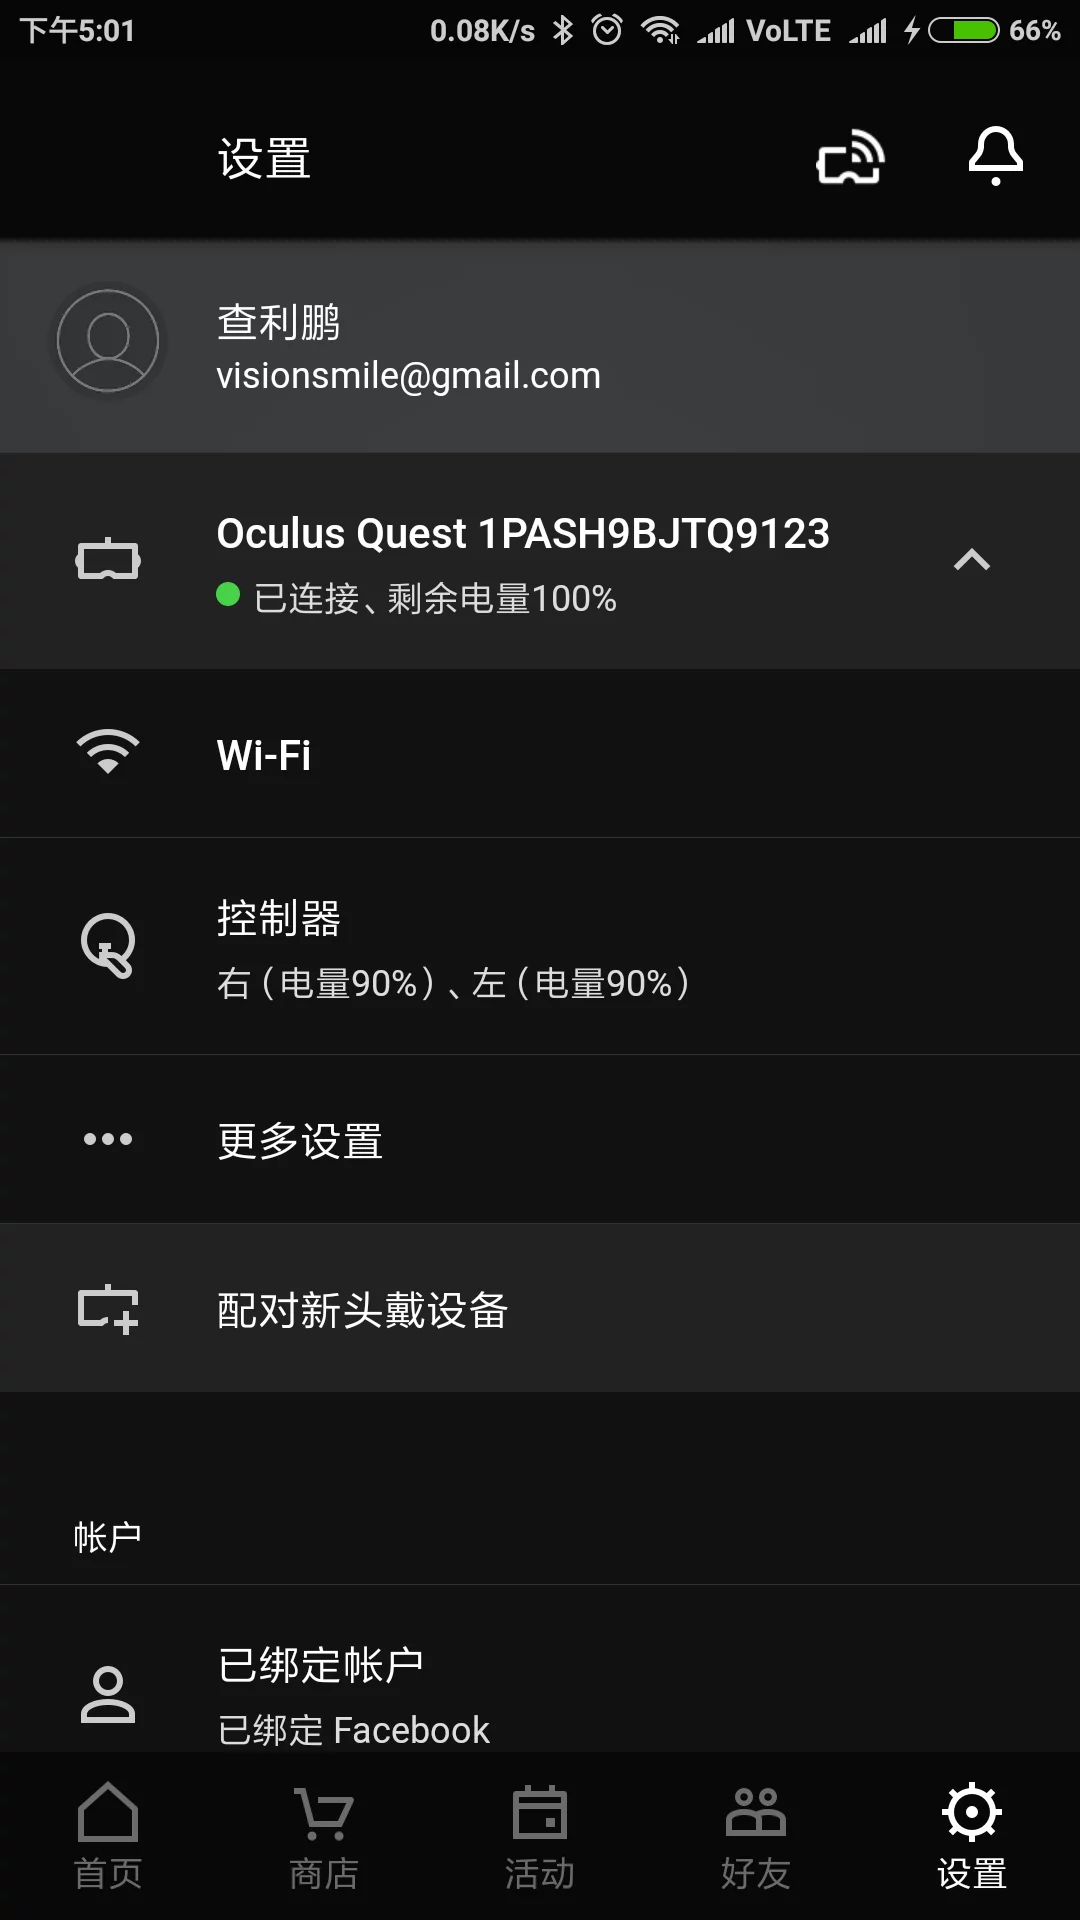
Then find Developer Mode and enable it.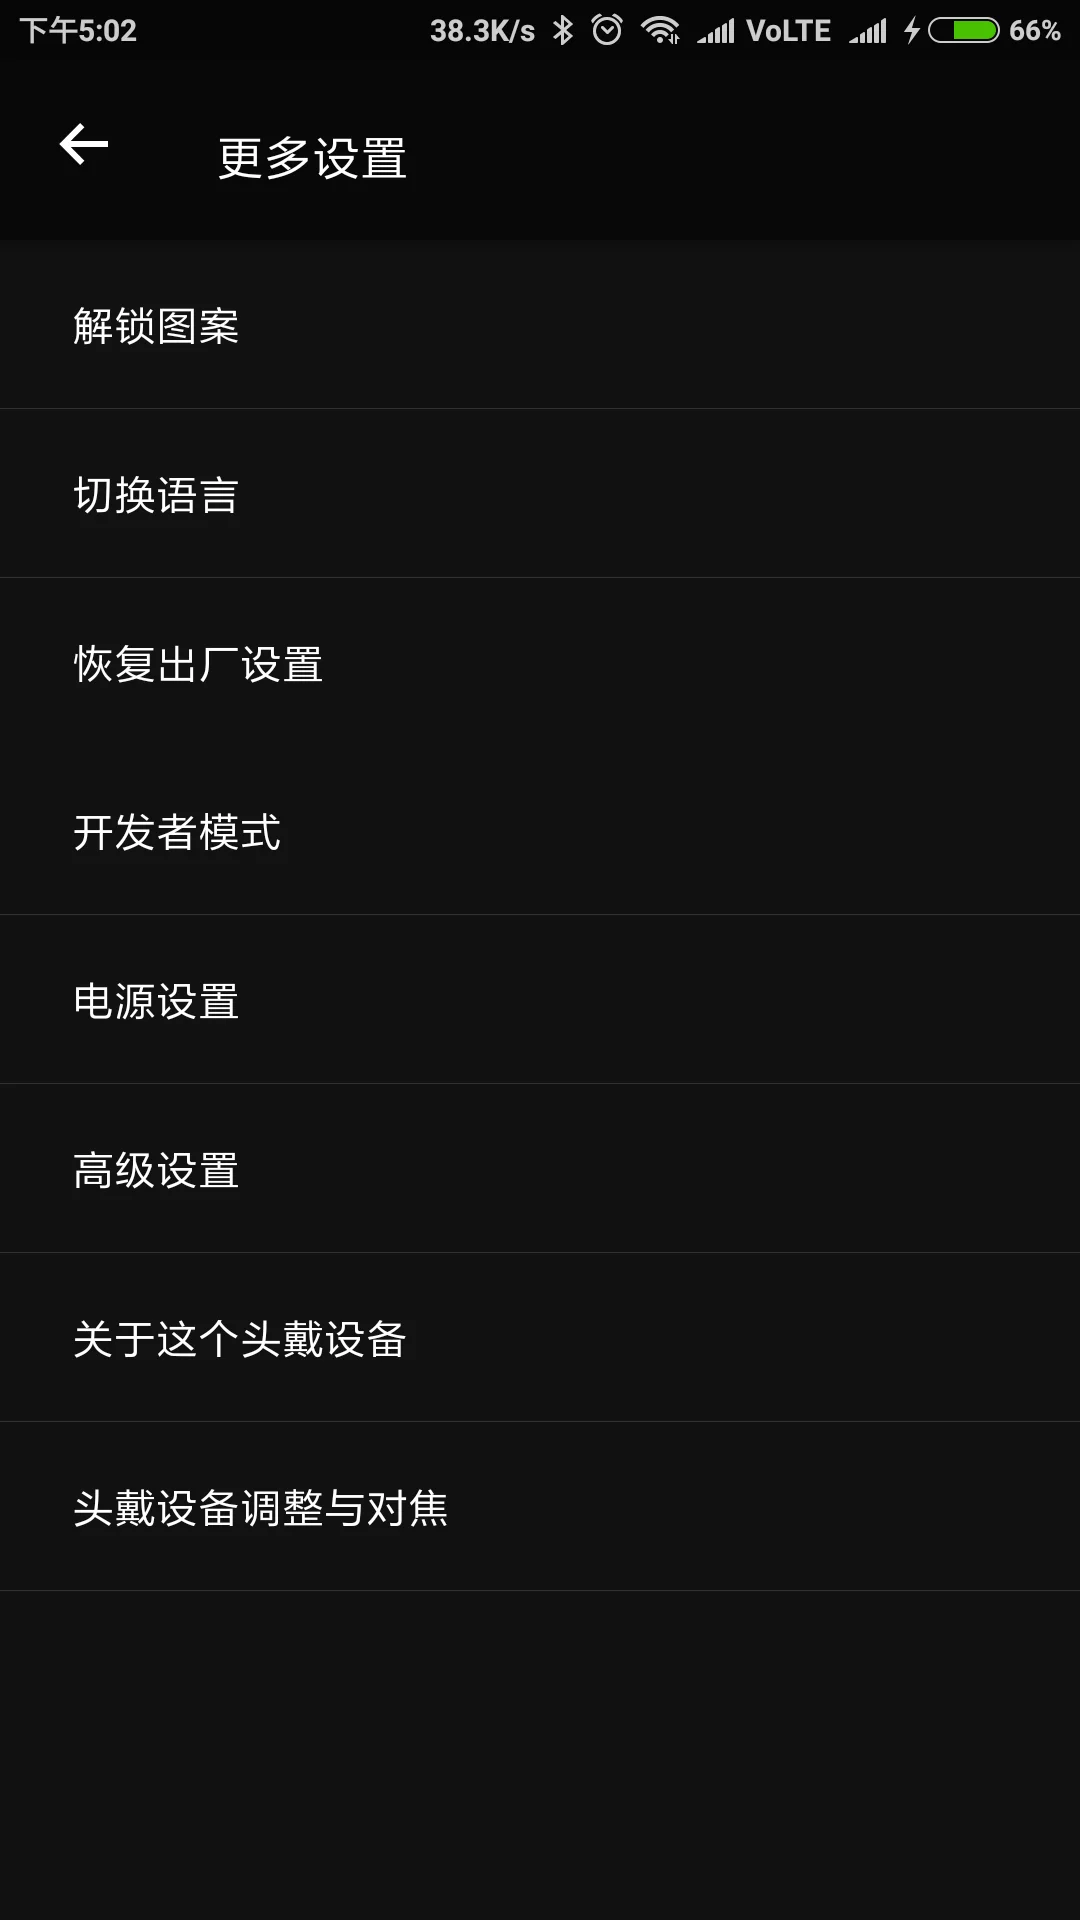
Once enabled, you will see Unknown Source under Library in Quest, meaning unknown source applications (all subsequently installed test apps will be categorized here).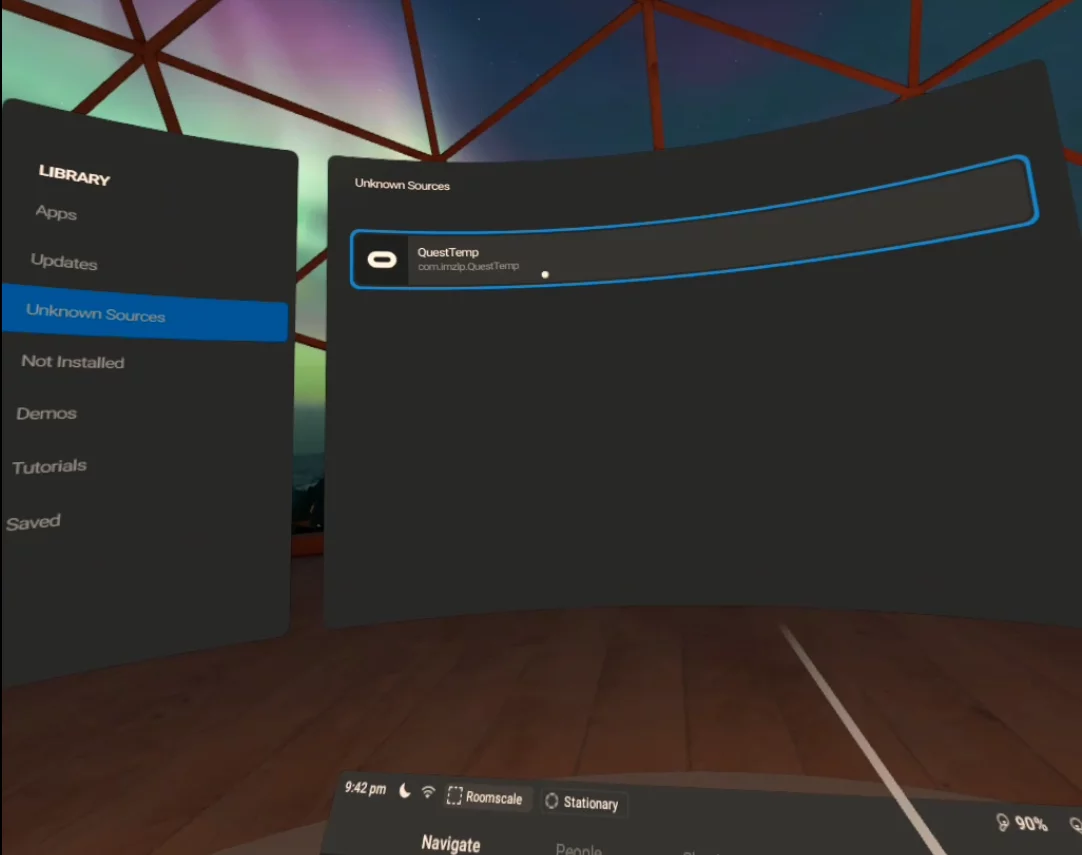
NVIDIA CodeWorks for Android
Since Quest essentially runs on the Android system, the packaged game is an apk for Android. To smoothly package the apk, you need to install the Android development environment.
We need to install android-sdk/jdk/android-ndk/gradle/apache-ant and several other environments. However, a good news is that NVIDIA has a tool called NVIDIA CodeWorks for Android which can greatly simplify the installation process of the Android development environment.
The installation packages for CodeWorks for Android can be found in the following directory of the UE engine:
1 | UE_4.23_Source\Engine\Extras\AndroidWorks\Win64 |
Additionally, you can download it from NVIDIA’s Download Center.
Start the installation, select the installation directory and download directory: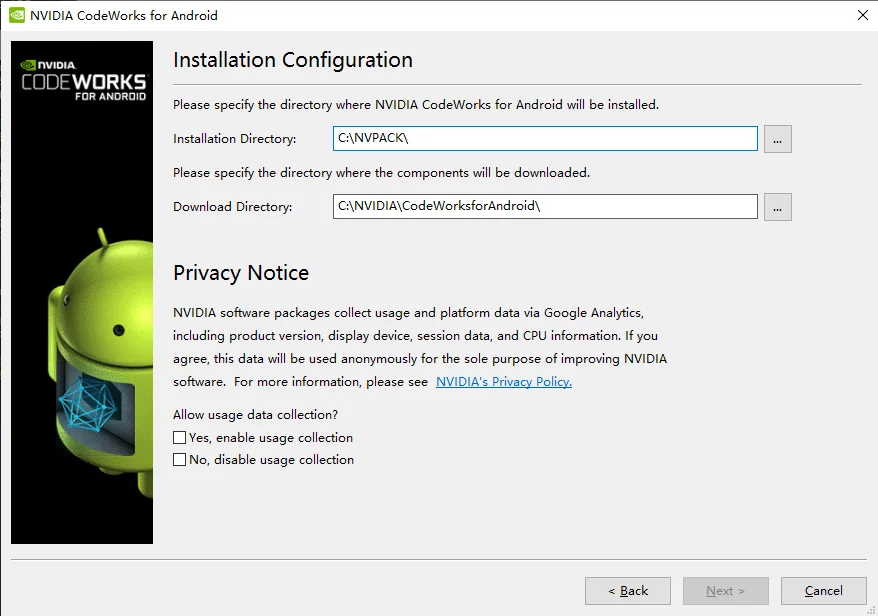
After installation is complete, open the installation path (default in C:\NVPACK\), and start Chooser.exe: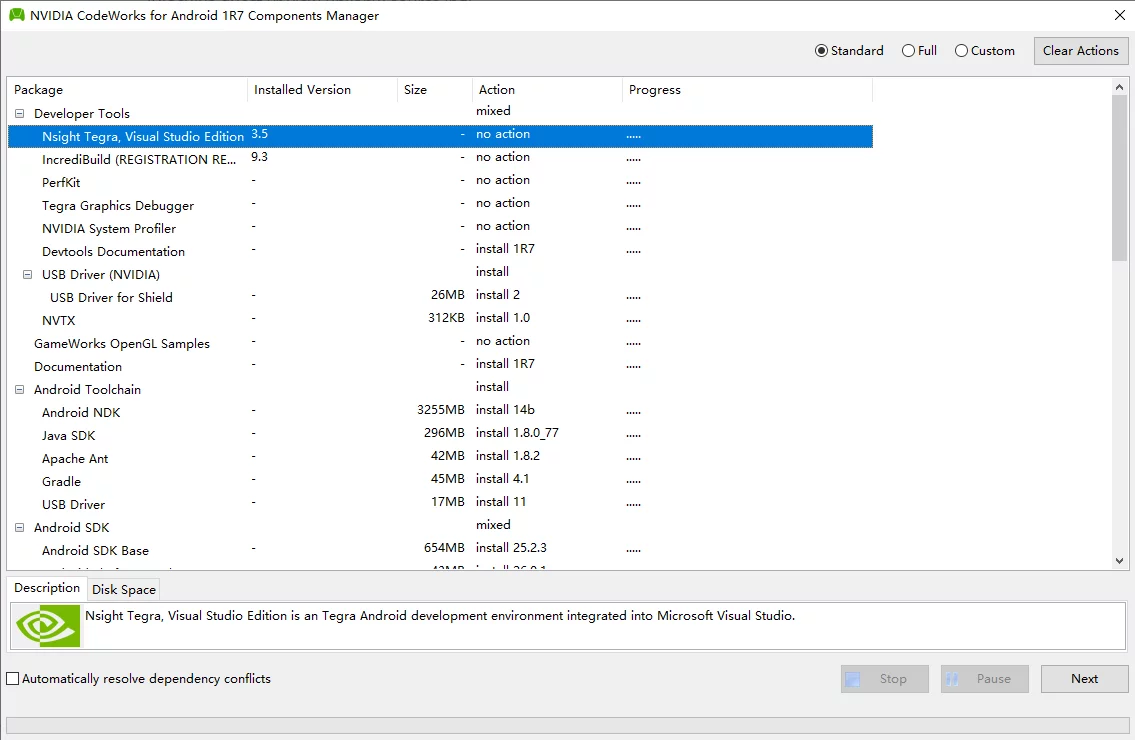
Select Standard and then click Next in the lower right corner to begin downloading and installing.
Given the poor network environment in China, some libraries may not be downloadable. I downloaded all the Standard components; the download link is: CodeWorks_1R7. After downloading, place it in the download directory selected during the CodeWorks installation, then restart Chooser.exe, click Next, and it will verify and install automatically.
If you do not wish to install CodeWorks, you can only download the Android environment: NVPACK_1R7u1_20190923, and then add the following environment variables to the system.
After installation, the system will automatically add the following environment variables:
| Environment var NAME | Value |
|---|---|
| ANDROID_HOME | C:\NVPACK\android-sdk-windows |
| ANDROID_NDK_ROOT | C:\NVPACK\android-ndk-r14b |
| ANT_HOME | C:\NVPACK\apache-ant-1.8.2 |
| GRADLE_HOME | C:\NVPACK\gradle-4.1 |
| JAVA_HOME | C:\NVPACK\jdk1.8.0_77 |
| NDK_ROOT | C:\NVPACK\android-ndk-r14b |
| NDKROOT | C:\NVPACK\android-ndk-r14b |
| NVPACK_NDK_TOOL_VERSION | 4.9 |
| NVPACK_NDK_VERSION | android-ndk-r14b |
| NVPACK_ROOT | D:\NVPACK |
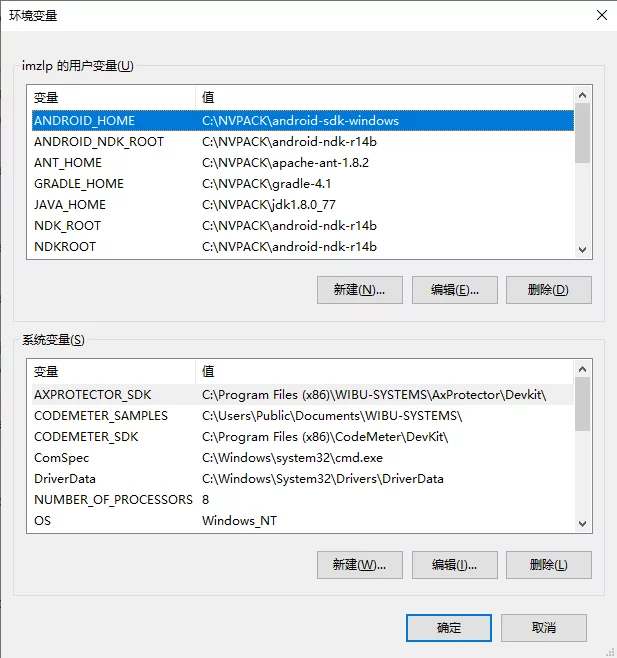
These environment variables are used in UE project settings under Project Setting - Android SDK.
Note: It’s best to ensure that there are no special characters in the path of environment variables, pure numbers + letters are optimal.
Create Quest Project with UE4
First, launch Unreal Engine. I am using version UE_4.21.2 installed from EpicLauncher.
To facilitate testing, I created a VR Template project, ensuring that Target is set to Mobile: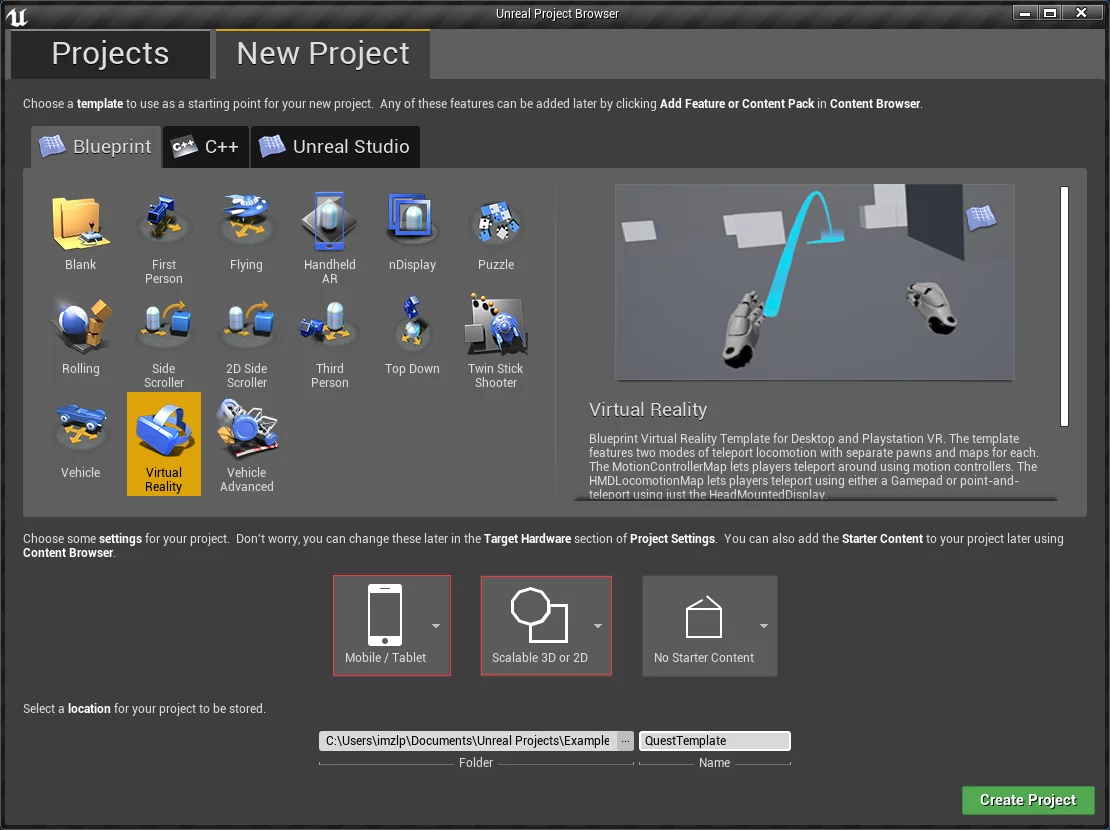
After creating and launching the UE Editor, first check if the
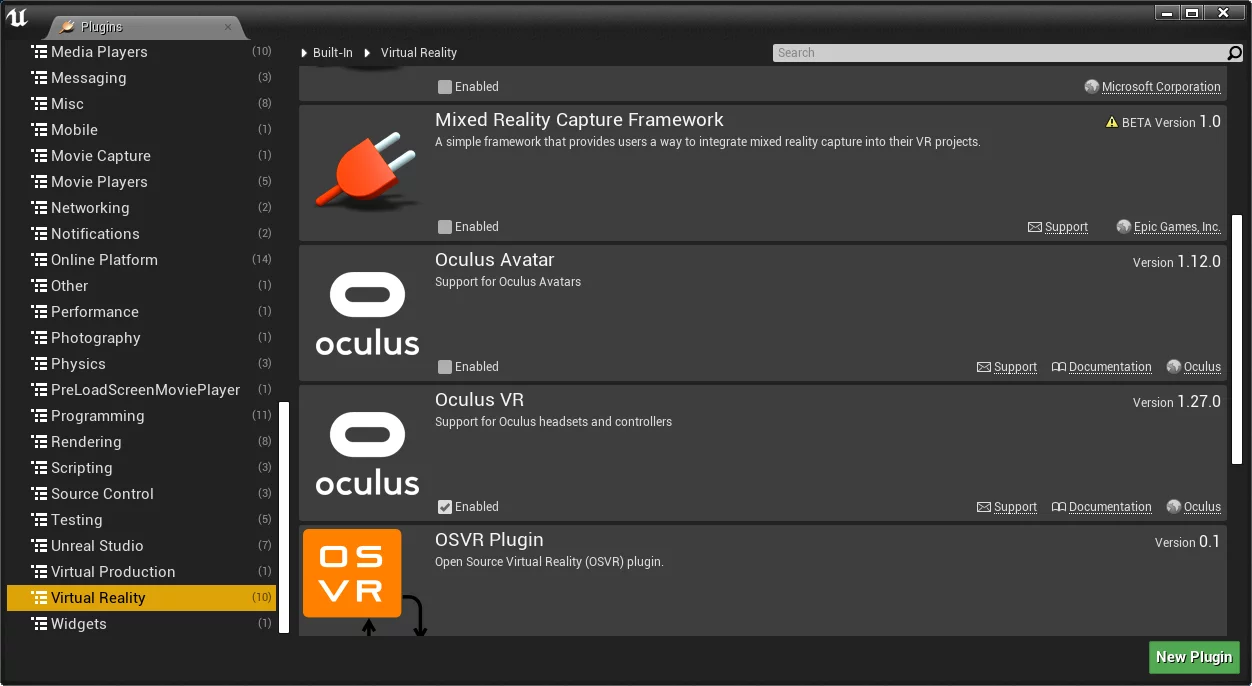
Oculus VRplugin is enabled.![]()
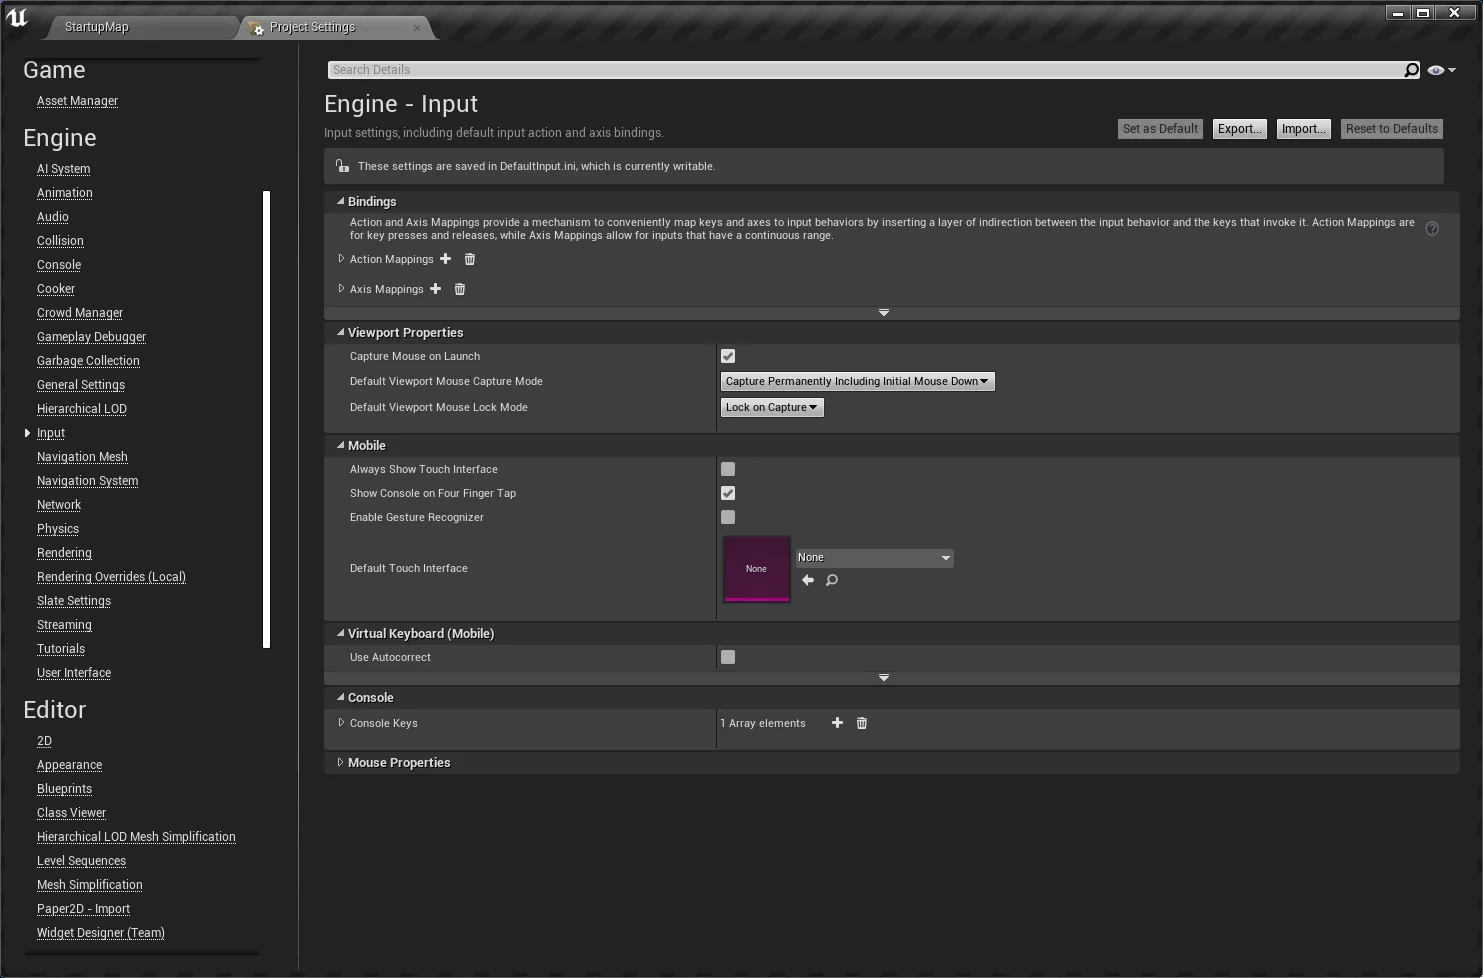
Open
Project Setting-Engine-Inputto confirm thatMobile-Default Touch Interfaceis set tonone:![]()
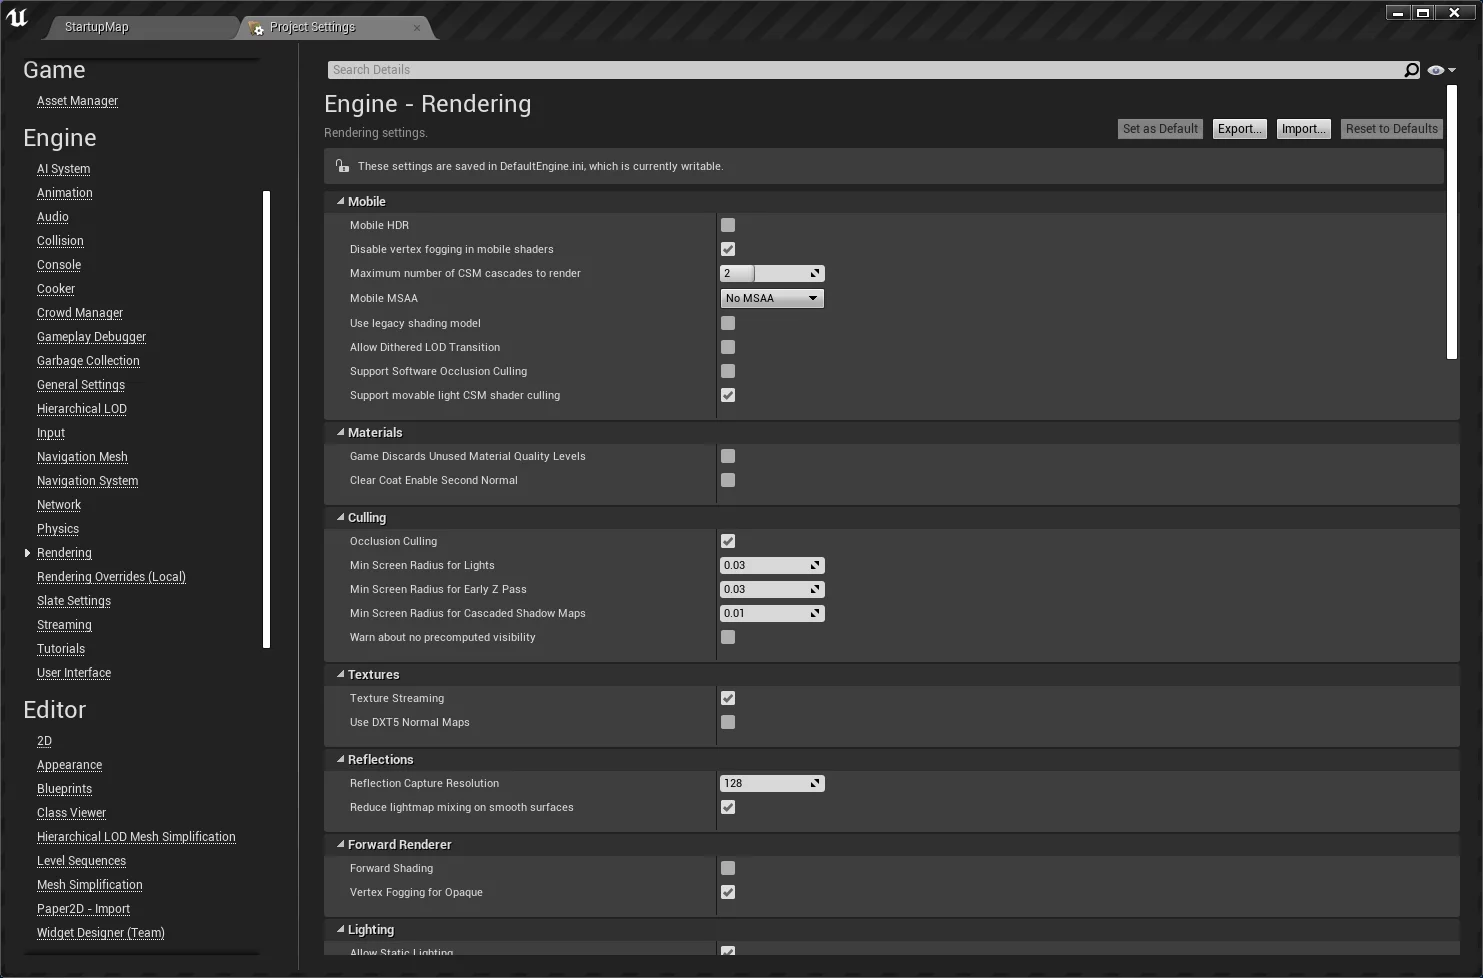
Open
Project Setting-Engine-Renderingto confirm thatMobile HDRis turned off:![]()
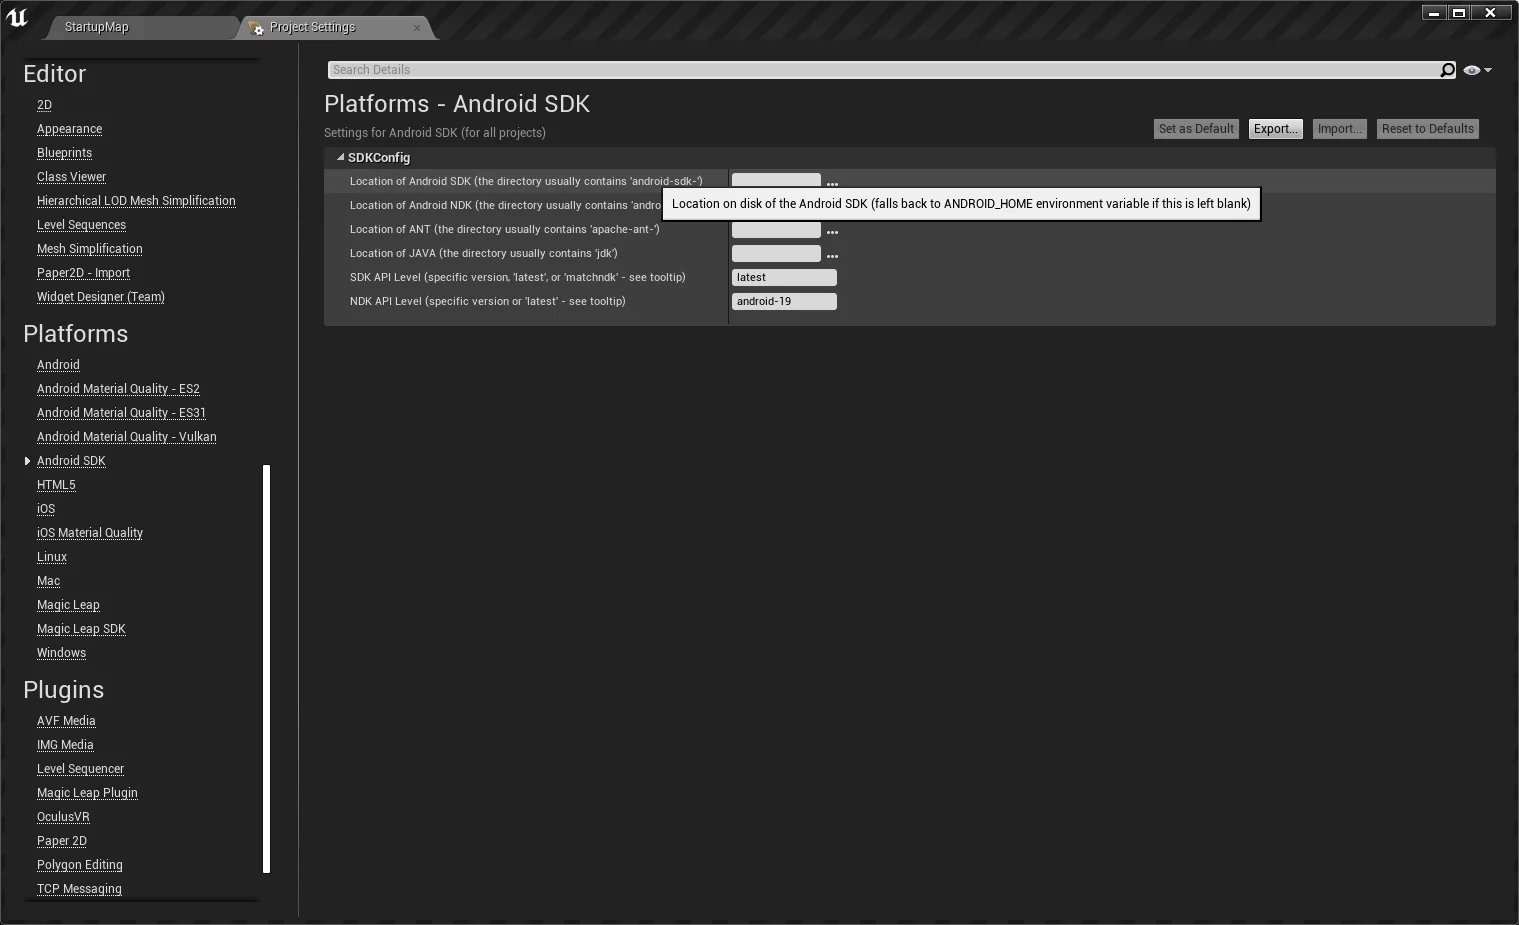
Open
Project Setting-Platform-Android SDK![]()
This is mainly to set the paths for the Android development environment, such as SDK/NDK/JDK. Refer to the prompt in the image; if not specified, it will search for environment variables with the specified NAME in the system. Since CodeWorks has already added these for us, this can be ignored. If you installed the environment yourself, you need to specify it here or add it directly to the system environment variables.Open
Project Setting-Platform-Android![]()
ExecuteConfigure NowandAccept SDK Licenserespectively.Note: If you do not execute
Accept SDK License, you will encounter aLicense not acceptederror during launch.
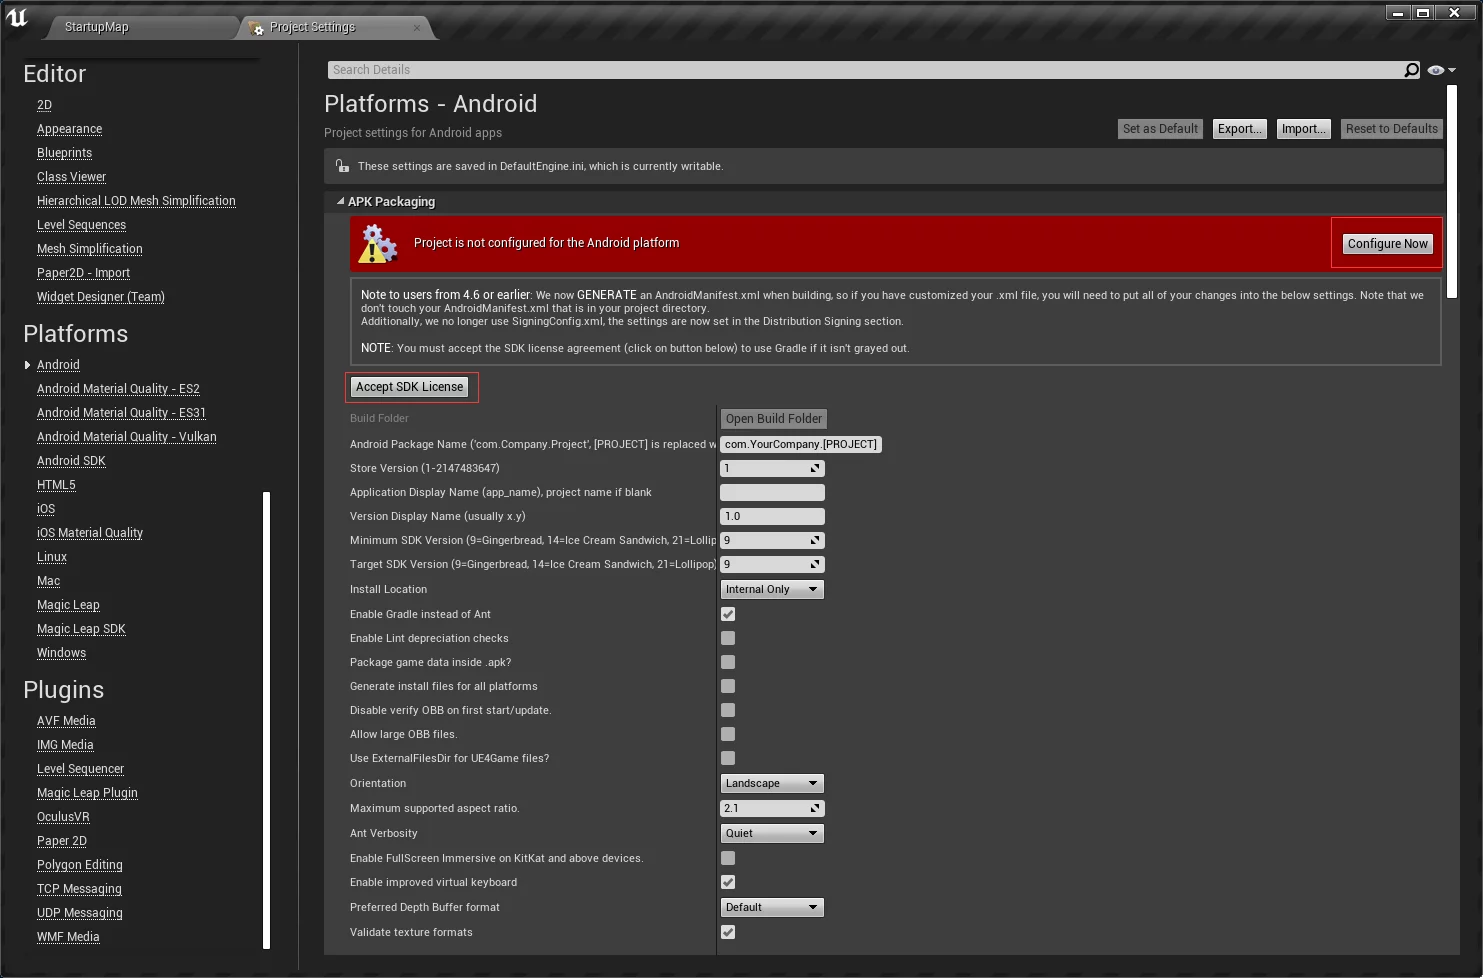
1 | License not accepted. SDK License must be accepted in the Android project settings to deploy your app to the device. |
Set Minimum SDK Version to 25, and Target SDK Version to 26.
Also, enable Enable FullScreen Immersive on KitKat and above device.
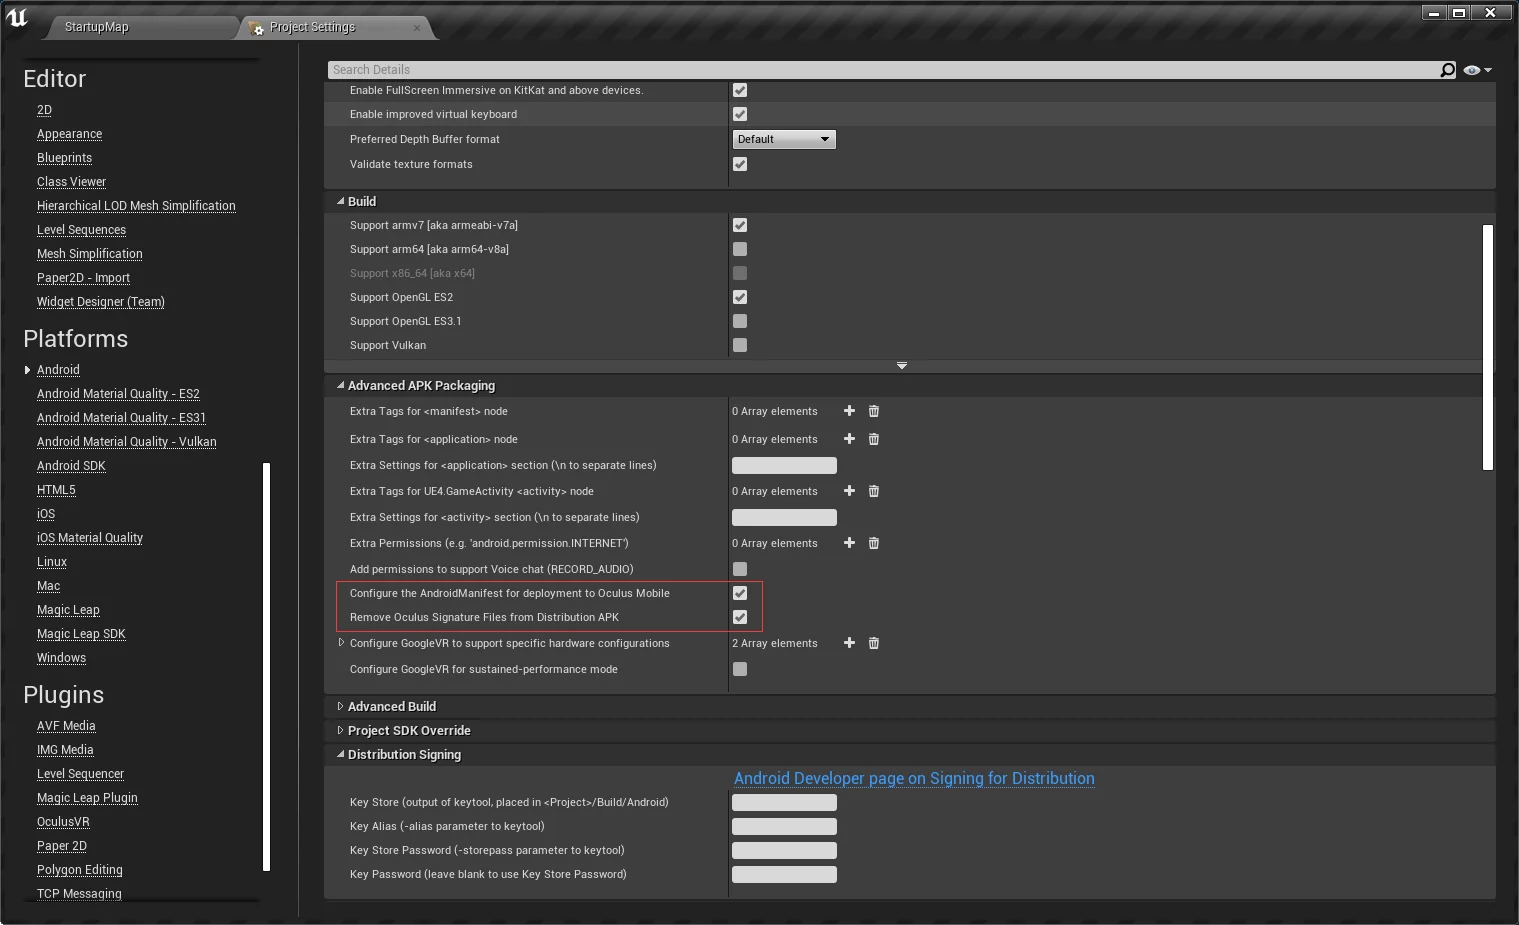
Then scroll down to find Advanced APK Packing and enable the following two items:
Configure the AndroidManifest for deployment to Oculus MobileRemove Oculus Signature File From Distribution APK
- Open
Project Setting-Project-Supported Platforms, enableAndroid; - Change the
Editor Startup MapandGame Default Mapof the VR template project toMotionControllerMap; - Connect the Quest to the PC using a Type-C USB cable;
- Close the Editor and restart the project;
After restarting the project, you will find Quest under Launch in the editor toolbar:
Launch it to begin compiling and testing the current project on Quest (it will be automatically installed on Quest under Unknown Source).
If you encounter the :app:assembleDebug error during launch or packaging, simply turn off Enable Gradle instead of Ant under Project Setting - Platform - Android; if you need to use Gradle, check whether the path set in the JAVA_HOME environment variable contains any special characters, preferably only numbers + letters.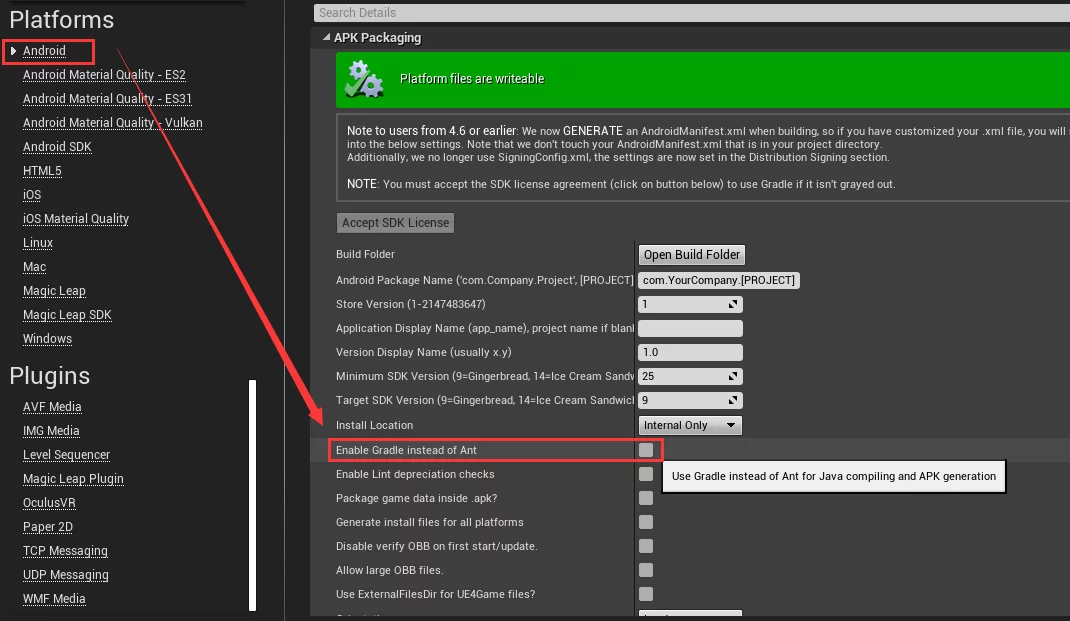
If you want to use Vulkan, you will need to upgrade to UE 4.22.2 or higher.
Solve Quest Only Tracking One Controller
After the first startup test showed that only one controller could be controlled in the game at the same time, and both controllers could not be used simultaneously. Initially thought it was a bug; however, after researching, it was found that this was because the packaging did not forcibly require 6DoF. For details, refer to the documentation: Enabling 6DoF head tracking. By default, the project does not specify 3DoF or 6DoF and defaults to 3DoF, which is why only one controller can be tracked.
The solution is to add the following in Intermediate/Android/APK/AndroidManifest.xml:
1 | <uses-feature |
However, since AndroidManifest.xml is generated, directly modifying the file will be overwritten. Therefore, it should be added to project settings:
According to the introduction, one can also edit in Build/Android/ManifestRequirementsOverride.txt (create it manually if it does not exist), it will replace the generated AndroidManifest.xml Requirements section. Therefore, you need to copy the section from the already generated AndroidManifest.xml and add the forced 6DoF user-feature to save it in Build/Android/ManifestRequirementsOverride.txt:
1 | <!-- Requirements --> |
Run or package again.
Package and Install
When packaging Android programs in UE, several different selectable Texture formats are available to target different hardware using different formats for compressed textures: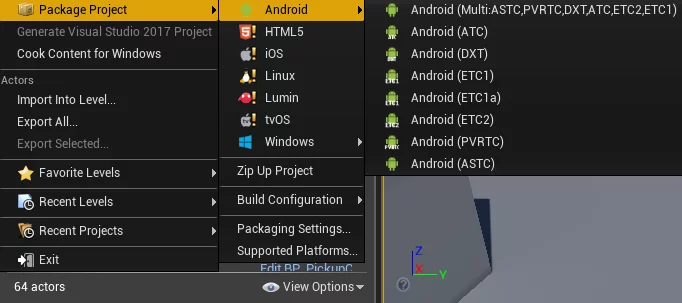
Not all Android devices are made the same. In particular, there are 4 different kinds of rendering hardware. They each support different formats of compressed textures.
| Format | Description |
|---|---|
| ETC1 | Supported by all Android based devices but cannot compress alpha textures (they are stored uncompressed). Recommend using an RGB and a separate alpha texture if need alpha to get better compression. |
| ETC2 | Supported by all OpenGL 3.x class devices and supports alpha compression. |
| ATC | Supported by Qualcomm Adreno GPUs and supports alpha compression. |
| DXT | Supported by Nvidia Tegra GPUs and supports alpha compression. |
| PVRTC | supported by PowerVR GPUs and supports alpha compression. |
| ASTC | Latest Texture compression format allowing more quality control by specifying block size and supports alpha compression. Available on some devices at this point and will be required for Vulkan Level 1. |
For detailed documentation on UE: Android Development Reference
Since Quest uses the Qualcomm Snapdragon 835, you can select ATC when packaging.
After packaging is completed, you will find the following files in the Binaries/Android directory:
1 | +---Binaries |
The apk and obb files are the packaged game program and data pack.
You can use adb commands to install the apk and copy the obb data package.
1 | adb install QuestTemp-armv7-es2.apk |
Then, copy the data pack to /sdcard/Android/obb/com.imzlp.QuestTemp/:
1 | adb push main.1.com.imzlp.QuestTemp.obb /sdcard/Android/obb/com.imzlp.QuestTemp/main.1.com.imzlp.QuestTemp.obb |
You can also directly execute
Install_QuestTemp-armv7-es2.bat, which contains these few commands.
VR Template Video
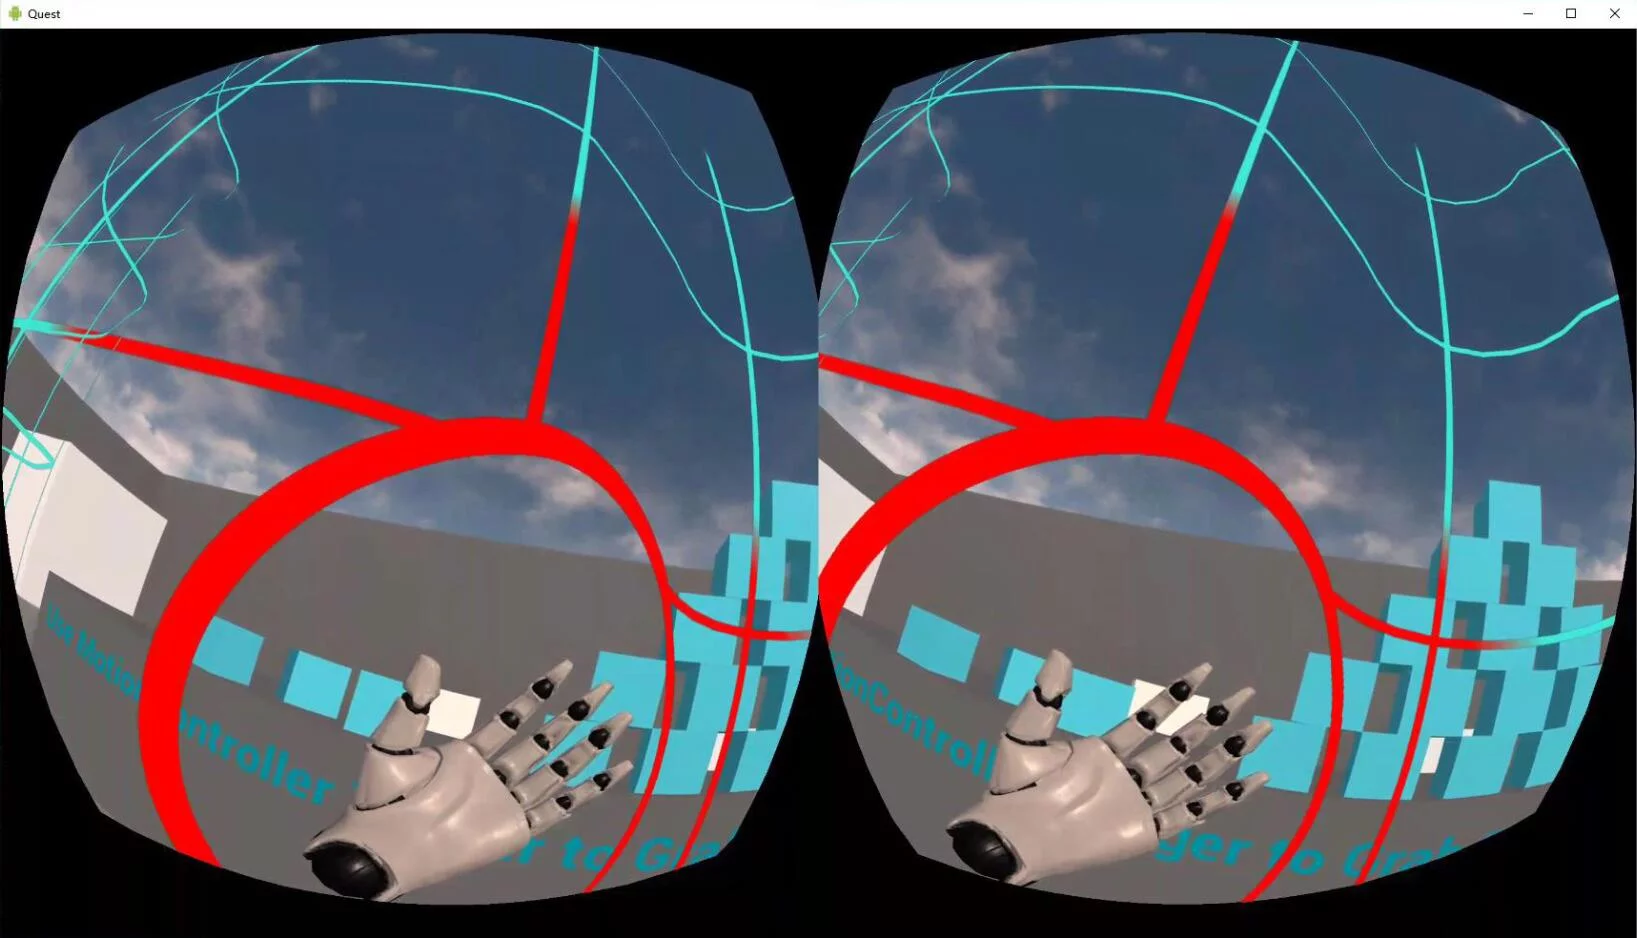
I recorded a simple video of this VR Template running on Quest: Oculus Quest Template, showcasing quite stable positioning.
PC View
Unlike PC VR, where the VR view can be displayed directly on the PC monitor during testing, to view Quest’s perspective on the PC in real-time aside from screen mirroring, the open-source tool scrcpy can be used. It is specifically designed for displaying and controlling Android devices. I often use it to control my phone; it requires a data cable to connect the device and uses adb to connect. scrcpy shows the dual-eye view when used with Quest: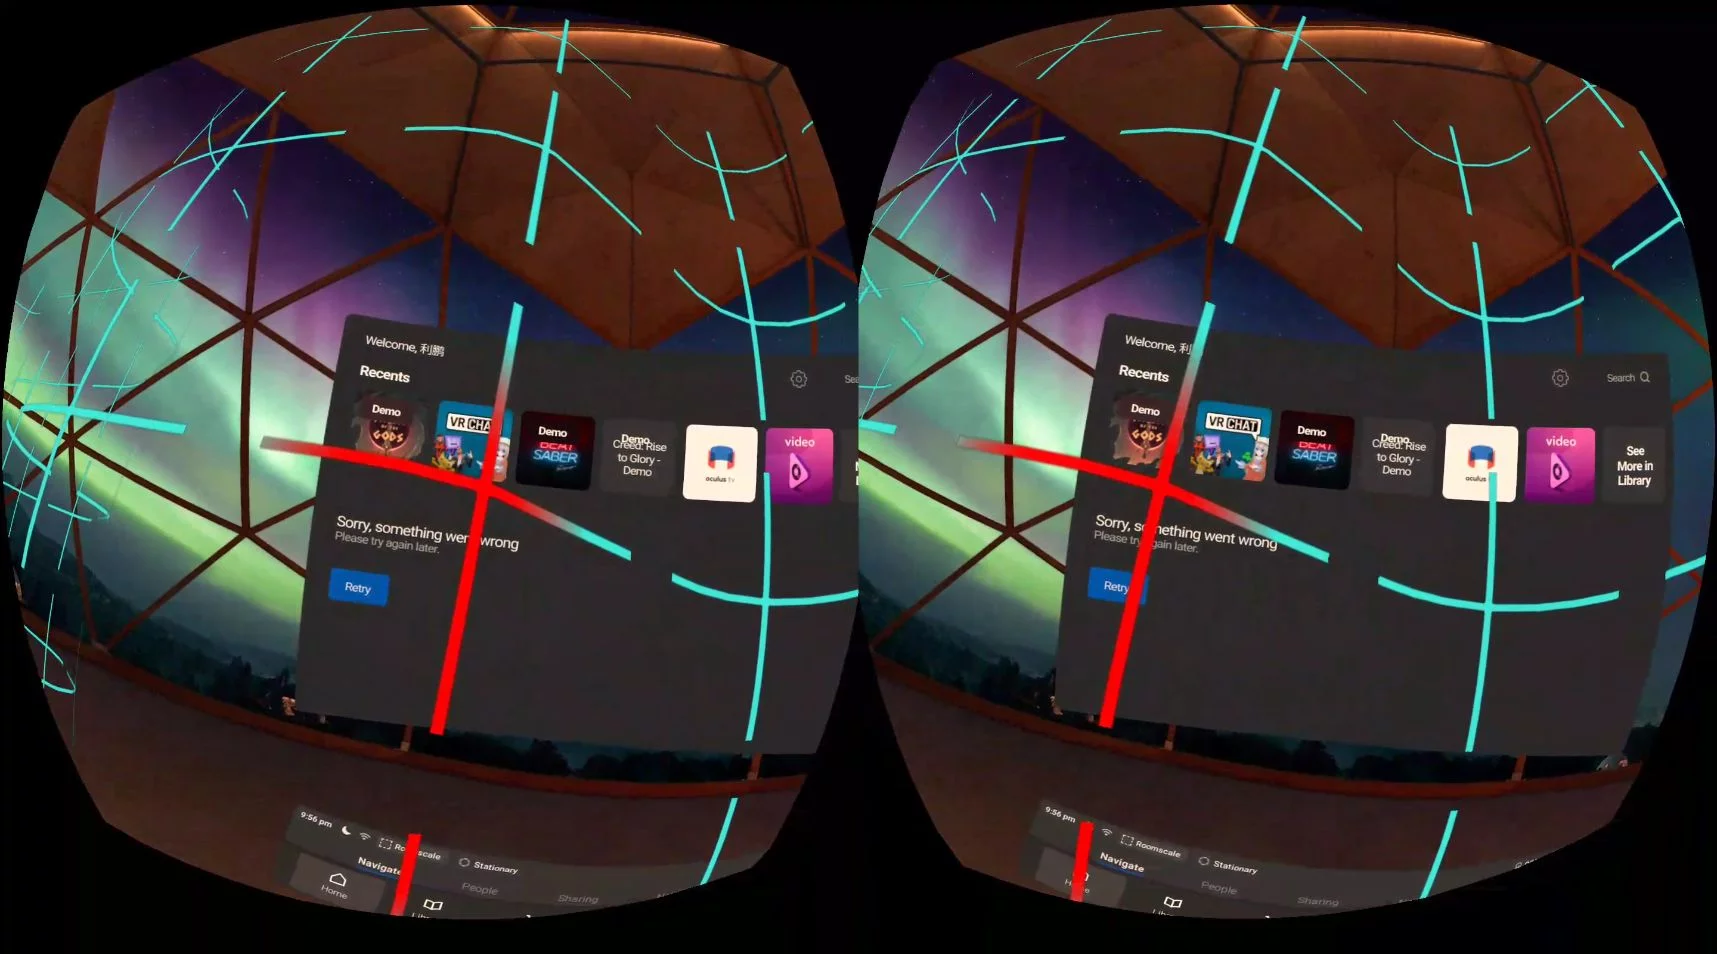
Debug and Performance
How can we check the parameters of the programs running on Quest, such as frame rate and system load?
You can use Android’s debugging tools adb and logcat commands to check: Android Debugging, as well as the parameters supported by logcat: Logcat Command Line Tool.
First, connect the Quest to the PC using USB, start the game, then enter the following command in the cmd window:
1 | adb logcat -s VrApi |
You will see a lot of outputs:
1 | C:\Users\visionsmile>adb logcat -s VrApi |
You can see the outputs from VrApi:
1 | FPS=72,Prd=45ms,Tear=0,Early=69,Stale=0,VSnc=1,Lat=1,Fov=0,CPU4/GPU=2/3,1651/515MHz,OC=FF,TA=0/E0/E0,SP=N/F/F,Mem=1804MHz,Free=1593MB,PSM=0,PLS=0,Temp=28.0C/0.0C,TW=2.96ms,App=9.17ms,GD=0.65ms,CPU&GPU=9.24ms,LCnt=1,GPU%=0.77,CPU%=0.27(W0.33) |
These parameters represent various metrics when running the game on Quest.
The meanings of these parameters can be found in the Oculus Quest documentation:
Capture video for Quest
Oculus’s CTO is a legendary figure in the game development world—John Carmack, who recently (on 2019.10.18) mentioned a method for capturing full-frame video at 60/72 fps on Go/Quest:
twitter link: If you want to capture full 60/72 fps video on Go/Quest instead of half rate, you can ‘adb shell setprop debug.oculus.fullRateCapture 1’.
Use the adb command:
1 | $ adb shell setprop debug.oculus.fullRateCapture 1 |
Documents and Tutorial
Development documentation for Oculus Quest:
UE’s Android development documentation:
Video tutorials:
- Using UE4 to Develop for Oculus Rift and Oculus Quest | Unreal Fest Europe 2019 | Unreal Engine
- How to Build for Oculus Quest using Unreal Engine
- How to Fix Only One Controller Tracking on Oculus Quest (after the v7 update - using UE 4.22)
- Oculus Quest Performance Profiling and Performance Optimization
Assets Download
All resources mentioned in this article:
- CodeWorks_1R7
- NVPACK_1R7u1_20190923
- SideQuest
- scrcpy
- Oculus Quest VR Template Project: QuestTemp
- Packaged QuestTemp: QuestTemp-armv7-es2.7z
Other
Not-PC based VR: