In the past few days, I helped a colleague set up a VPS for proxy use and organized some related materials along the way. This article is not aimed at beginners. Before reading the following content, you should first have a VPS that can access the external network (foreign network), and secondly, you should have some basic knowledge of Linux operations.
I previously wrote a blog post about using Shadowsocks on Linux. If you’re interested, you can check it out here: Using Shadowsocks on Linux
Installing Shadowsocks-Python
Installation Method:
1 | $ wget --no-check-certificate https://raw.githubusercontent.com/teddysun/shadowsocks_install/master/shadowsocks.sh |
Uninstallation Method:
Log in as the root user and run the following command:
1 | $ ./shadowsocks.sh uninstall |
Single User Configuration File Sample:
Configuration file path: /etc/shadowsocks.json
1 | { |
Multi-User Multi-Port Configuration File Sample:
Configuration file path: /etc/shadowsocks.json
1 | { |
Usage Commands:
1 | # Start |
Installing libsodium (CHACHA20 Encryption)
chacha20 depends on libsodium. Here’s how to compile and install libsodium:
First, install the dependency gcc and g++:
1 | $ sudo apt-get install gcc g++ |
Download the libsodium source code and compile:
1 | $ wget https://download.libsodium.org/libsodium/releases/LATEST.tar.gz |
After installation, manually edit Shadowsocks configuration file shadowsocks.json to change the method entry to chacha20 to enable it. The configuration file path from the one-click install SS script is /etc/shadowsocks.json.
Modify the result as follows (only change method):
1 | { |
Installing net-speeder
Installation Steps:
1: Download the source code and unzip
1 | $ wget https://github.com/snooda/net-speeder/archive/master.zip |
2: Prepare the compilation environment
debian/ubuntu:
1 | # Install libnet-dev: |
centos:
1 | # Download epel: https://fedoraproject.org/wiki/EPEL/zh-cn. For example, 64-bit CentOS6: |
Compile:
Compile using the Linux Cooked interface (venetX, OpenVZ):
1 | $ sh build.sh -DCOOKED |
Compile using a regular network card (Xen, KVM, physical machine):
1 | $ sh build.sh |
Usage (needs to be started with root permissions):
1 | $ nohup net_speeder venet0 "ip" >/dev/null 2>&1 & |
Using finalspeed for acceleration
2017.07.20 19:54 Note: I have discontinued the use of finalspeed and recommend using锐速 or bbr.
One-click installation code:
1 | $ wget -N --no-check-certificate https://raw.githubusercontent.com/91yun/finalspeed/master/install_fs.sh && bash install_fs.sh |
One-click uninstallation code:
1 | $ wget -N --no-check-certificate https://raw.githubusercontent.com/91yun/finalspeed/master/install_fs.sh && bash install_fs.sh uninstall |
finalspeed operational commands
1 | # Start |
finalspeed installation path
Installation path: /fs/
Log path: /fs/server.log
finalspeed usage method
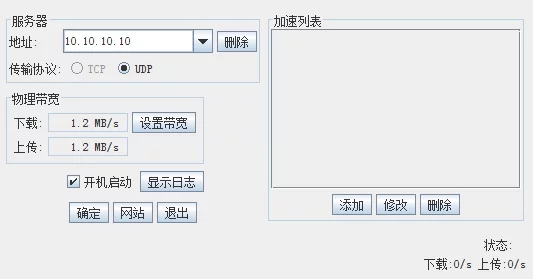
Assume the server IP is 10.10.10.10, finalspeed port is the default 150, and SS server port is 898. The prerequisite for acceleration is that the SS server is running properly, and the SS client can also log in normally.
1. Run the FinalSpeed client and enter your server IP
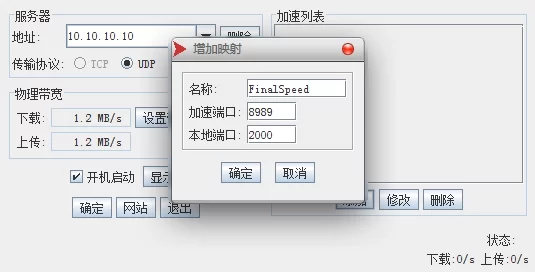
2. Click Add - Increase acceleration port, the acceleration port is the SS server port 8989. If it is another port, please modify accordingly. The local port can be arbitrary; here it is 2000.
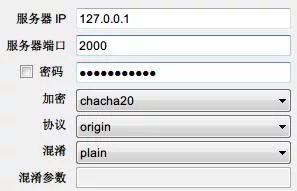
3. Open the SS client to add the server, server IP is 127.0.0.1, server port is the corresponding local port of the acceleration port, here it is 2000, then set your SS password and encryption method.
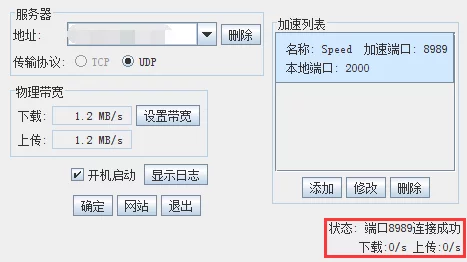
5. Confirm and save, choose to use the just added server, and set the browser proxy. After successfully connecting, the FinalSpeed status bar will display the prompt “Connected to server successfully.”
Add to VPS startup
Finally, add these services we installed to VPS’s startup so that our SS service will start even after the VPS restarts.
Add the following lines of code to /etc/rc.local:
1 | nohup /etc/init.d/shadowsocks start >/dev/null 2>&1 & |
Finally, enter the following commands to check the status of the programs:
1 | $ /etc/init.d/shadowsocks status |
As shown below, running this way is OK.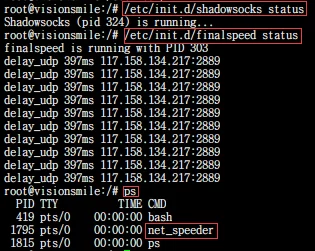
References
The addresses of the tools mentioned in the article:
Reference articles:
One-click installation script for Shadowsocks Python version
One-click installation script for shadowsocks-libev on Debian
ShadowsocksR Server Installation Tutorial
One-click installation package for finalspeed
Dual-speed FinalSpeed client download and tutorial, a boon for Openvz
Building Shadowsocks on Bandwagonhost and optimizing speed
Optimizing single-thread download speed on high-latency unstable links with net-speeder