Some technical notes written in the daily cursive about UE4 and VR development, as well as some related materials. Previously scattered in imzlp.com/notes, they have been organized today, and future notes will be placed in this article.
Engine Documents
UE4 Online Documents
- Unreal Engine API Reference
- Coding Standard
- Unreal Architecture
- Gameplay Framework
- Compiling Game Projects
- Asynchronous Asset Loading
- Online Subsystem Overview
- Start Commands
- Command-Line Arguments
- UPARAM
- UPROPERTY
- UFUNCTION
UE GamePlay Framework Tutorial
- Unreal Engine Gameplay Framework Primer for C++
- Gameplay Classes
- Gameplay Programming
- Actor Lifecycle
- This post in Russian (Unofficial)
VR Devices
Height Issue When Adapting Different VR Devices in UE
When adapting UE for Oculus Rift and HTC Vive, be sure to change TrackingOrigin (EHMDTrackingOrigin::Type) to Floor, otherwise the default tracking origin will be at eye level, causing the headset position in the game scene to be incorrect.![]()
Another issue is that when using PlayerStart, PlayerStart has a height, so the height may be incorrect (depending on how your Pawn is written). A solution is to override AGameModeBase‘s SpawnDefaultPawnAtTransform to specify the height.
VR Headset Initialization When Starting the Game in UE
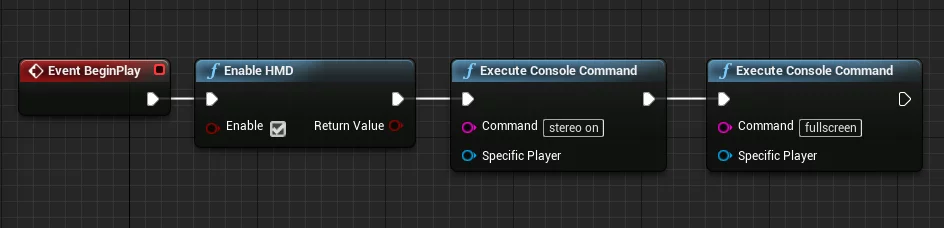
1 | Stereo On/Off |
Reset VR Headset Rotation and Position
As the default orientation of the VR headset along the X-axis is related to the room’s setup, when we initially deviate from the orientation during positioning, entering the game will lead to a dislocation from what we set for the player to see, necessitating correction.
You can use the following function:
1 | /** |
There is also a node of the same name in Blueprints.
Using Oculus Rift in UE
After installing the Oculus Rift device, you need to enable Unknown Source in the Oculus Store; otherwise, it cannot be previewed in UE.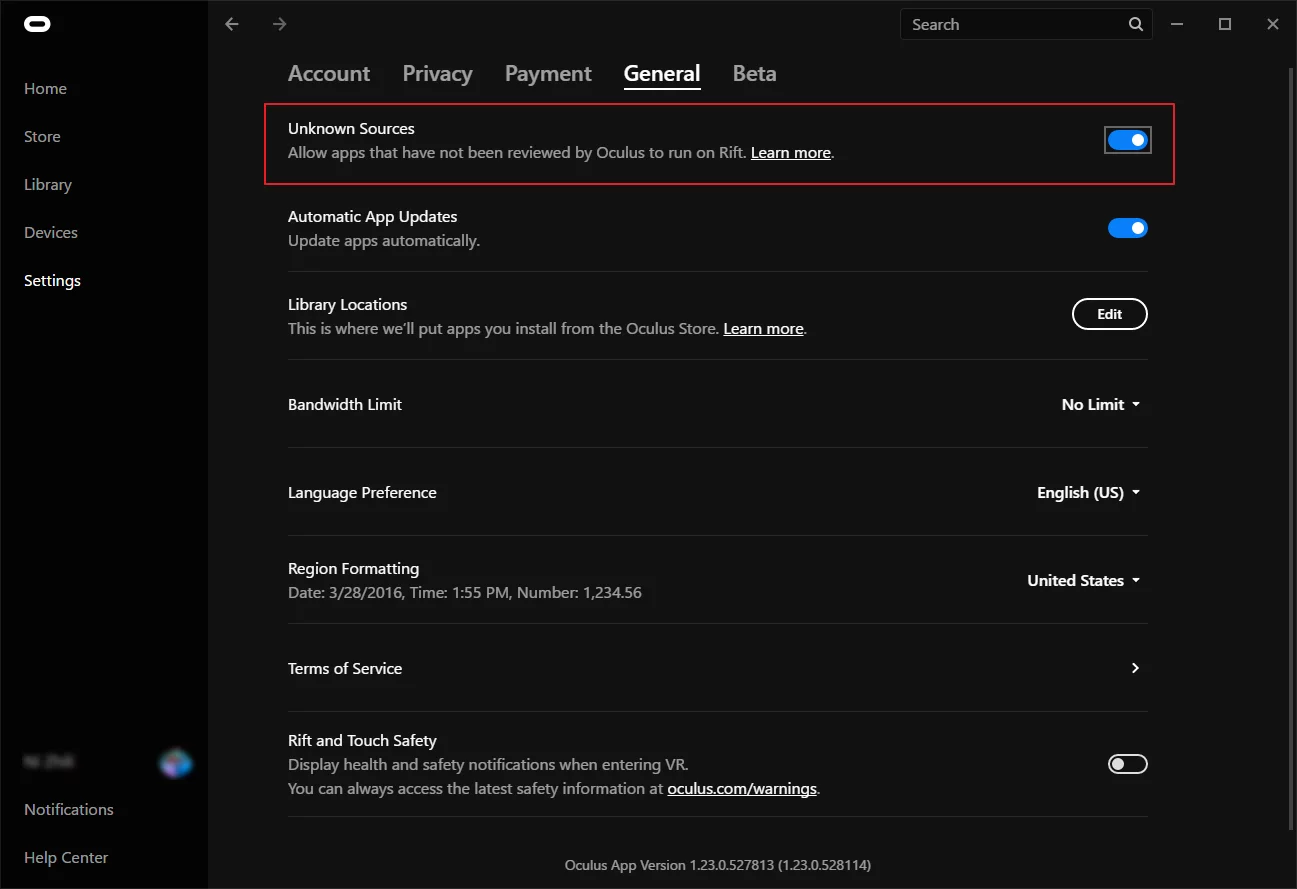
The documentation page adapted for Oculus Rift in Unreal is: Developing for Oculus Rift.
The official key operation introduction provided by Oculus: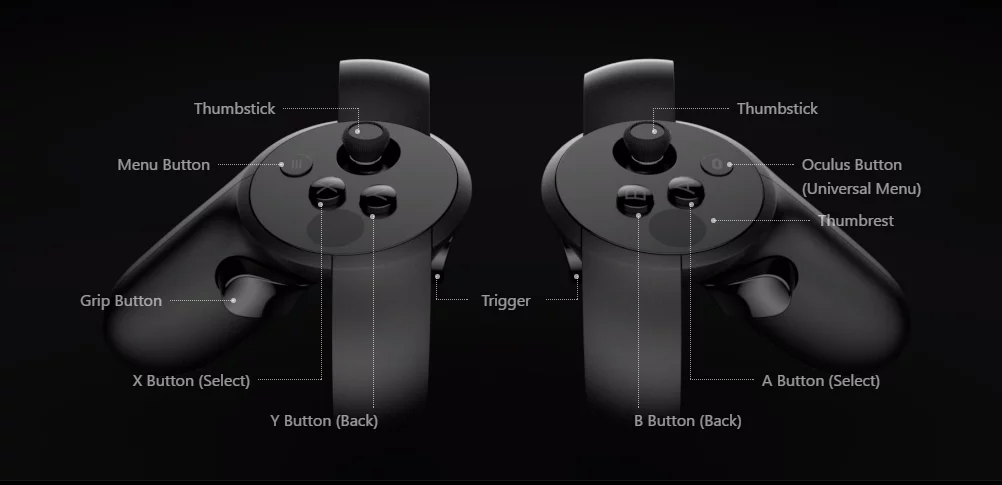
Additionally, key mapping for Oculus Rift in UE: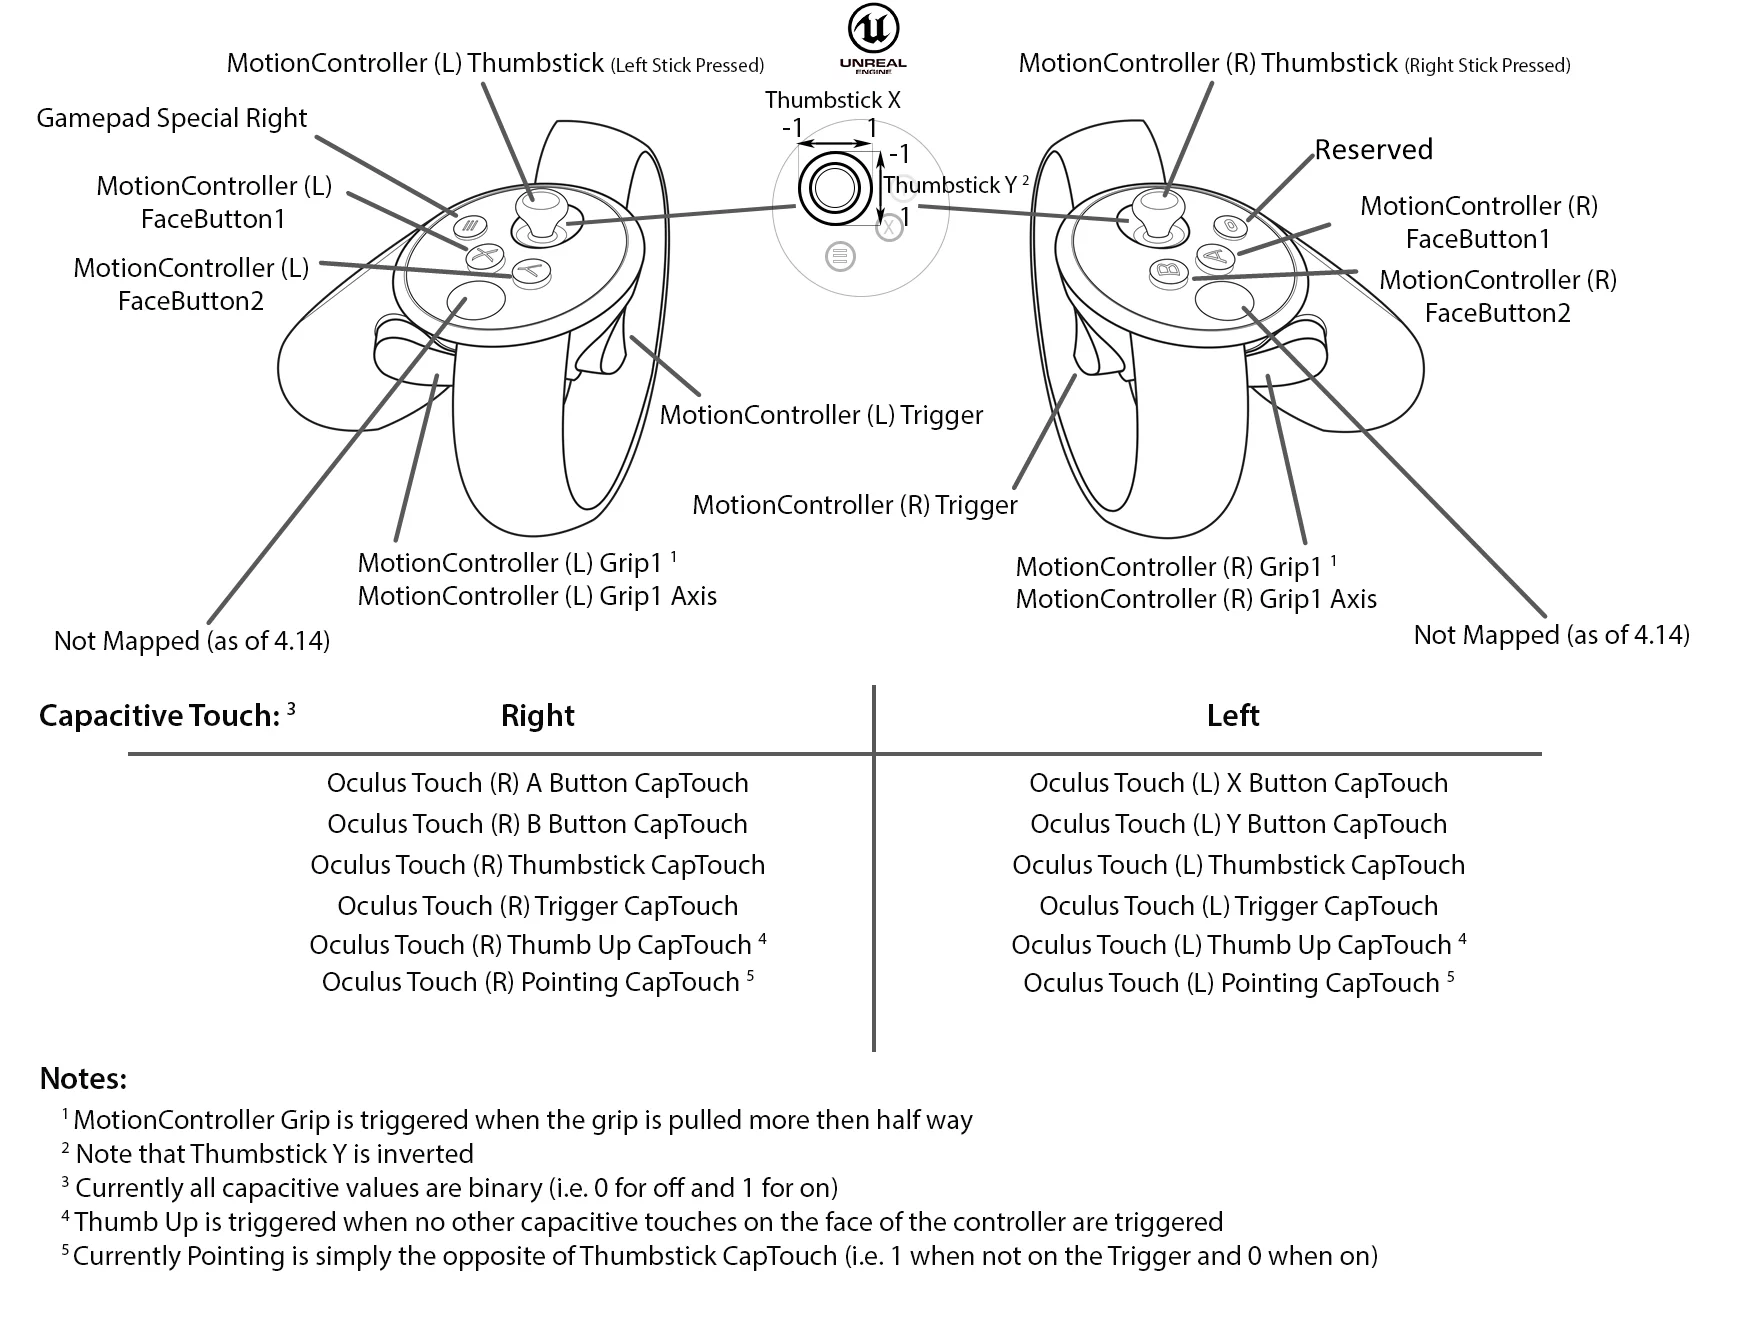
HTC Vive Key Mapping
In comparison to the above Oculus Rift, here is a key mapping for HTC Vive:
HTC VIVE Device Setup
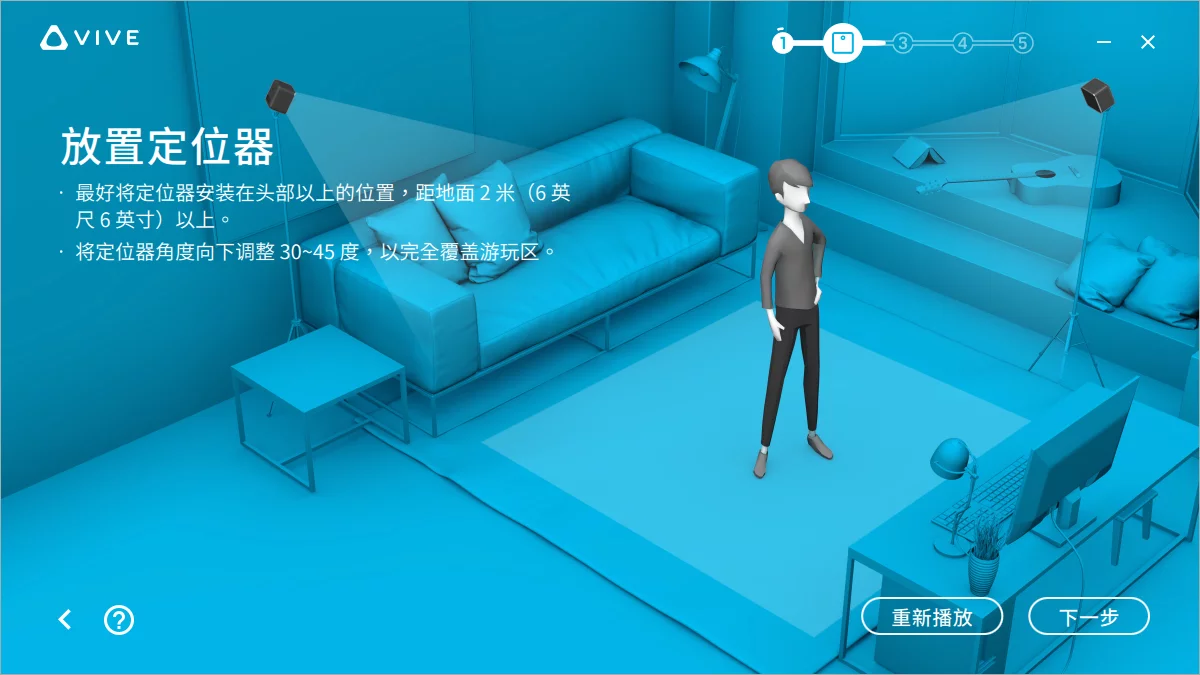
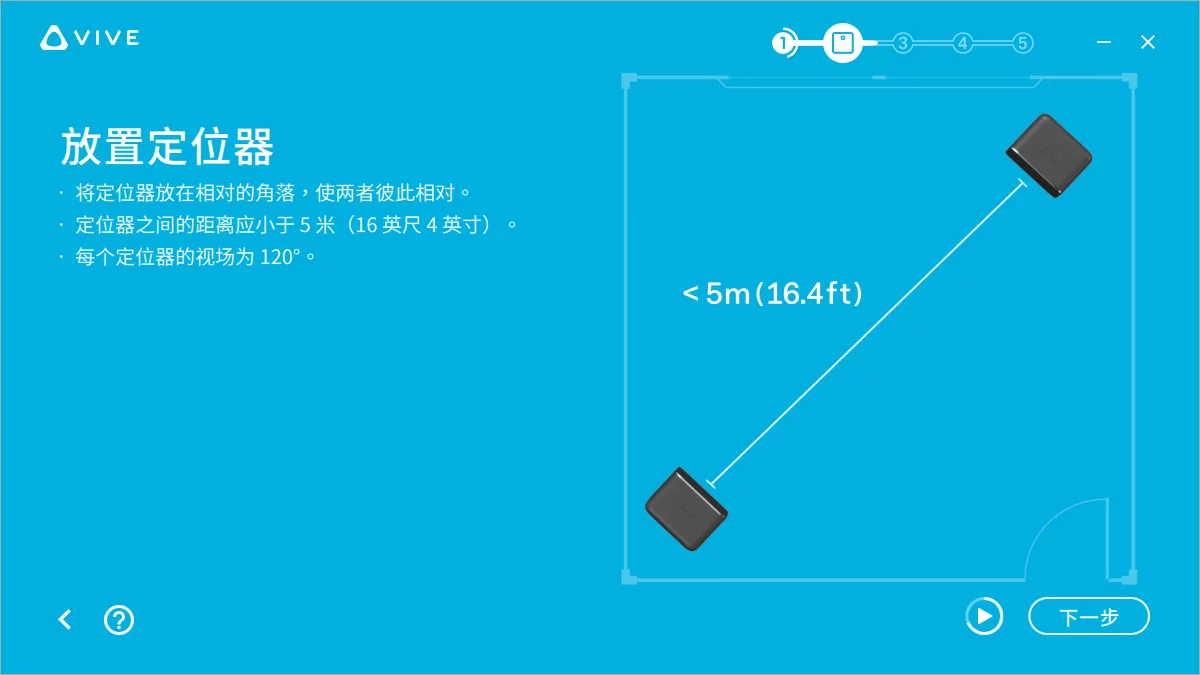

SteamVR 2.0 Base Stations
HTC Vive Pro supports SteamVR 2.0 base stations, with a tracking range of 150° and 7 meters, and supports base station daisy chaining (up to 16) to achieve large space tracking solutions.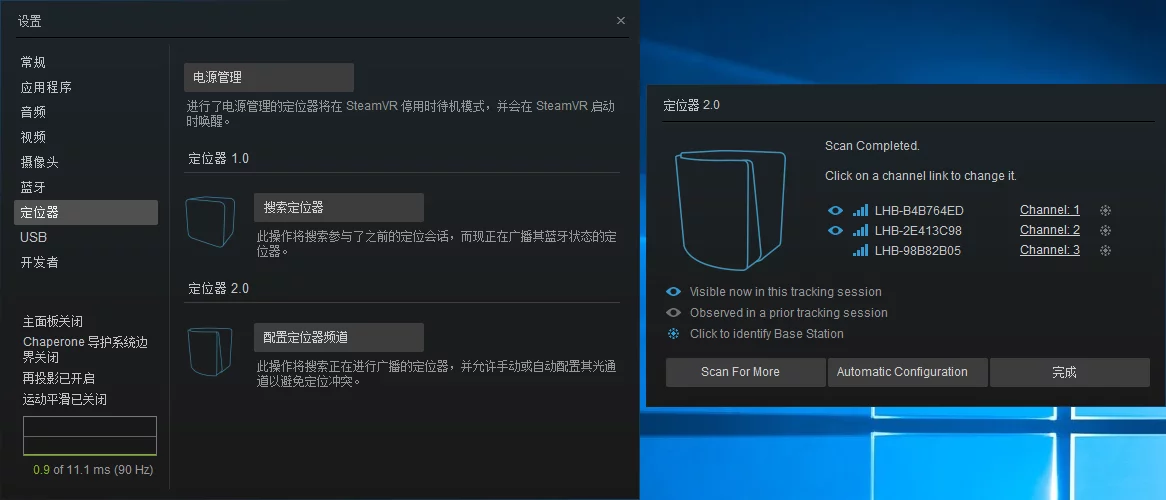
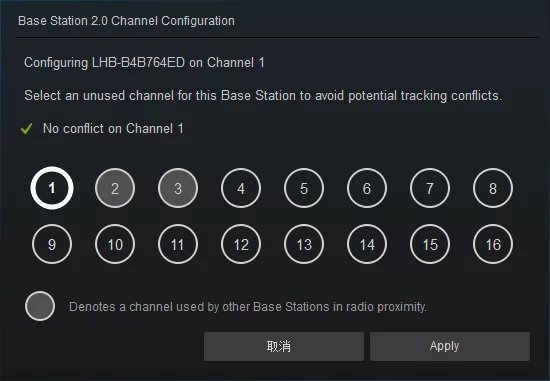
Note: The second-generation base stations do not support the first-generation HTC Vive headset.
Using Proxifier to Route Oculus through SS Proxy
Yesterday the company purchased an Oculus Rift device, and during the installation, a global proxy is needed. On Windows, I used Proxifier to route Oculus-related software through the proxy.
First, add the proxy in Proxifier: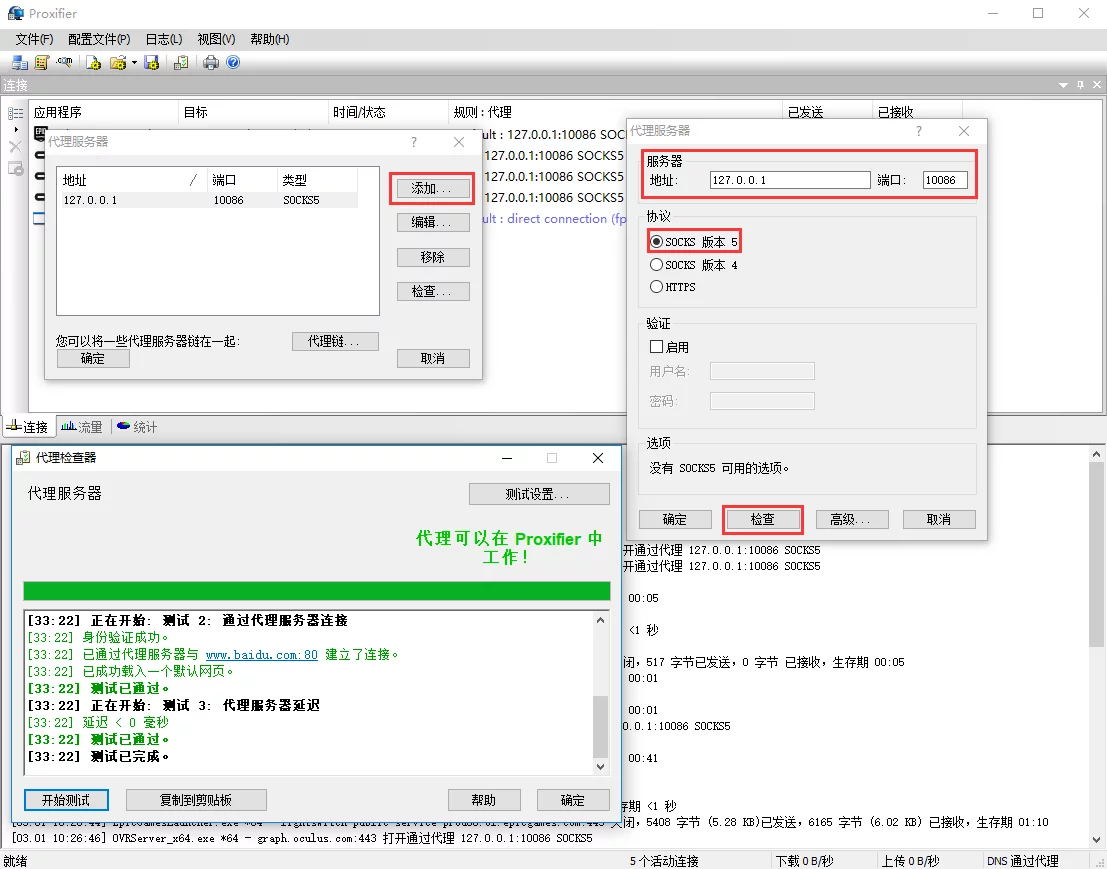
Once the connection test is successful, you can proceed with the following operations.
After a successful connection, you can add a proxy rule. The processes related to Oculus programs are as follows; what we need to do is route these processes through the SS proxy:
1 | OculusSetup.exe;OculusClient.exe;OVRServiceLauncher.exe;OVRServer_x64.exe;OculusVR.exe;OculusCompatCheck.exe;CompatToolCommandLine.exe;OculusLogGatherer.exe;OVRLibrarian.exe;oculus-driver.exe;OVRLibraryService.exe;oculus-overlays.exe;OVRRedistributableInstaller.exe; |
Fill in the above content in the Application text box, then select the local proxy port for SS routing.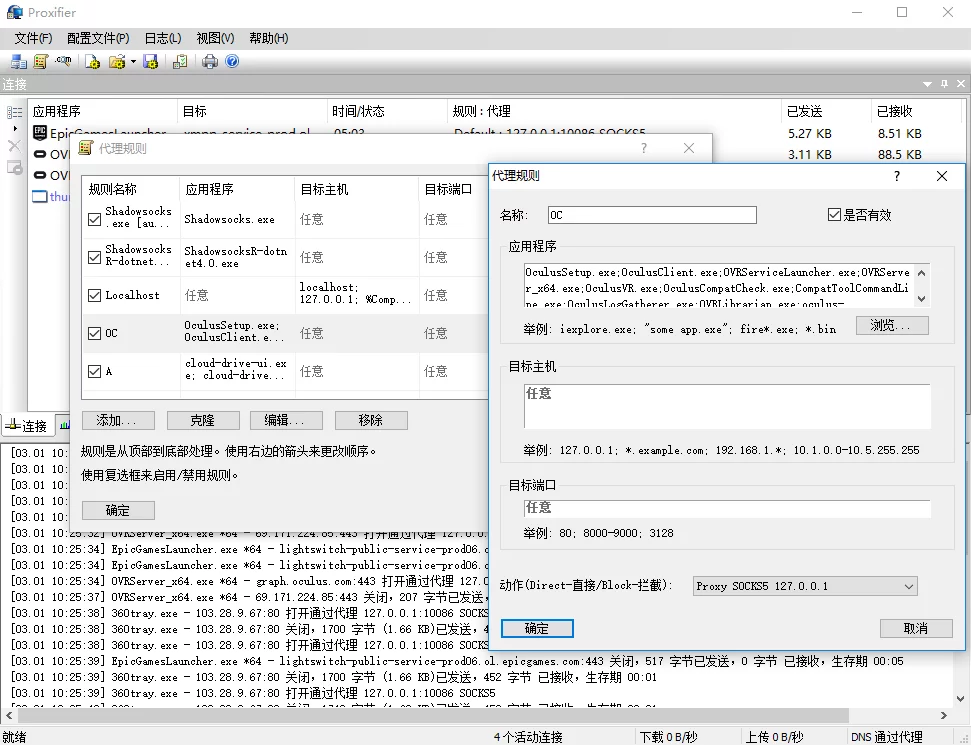
For other programs (such as foreign-made games, Steam, etc.), if you need to force them through the SS proxy, the same method applies.
VR Blurriness Issue
Because the default Screen Percentage value in UE projects is very low, it can appear very blurry. However, increasing it directly can result in a severe frame rate drop.
Typically, setting it to under 200 provides good image quality. Below are the recommended values from UE (ideal values). The art team then needs to optimize the scene based on this to ensure a frame rate close to full.
For versions prior to 4.19 (excluding 4.19), the recommended ideal value for VR HMD (r.ScreenPercentage) is:
| DeviceType | r.ScreenPercentage |
|---|---|
| Oculus Rift | 133 |
| HTC Vive | 140 |
| PSVR | 140 |
| GearVR | 120 |
| GoogleVR | 120 |
In versions after 4.19, UE introduced vr.PixelDensity; with r.ScreenPercentage set to 100, standardized values can be used across different platform devices:
| DeviceType | r.ScreenPercentage | vr.PixelDensity |
|---|---|---|
| Oculus Rift | 100 | 1 |
| HTC Vive | 100 | 1 |
| PSVR | 100 | 1 |
| GearVR | 100 | 1 |
| GoogleVR | 100 | 1 |
Lower values will perform faster but will be undersampled (more blurry) while values over 1 will perform slower and will supersample (extra sharp).
This way, you can control display quality by adjusting the standardized value of vr.PixelDensity.
For a detailed introduction, refer to the link: Significant Changes Coming To VR Resolution Settings in 4.19
Solution for HTC VIVE Tracker Fault (03)
If the tracker panel flashes red and SteamVR shows Tracker Fault (03), please try to manually flash the tracker (base station) firmware. The steps are as follows:
The firmware path is located under the Steam installation path: Steam\steamapps\common\SteamVR\tools\lighthouse\firmware\lighthouse_tx\archive\htc_2.0, locate the following two files:
1 | * lighthouse_tx_htc_2_0-calibration-rescue-244.bin |
- With the tracker (base station) powered off, connect it to the computer using a micro-B USB cable.
- Press and hold the mode button on the back of the tracker (base station) and insert the power cable.
- Once the computer confirms it as a USB mass storage device, you can release the mode button.
- The connected tracker (base station) storage device will be named “CRP_DISABLED”. Open it and delete the file “firmware.bin”.
- Copy the file “lighthouse_tx_htc_2_0-calibration-rescue-244.bin” to the base station’s storage.
- After copying, unplug the power cable.
- Wait a few seconds, and then plug the power back in. Do not press the mode button during this process. After a few seconds, the tracker (base station) should blink green or red quickly. A green light indicates successful recovery.
- If it flashes red, it indicates it cannot fix automatically, please send it for repairs.
- Unplug the power again.
- Repeat steps 1 to 7, but in step 5, change the copied file to “lighthouse_tx_htc_2_0-244-2016-03-12.bin”.
- Once complete, the tracker (base station) should return to normal; set its channel to “A” and track it individually (with the other base station powered off) to confirm functionality. Once confirmed to be working properly, turn on the other base station.
If there is a flashing green light and it cannot be used normally, repeat steps 1 to 7, but in the fifth step, clear all files in “CRP_DISABLED” and only copy “lighthouse_tx_htc_2_0-244-2016-03-12.bin”.
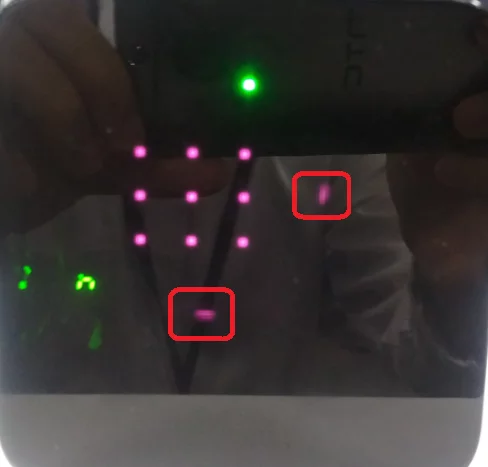
- If manually flashing the tracker (base station) firmware and calibration still doesn’t work, please take a photo to ensure whether the two laser dots are functioning normally (an iPhone/iPad cannot capture laser dots). If either of these two laser dots does not show, it indicates laser damage, please send it for customer service inspection.
Reference link: Tracker Fault (03)
Engine Analysis
Starting UE Game
The game’s initialization starts from UGameInstance::StartGameInstance.
Called through FEngineLoop::Init(), it polymorphically calls GEngine->Start(), which then invokes UGameEngine::Start()’s GameInstance->StartGameInstance();: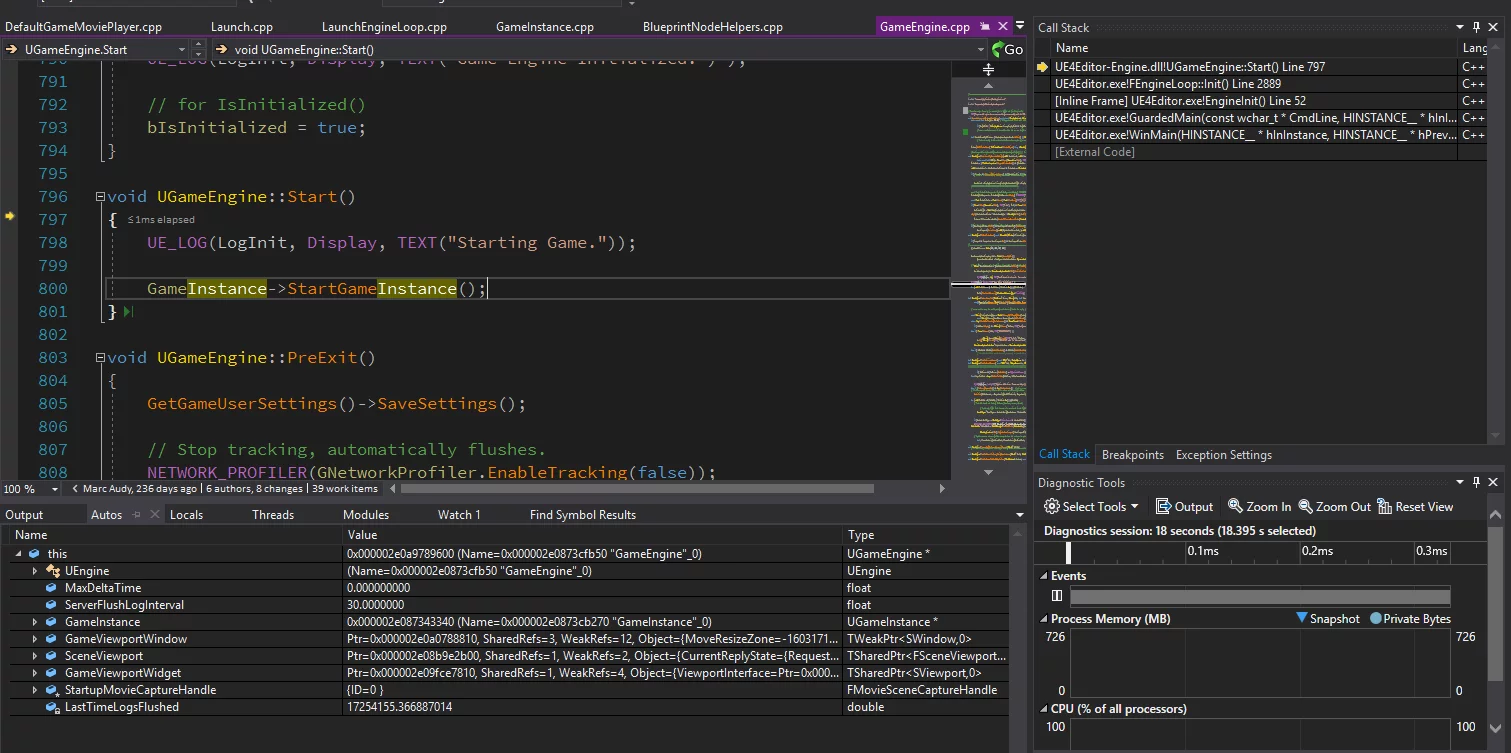
Actor Initialization in UE
The PreInitializeComponents/InitializeComponents/PostInitializeComponents and DispatchBeginPlay of AActor are all invoked in ULevel::RouteActorInitialize.
1 | void ULevel::RouteActorInitialize() |
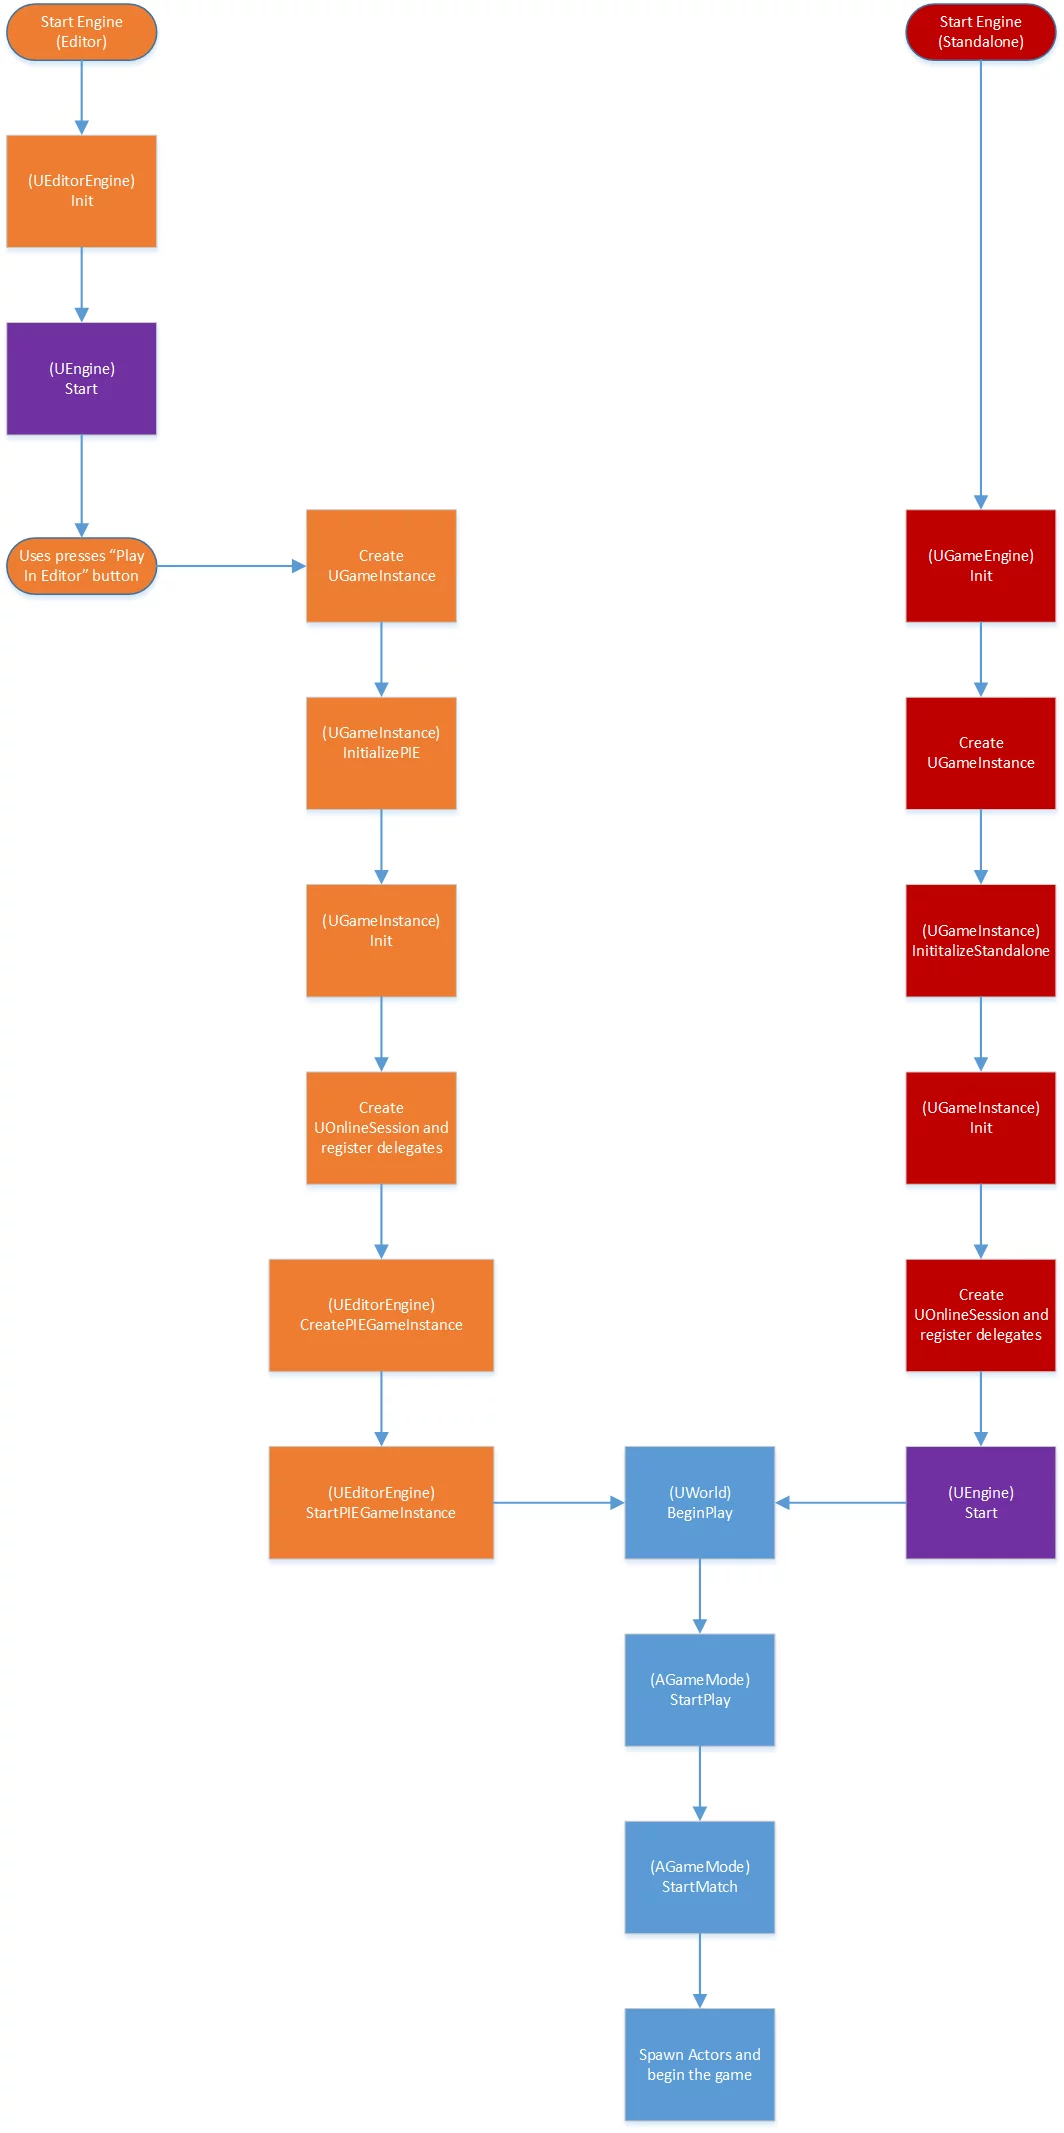
UE4: Engine Start Order
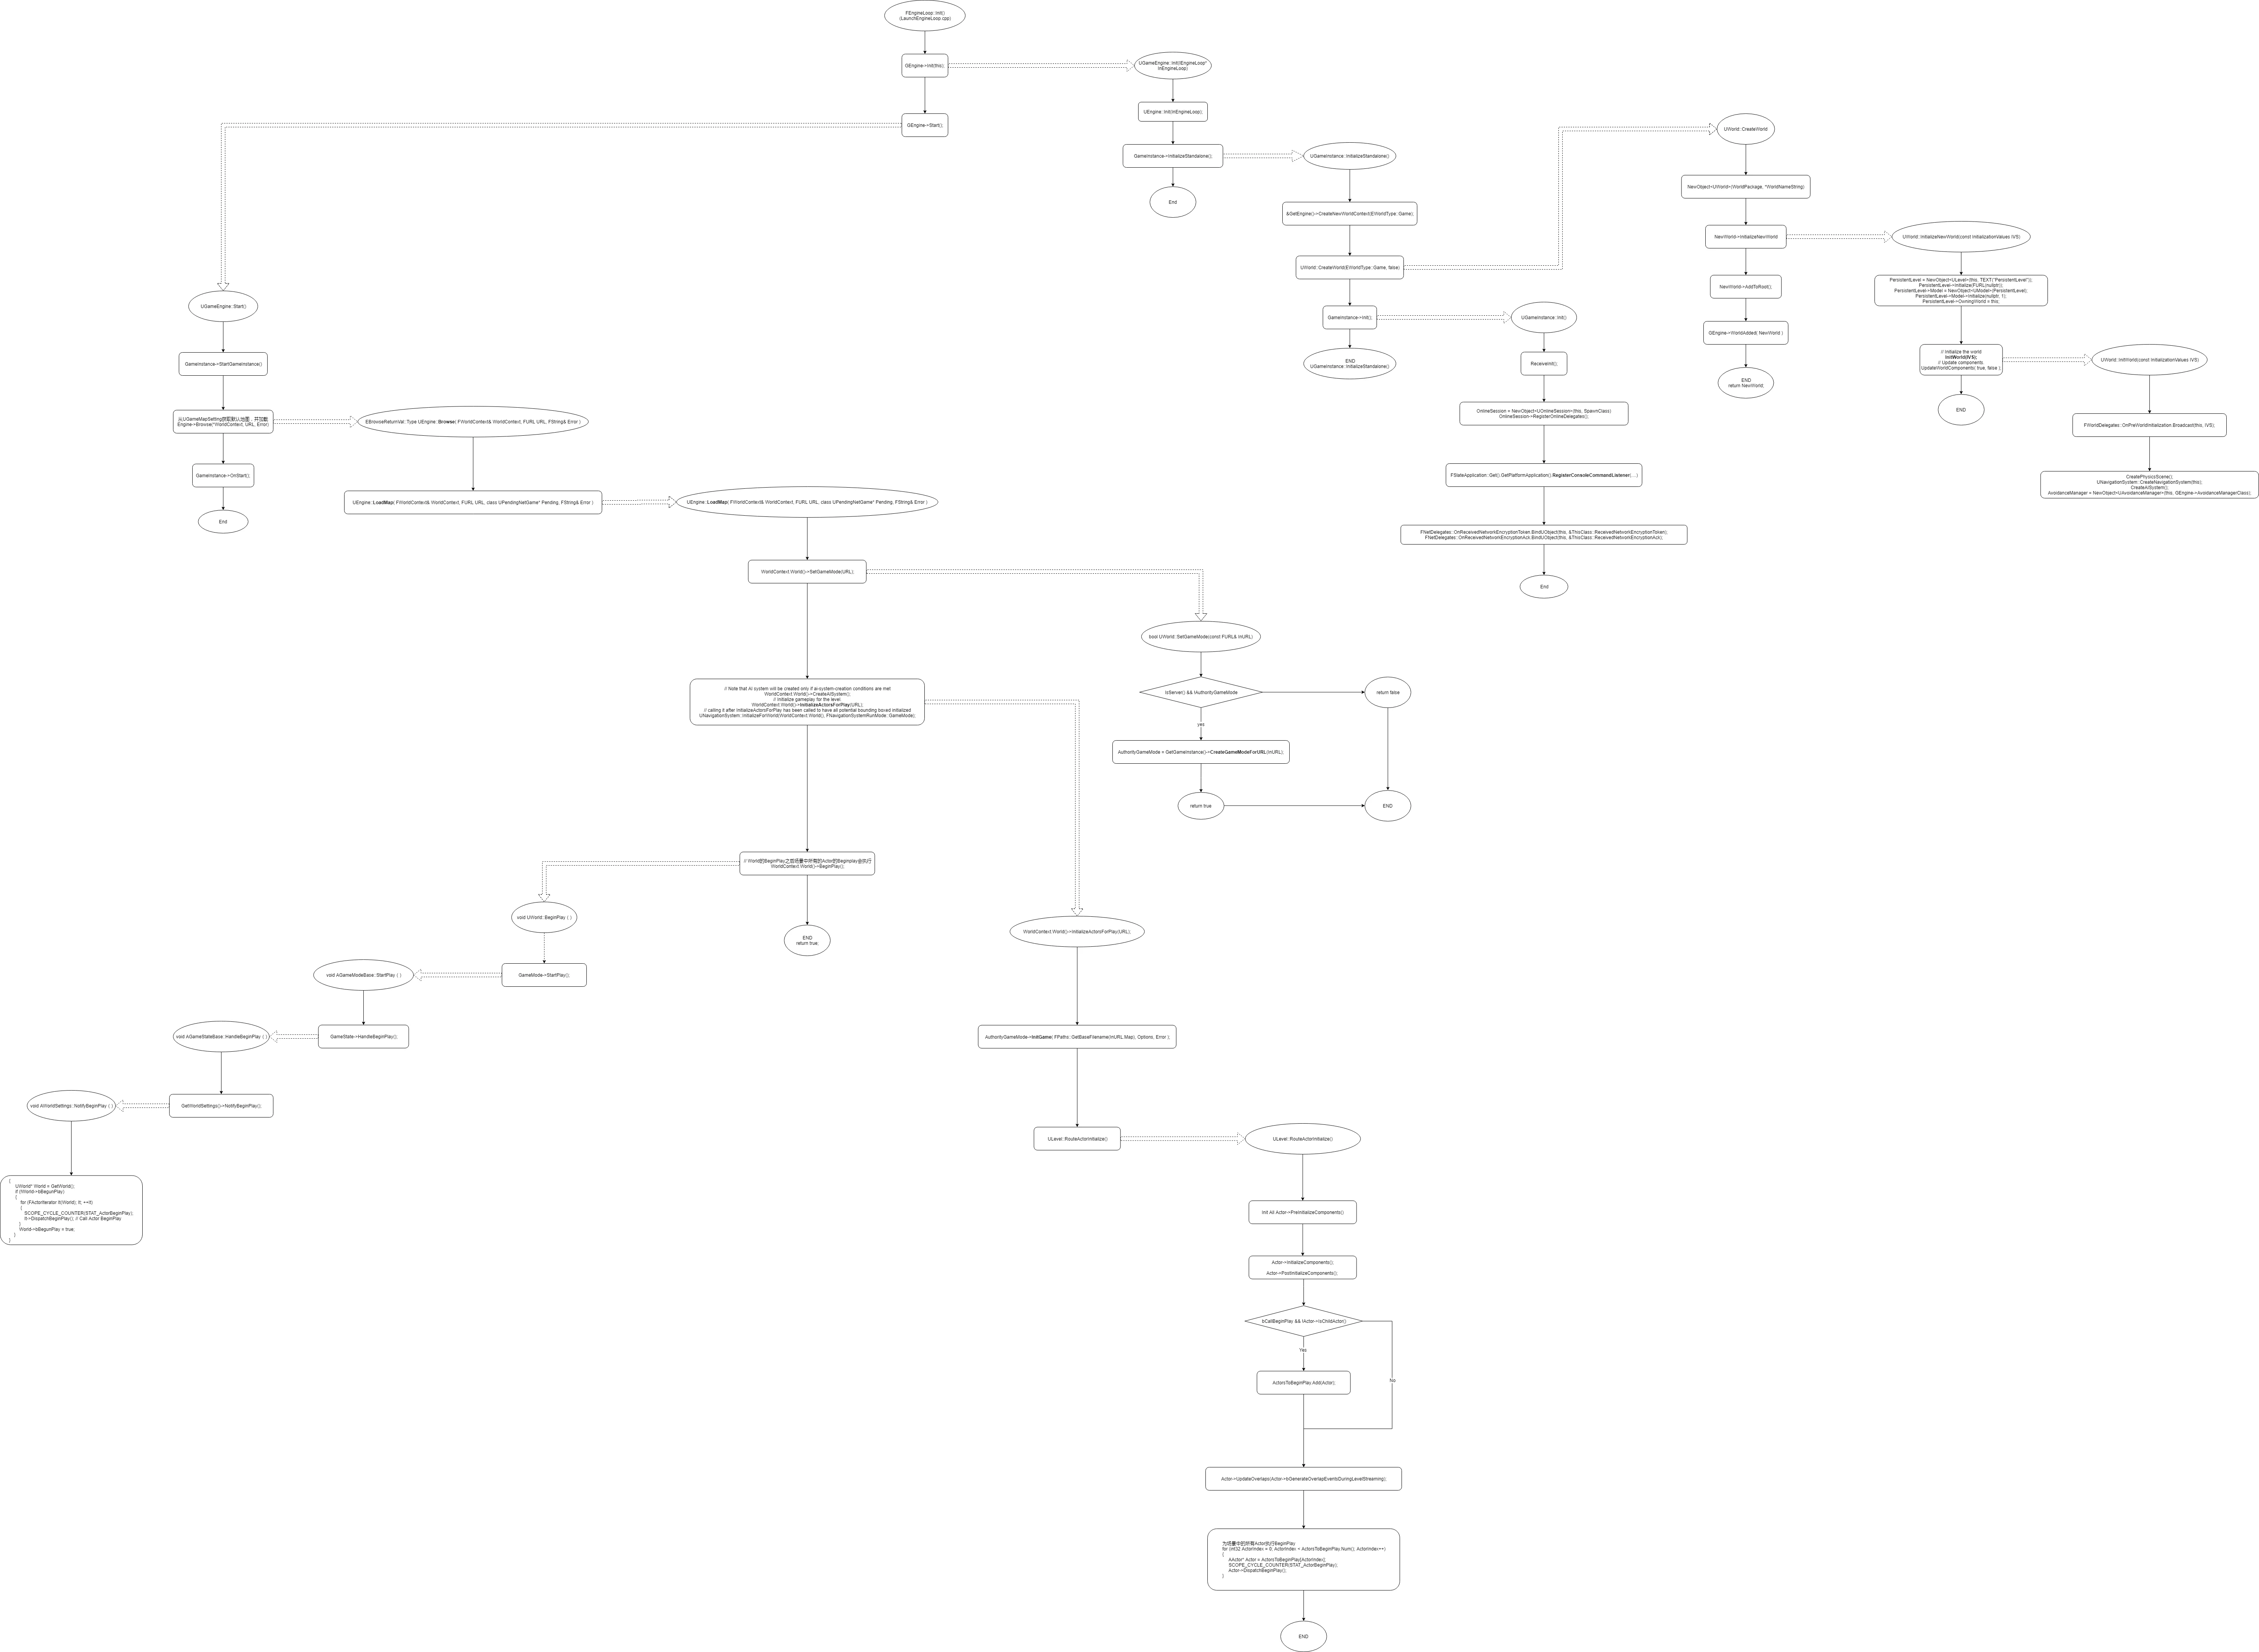
UE Engine Tick Call Stack
1 | FEngineLoop_Tick=>start: void FEngineLoop::Tick() |
Game Flow on UE4
Actor LifeCycle
Actor Lifecycle on Unreal Engine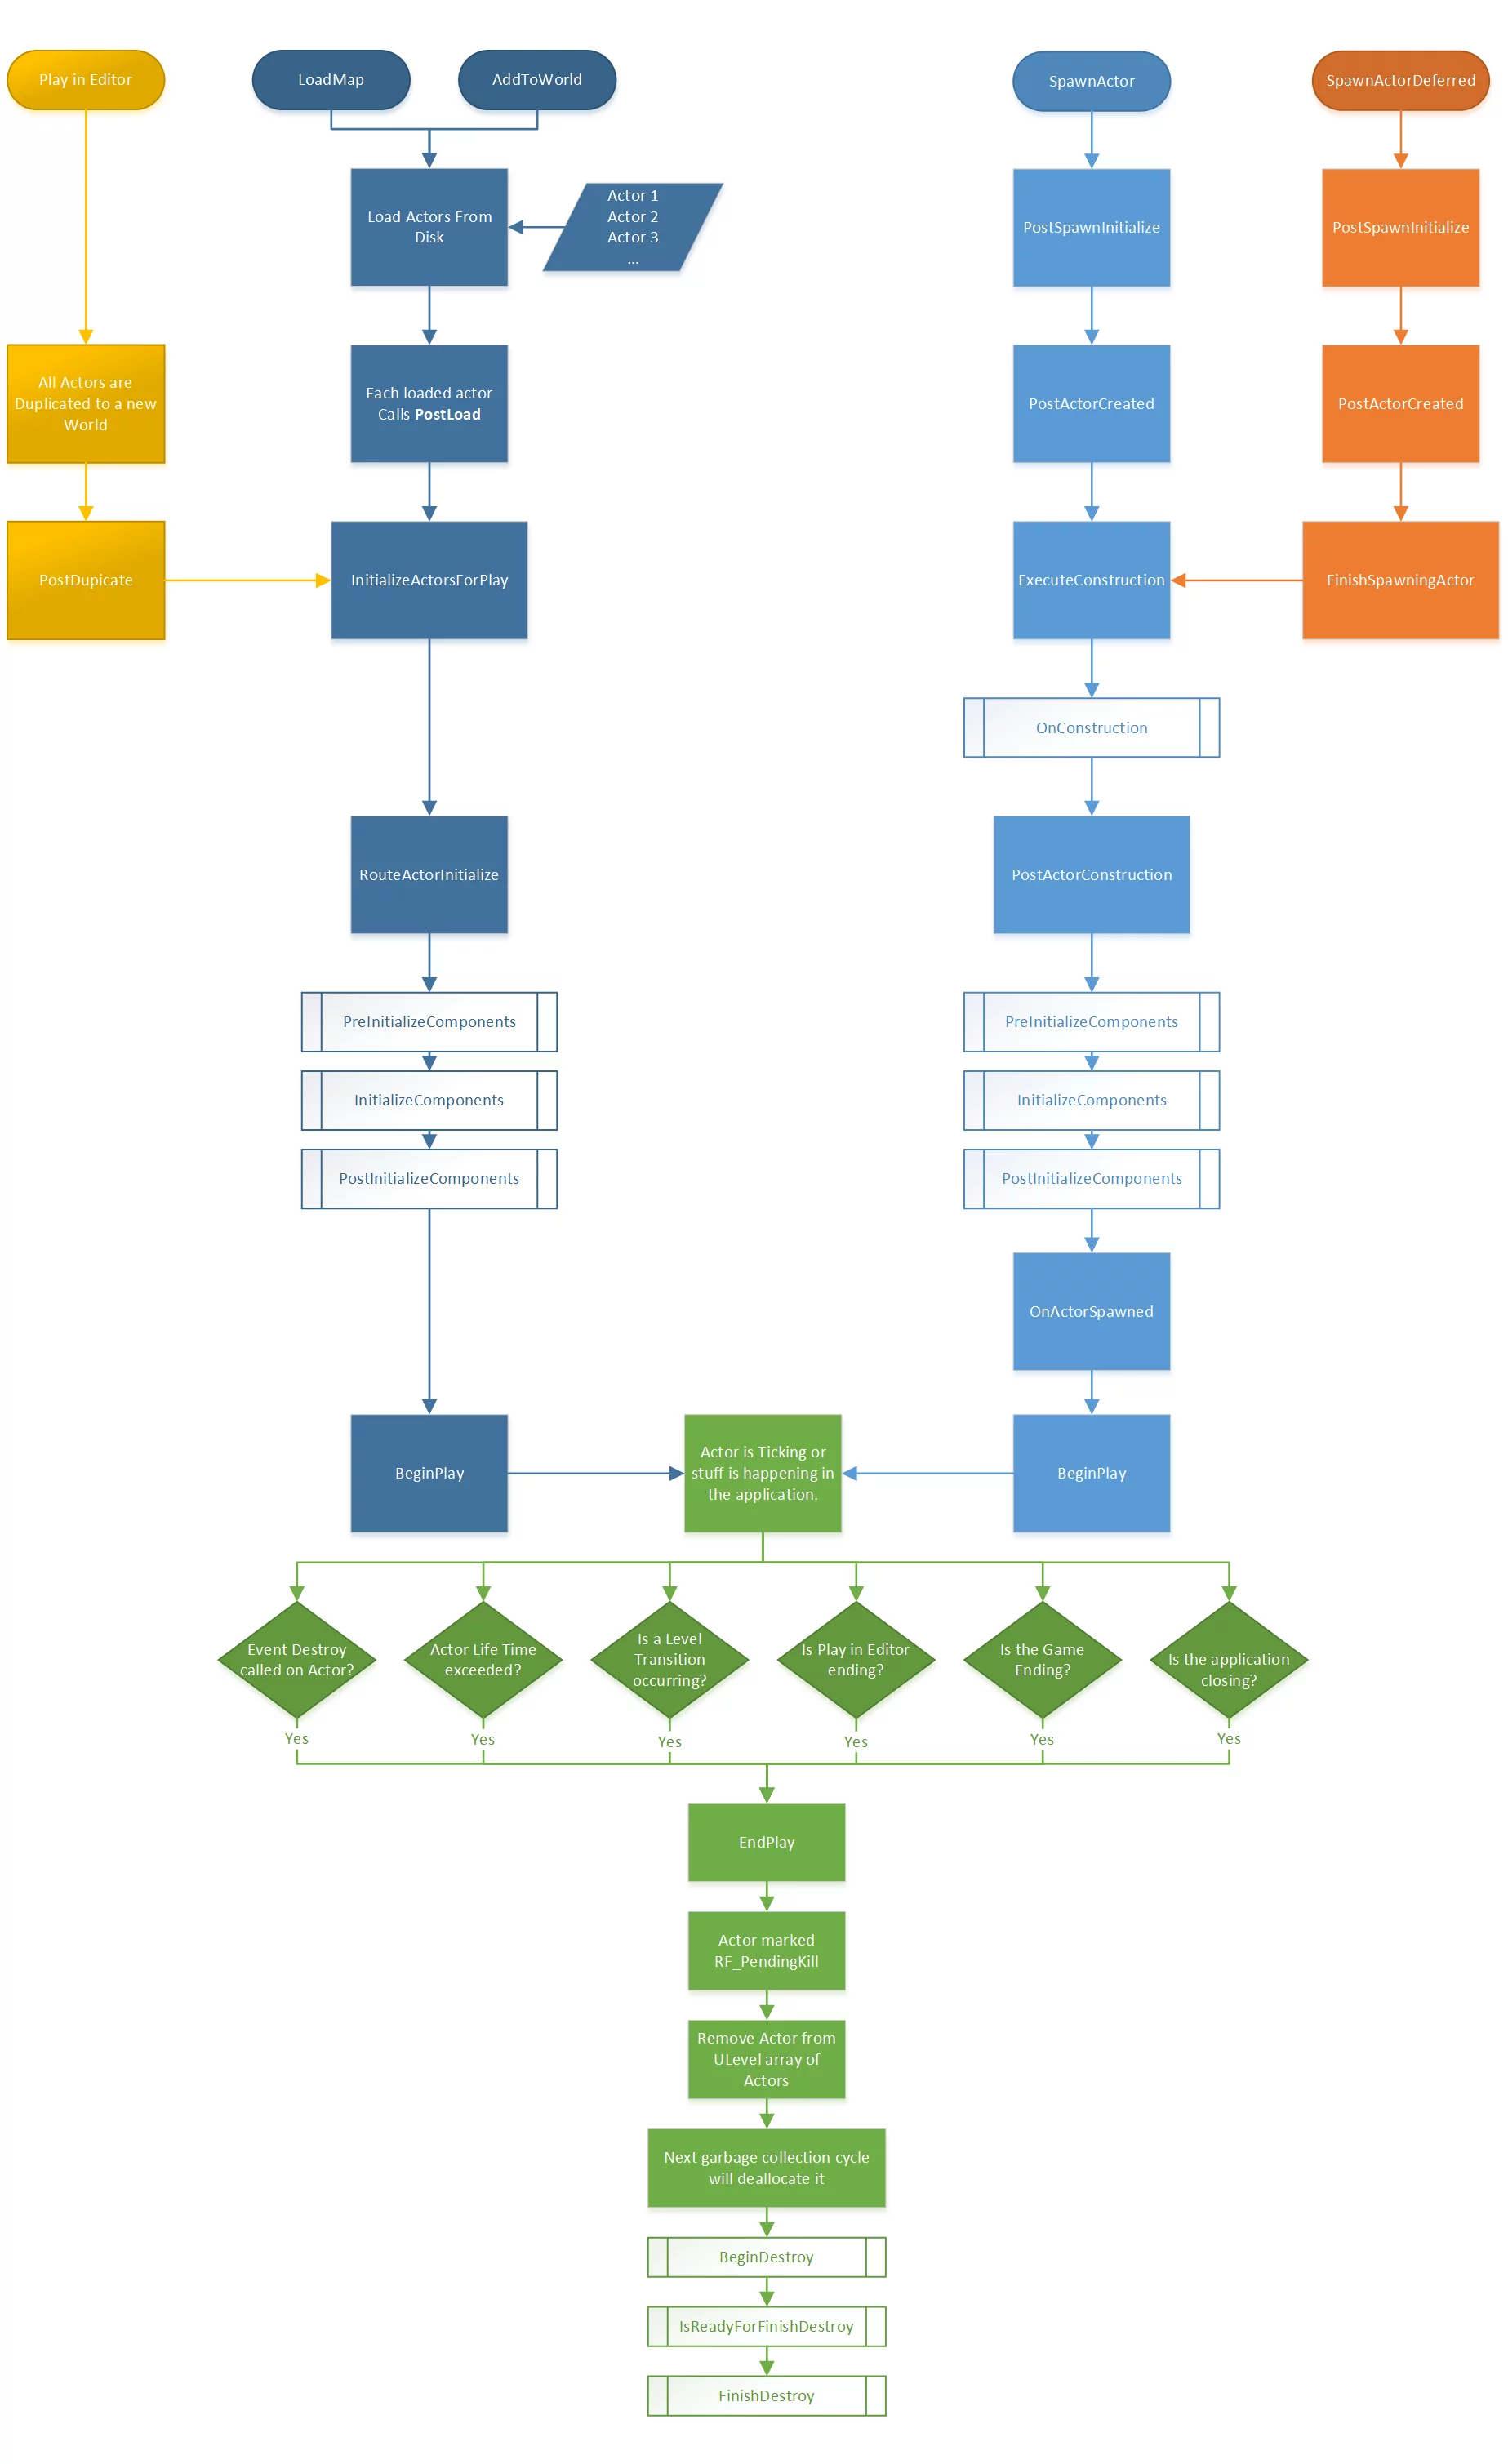
UE Log Macros Defined
Some log definitions in UE source code:
These logs are defined in EngineLogs.h:
1 | ENGINE_API DECLARE_LOG_CATEGORY_EXTERN(LogPath, Warning, All); |
In CoreGlobals.h, the following logs are defined:
1 | CORE_API DECLARE_LOG_CATEGORY_EXTERN(LogHAL, Log, All); |
Some log definitions recently used are pasted here:
1 | // Module: Json |
Method to Detect if Engine is Installed Version
The engine version installed via EpicGameLauncher cannot create a Target Program project using UnrealBuildTool.exe -ProjectFiles "ProgramProjectName", and it will prompt the following error:
1 | ERROR: UnrealBuildTool Exception: A game project path was not specified, which is required when generating project files using an installed build or passing -game on the command line |
This exception in UBT’s related code is in ProjectFileGenreator.cs:
1 | // ProjectFileGenreator.cs |
From this code, it can be seen that if the -game parameter is passed to UBT and the engine is an installed version (EpicGameLauncher), it will check if the project parameter is provided; if not, it will throw an exception.
The normal UBT call command is:
1 | UnrelBuildTool.exe -ProjectFiles -project="D:\UnrealProjects\UEProject.uproject" -game |
This ordinary Game parameter will not throw an exception in UBT. However, calling UBT with the command to generate Program will throw an exception:
1 | UnrelBuildTool.exe -ProjectFiles ProgramName |
According to the above ProjectFileGenreator.cs detection code, what we need to do is change the result returned by UnrealBuildTool.IsEngineInstalled() to false.
Continuing with the code, UnrealBuildTool.IsEngineInstalled() retrieves a bool variable bIsEngineInstalled in UnrealBuildTool:
1 | // UnrealBuildTool.cs |
A search for references reveals that the bIsEngineInstalled variable is set in GuardedMain:
1 | // UnrealBuildTool.cs |
From the code, we can see that UBT has three methods to determine whether the engine version is installed:
- Check if the parameters passed include
-installledand-installedengine - Check if the parameters passed include
-notinstallengine - Check if the engine path contains the
InstalledBuild.txtfile underEngine\Build
(So there are actually three methods but effectively two; even if -notinstallengine is specified, it still needs to check for the existence of the Engine\Build\InstalledBuild.txt file.)
The detection order is as follows:
1 | -installled > -installedengine > -notinstalledengine > Engine\Build\InstalledBuild.txt |
Therefore, when I want UBT to consider my engine version as not installed, there are two ways:
- Pass the
-notinstalledengineparameter to UBT and delete theInstalledBuild.txtfile from theEngine\Builddirectory. - Call UBT without passing
-installledand-installedengineparameters, and delete theInstalledBuild.txtfile from theEngine\Builddirectory.
Note: There are also the following two checks in UBT:
1 | // UnrealBuildTools.cs |
UE:Get all registered Engines
You can use IDesktopPlatform::EnumerateEngineInstallations to obtain all engine versions installed from the launcher, and those registered by the user using UnrealVersionSelector in the current system.
1 | TMap<FString,FString> Installations; |
UnrealVersionSelector Registered Engine Path
When registering an engine using UnrealVersionSelector, it will write the registered engine path into the registry:
1 | HKEY_CURRENT_USER\SOFTWARE\Epic Games\Unreal Engine\Builds |
The registry entry’s lpValueName will be a generated GUID:
1 | // DesktopPlatfromWindows.cpp |
UE does not directly provide an API in IDesktopPlatfrom for obtaining the list of engines registered by users through the UnrealVersionSelector.
However, it writes the function to obtain per-user installations engines from the registry in EnumerateEngineInstallations:
1 | void FDesktopPlatformWindows::EnumerateEngineInstallations(TMap<FString, FString> &OutInstallations) |
EpicGameLauncher Version Engine Registry Path
It was mentioned above that if the engine is a non-source version, the registered paths will be written into the registry when using UnrealVersionSelector:
1 | HKEY_CURRENT_USER\SOFTWARE\Epic Games\Unreal Engine\Builds |
The versions installed from EpicGameLauncher will be written to another registry path:
1 | HKEY_LOCAL_MACHINE\SOFTWARE\EpicGames\Unreal Engine |
Its value (exported from the registry) is:
1 | Windows Registry Editor Version 5.00 |
UE provides a method to obtain engines installed from EpicGameLauncher (via the IDesktopPlatfrom interface):
1 | TMap<FString,FString> Installations; |
UnrealVersionSelector Registry File Association
1 | Windows Registry Editor Version 5.00 |
Note: If you want to add launch methods for your defined files, you can use this method.
UE Registered Compiled Engine Installation Path
UE provides the UnrealVersionSelector tool to select engine versions/generate sln, etc., which can also be used to register local engines (non-Launcher installed, such as self-compiled source engines) into the right-click Select Unreal Engine Version... list in the project file.
A simple analysis of the UnrealVersionSelector code shows its registration process as follows:
1 | WinMain_Func=>start: WinMain |
The operation of writing to the registry is in the FDesktopPlatformWindows::RegisterEngineInstallation function.
The operation is to write the registered engine directory into a string item in HKEY_CURRENT_USER\Software\Epic Games\Unreal Engine\Builds.
When right-clicking Switch Unreal Engine Version..., it will modify the .uproject file’s EngineAssociation value:
The call flow is as follows:
1 | WinMain_Func=>start: WinMain |
The execution of writing the project file operation is in FDesktopPlatformBase::SetEngineIdentifierForProject:
1 | bool FDesktopPlatformBase::SetEngineIdentifierForProject(const FString &ProjectFileName, const FString &InIdentifier) |
So if you choose a project that uses a compiled engine, you can open the project’s .uproject file with a text editor and see that the value of the EngineAssociation item is the version value of the engine from the registry.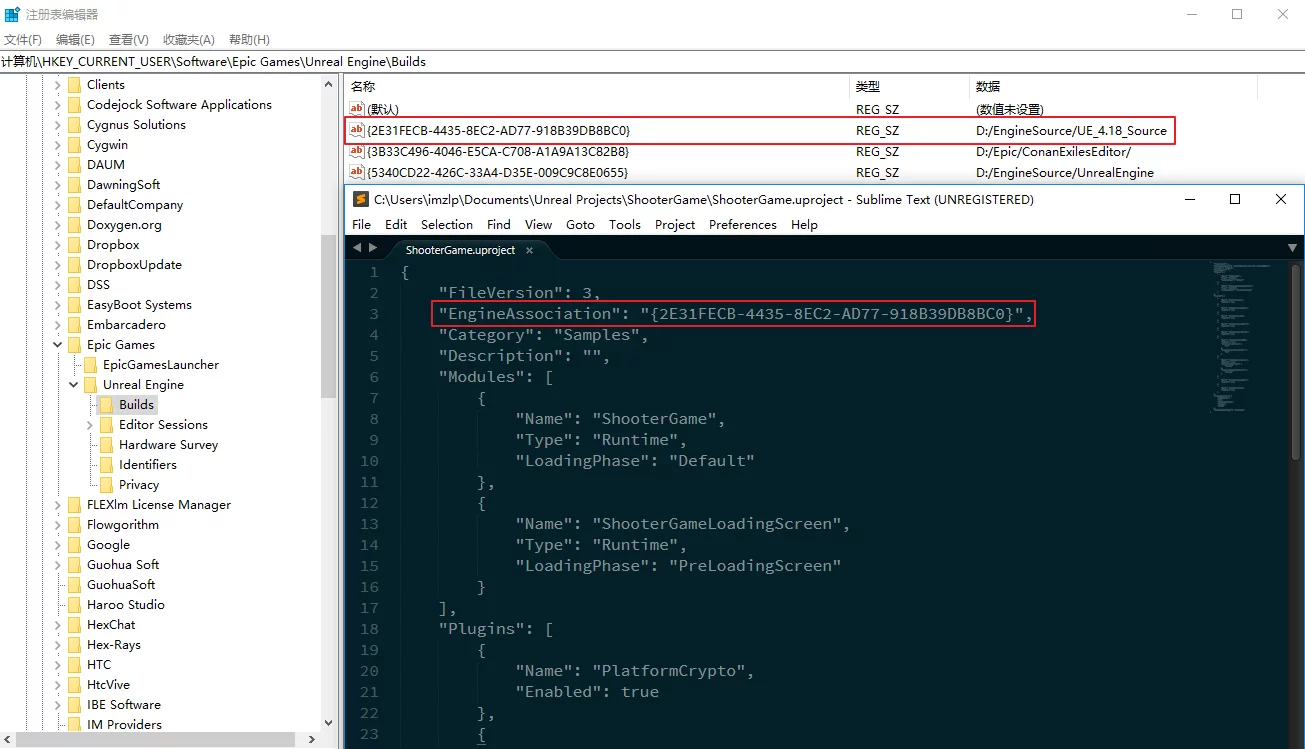
Note: The command line arguments supported by UnrealVersionSelector and their purposes can be found in UnrealVersionSelector.cpp#L224:
1 | int Main(const TArray<FString>& Arguments) |
Resolving .uproject Right-Click Generation Failure
First, you need to check the path of the UnrealVersionSelector.exe used in the right-click menu by opening the registry:
1 | HKEY_CLASSES_ROOT\Unreal.ProjectFile |
Then find the shell\open\command entry to see the location of UnrealVersionSelector.exe (if you haven’t installed the source version, it will default to the Binaries path of EpicGamesLauncher), for example:
1 | "C:\Program Files (x86)\Epic Games\Launcher\Engine\Binaries\Win64\UnrealVersionSelector.exe" /editor "%1" |
Then go to C:\Program Files (x86)\Epic Games\Launcher\Engine\Binaries\Win64 and set UnrealVersionSelector.exe to run with administrator privileges (right-click - Properties - Compatibility - Run this program as an administrator).
GamePlay
UE Macro Library Issues
When using macro libraries in UE blueprints, simply saving changes to the macros inside the macro library isn’t sufficient; you must compile the blueprint using the macro library to see changes take effect. Essentially, the compilation inside the blueprint is what directly expands the macro. Otherwise, it will still be the earlier unmodified version, which is very frustrating. This issue exists in UE4.18.3; other versions haven’t been tested.
UE Saved Directory When Packing in Shipping Mode
The UE project includes the Saved directory under the project directory or target directory packed for Development or DebugGame, which contains Autosaves/Backup/Config/Logs/Crashs/SaveGames, etc.
However, with Shipping packaging, the Saved directory will not be located in the target directory but instead in C:/User/%username%/AppData/Local/ProjectName, with ProjectName replaced by your project name.
For more about UE packaging, you can check the UE documentation:
CharacterMovement Enabling RVO Obstacle Avoidance
CharacterMovementComponent has an automatic avoidance function; you just need to enable UseRVOAvoidance.
However, remember to disable the RVO obstacles after the character dies; otherwise, it will lead to issues where monsters avoid obstacles on open ground.
You can use SetAvoidanceEnable to disable it.
VR Bow Model Standards
The bow needed for VR should be a SkeleMesh, with the root bone point located at the gripping position (preferably at the center of the bow), and for computation convenience, the model direction should follow the requirement below: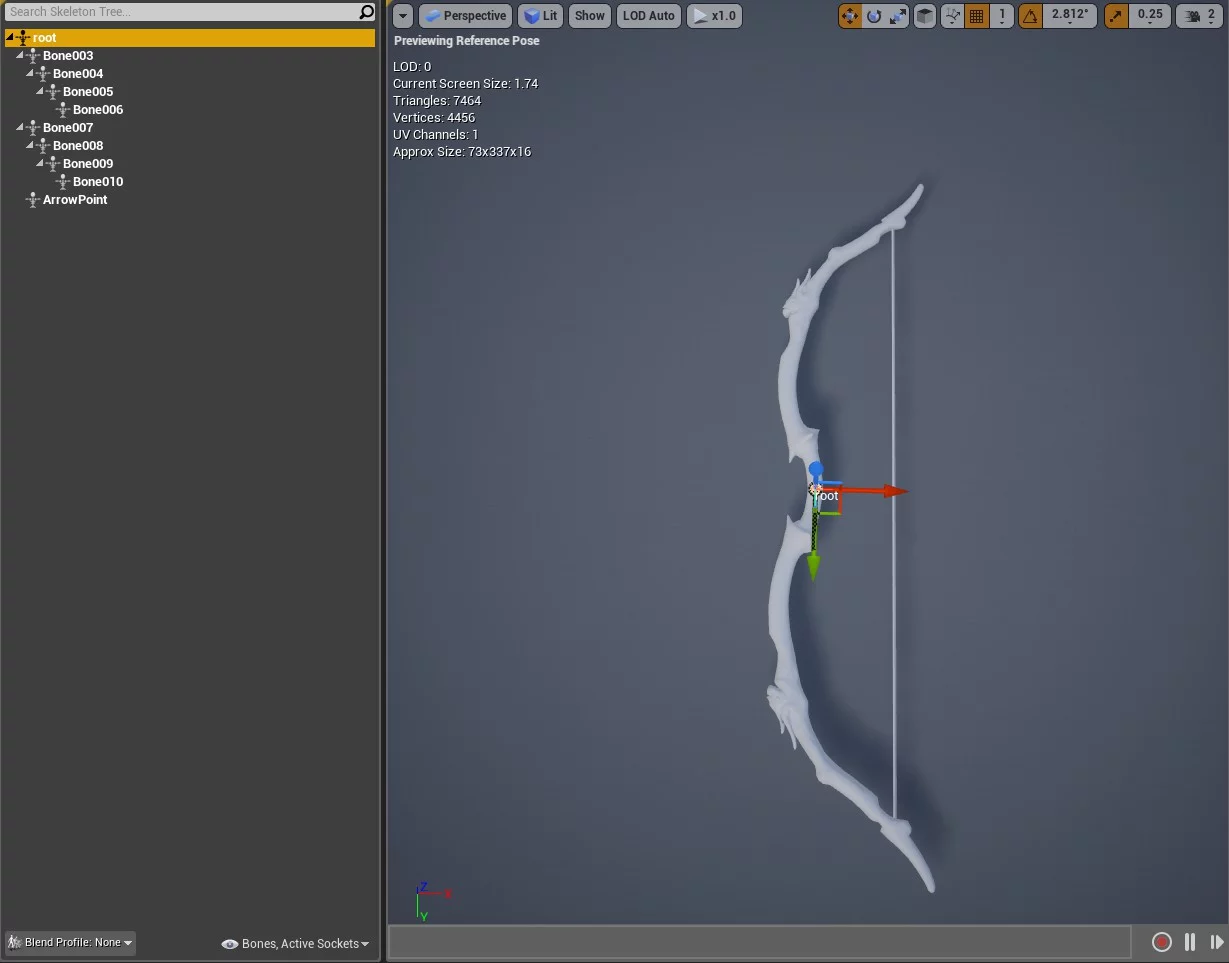
This is to facilitate the calculation of the rotation when the VR player grabs the bow:
When drawing the bow, the hand gripping the bow provides Roll rotation, while Pitch and Yaw are provided by the rotation needed for the hand gripping the bow to look at the hand drawing the bow.
All bows should follow the same model rotation standard, which is easy to implement visually, but adjusting them differently programmatically is cumbersome.
Additionally, the model origin of the arrow should be at the tail of the arrow fletching:![]()
Creating a satisfying bow experience is quite complicated, and the key lies in detail optimization.
Implementation of Outfit Change in UE
In the UE USkinnedMeshComponent, there is a function like this:
1 | class ENGINE_API USkinnedMeshComponent : public UMeshComponent |
It essentially means that the current SkinnedMeshComponent will move according to the pose of NewMasterBoneComponent.
We can use a set of models using the same skeleton to implement the outfit change functionality, such as head, torso, legs, feet, and hands, by having a character possess five separate USkinnedMeshComponent model components to represent different parts.
The character can have an animated USkinnedMeshComponent as the body, and then set the MasterPose of the five upper USkinnedMeshComponent parts to it.
At this point, all parts will animate according to the body’s animation; achieving outfit changes can simply be done by modifying the models of the respective parts.
Compiling Blueprint to C++ Code in UE
UE supports compiling blueprints to C++ code. You need to select Exclusive (only selected blueprint assets will generate C++) or Inclusive (generates C++ for all blueprint assets) in Project Setting - Packaging - Blueprints.
After selection, pack the project. Once packed successfully, you can find the .cpp and .h files starting with the blueprint name in the public/private directories under the Intermediate\Plugins\NativizedAssets\Windows\Game\Source\NativizedAssets path.
UE Blueprint Function Library Cannot Be Called in UObject
When creating a Blueprint Function Library in the editor and creating a function, that function cannot be called in the blueprint’s Object, it will prompt:
1 | Function Requires A World Context. |
Writing a test blueprint function library generates C++ code:
The generated C++ code is as follows (removing redundant parts; full code can be found here):
1 | // TestFuncLib_pf1448227310.h |
Simply copying the above code to a C++ blueprint function library can be callable in UObject… this is perplexing.
Placing Components into Bone Sockets in UE
In Blueprints, you can directly set the parent socket property in the Blueprint editor to place a component into a bone socket. In C++, it’s similar but slightly more complex. Let’s look at a code example from ShooterGame:
1 | // ShooterGame\Private\Weapons\ShooterWeapon.cpp |
The same AttachToComponent method is used, and in Blueprints, you can also use a node with the same name to attach to bone sockets.### Getting OpenLevel Options in Unreal
When loading a level in UE, you can pass a FString of options: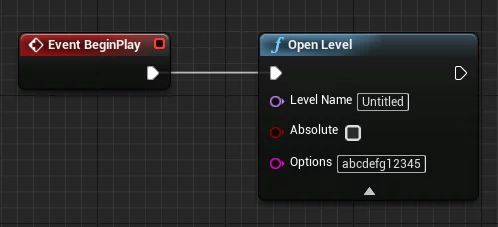
In the loaded level, you can retrieve it using GetGameMode: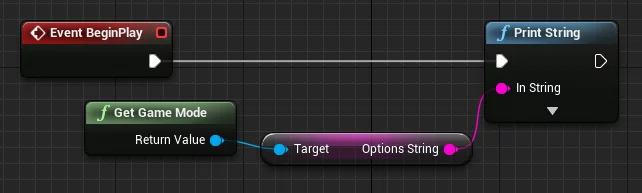
Using C++, the code looks like this:
1 | AGameModeBase* OurGameMode=UGameplayStatics::GetGameMode(this); |
Note: After switching levels, objects created in the original level will be destroyed. To retain specified Actors during level switch, use the GameMode’s GetSeamlessTravelActorList.
Converting 3D Positions in Game Scenes to Screen Positions

Setting the Mouse Cursor’s Relative Position in Viewport
First, install the LowEntry-ExtendedStandardLibrary plugin, which provides the ULowEntryExtendedStandardLibrary::SetMousePosition function to set the mouse cursor’s relative position in the viewport. The viewport size can be obtained using UWidgetLayoutLibrary::GetViewportSize.
Mouse Focus Not in Window After Starting Game in UE
You can use SetInputModeGameAndUI to set the mouse focus within the window, with InMourseLockMode set to LockAlways. By using this operation when starting the game, the mouse focus will be within the game window, thus avoiding the need to click the game window before clicking UI elements.
Determining if a Particle Effect is Looping
If an UParticleSystem‘s Emitter has its Required Emitter Loops set to 0, it is a looping effect: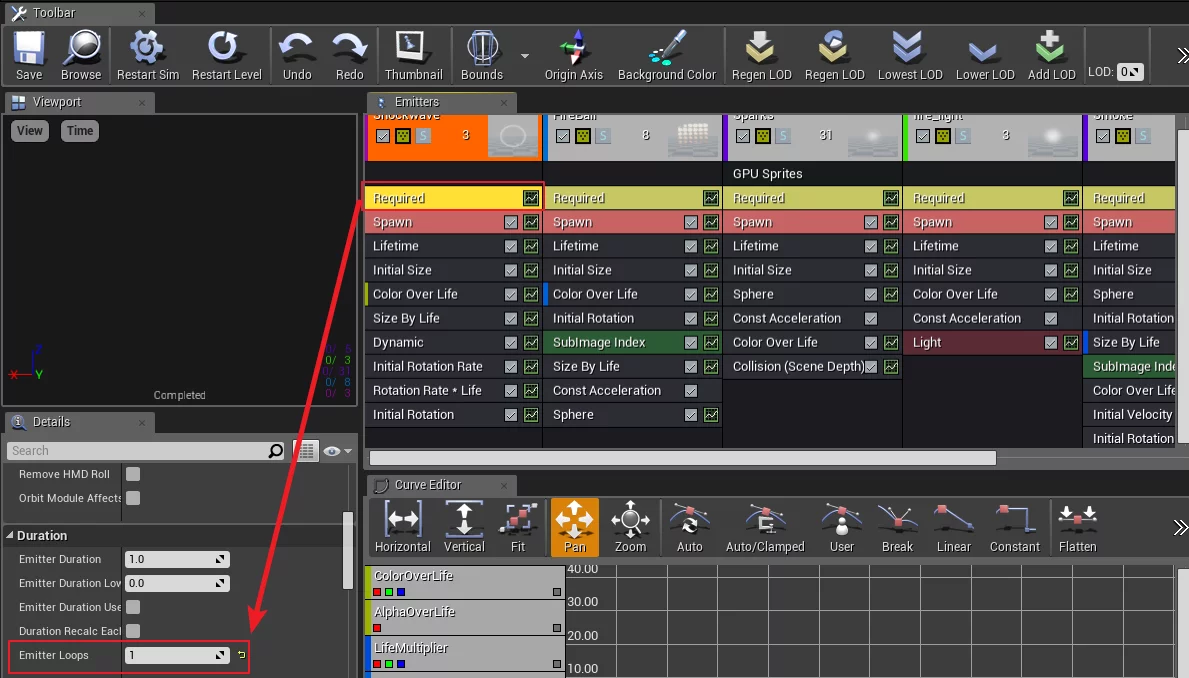
UE provides a method to check if a particle effect is looping:
1 | bool UParticleSystem::IsLooping()const{ /*...*/ } |
As long as there is one looping Emitter in the effect, the effect is considered looping. However, this method is not exposed to Blueprints; you can write a function library to wrap it for Blueprints.
Cross-Module Class Symbol Export Considerations
When inheriting/accessing classes within the UE engine, always check if the class has export symbols. Classes without export symbols cannot be linked to definitions. For example, the FParticleSpriteEmitterInstance class under the UE Engine module does not have export symbols.
Creating Asynchronous Nodes in Blueprints
In a project, there might be needs for asynchronous operations, such as downloading files, where a download command waits for completion before callback, while minimizing excessive event bindings and unbindings. In Blueprint nodes, some asynchronous operations like PlayMontage/DownloadImage have multiple output nodes: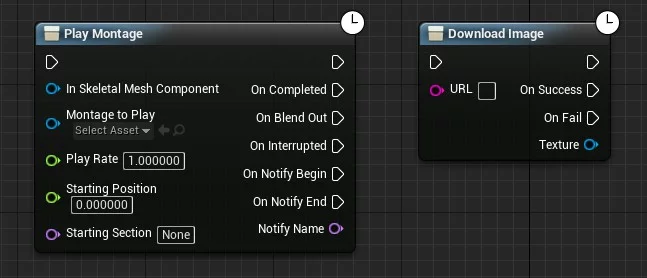
Can we write our asynchronous operation node? Absolutely.
You can check the implementation of the DownloadImage node in Engine\Source\Runtime\UMG\Public\Blueprint\AsyncTaskDownloadImage.h (C++API).
Here’s how to create a similar node:
- The key is to inherit
UBlueprintAsyncActionBase, which is necessary. - Write a static function that returns a pointer to the class and mark it with
UFUNCTIONBlueprintInternalUseOnly="true". - Declare and define several dispatcher members, which will be the asynchronous nodes—these are the exec nodes on the right side of Blueprint nodes.
Let’s first look at the declaration of DownloadImage:
1 | class UTexture2DDynamic; |
Comparing it with the DownloadImage node above, we see:
0. First, a dynamic multicast delegate FDownloadImageDelegate is declared, requiring one parameter.
- The
UAsyncTaskDownloadImageclass declares two event dispatchers,OnSuccessandOnFail, which correspond to the exec nodes and parameterTexturein the Blueprint node. - The static function
DownloadImagereceives aFStringparameter and returns aUAsyncTaskDownloadImage*, making the dispatcher execution nodes visible in the Blueprint.
That is, the dynamically declared member and its parameters will appear on the right side of the Blueprint node.
I implemented an asynchronous operation behavior, and here’s how it looks in Blueprint: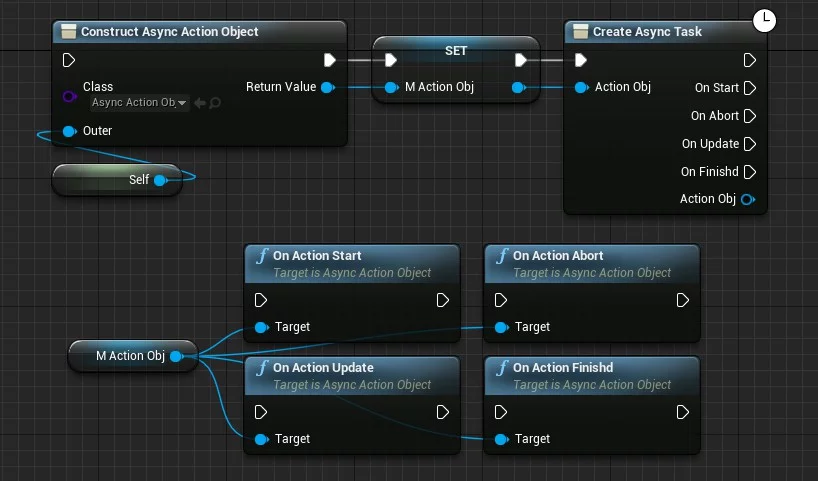
The behavior involves first creating an AsyncActionObject to later trigger asynchronous operations, and then executing CreateAsyncTask, which binds events to the previously created AsyncActionObject.
You can then call operations like OnActionStart on that ActionObj to invoke the relevant nodes on the right of CreateAsyncTask.
Note: My implementation restricts that one object corresponds to one Task; if the current AsyncActionObject is already bound to another task, task creation will fail.
Here’s the code:
1 | // AsyncTask.h |
Now for the implementation:
1 | // AsyncTask.cpp |
Declaration for the AsyncActionObject class:
1 | // AsyncActionObject.h |
And its implementation:
1 | // AsyncActionObject.cpp |
Essentially, it wraps two layers of dispatchers…
For example, it can be used to listen for an animation being terminated or completed in a behavior tree, then execute other behaviors, thus solving coupling between different modules.
UE Warning/Error for Including Windows Header Files
If you use windows.h in UE, you may encounter error 4668 in VS, which was previously a warning in earlier UE versions but became an error in UE4.18. UE itself encapsulates the header files of the Windows API, and you can include the relevant:
1 |
|
Alternatively, you can use:
1 |
to also resolve the issue.
Additionally, if you use Windows API in your code, like windows.h, you may encounter similar errors like:
1 | 1>C:\Program Files\Epic Games\UE_4.15\Engine\Source\Runtime\Core\Public\Async/TaskGraphInterfaces.h(892): error C2039: '__faststorefence': is not a member of 'FWindowsPlatformMisc' |
The solution to this problem is to avoid including these Windows API header files in UE header files; move them to the corresponding .cpp files instead.
Getting the Relative Ratio of the Cursor in the Window in UE
First, obtain the current window size using UGameViewportClient to get the SWindow, and then you can use SWindow::GetSizeInScreen to obtain the size:
1 | void GetWindowSize(bool& Success, int32& Width, int32& Height) |
Then to get the cursor’s position within the current window, you can use APlayerController::GetMousePosition (it is also obtained via the Viewport):
1 | bool APlayerController::GetMousePosition(float& LocationX, float& LocationY) const |
Then dividing the two will give you the relative position of the mouse in the current window.
Gamma Value of SceneCapture2D
When capturing images using USceneCapture2D to RenderTarget and displaying it on the Spectator Screen, the colors might appear incorrect:
The solution is to:
- Set the SceneCapture2D’s
CaptureSoucetoFinal Color (LDR) in RGB. - Set the RenderTarget resource’s gamma value to
2.2to make it look close to the original image.
A Cool Trick with Event Parameters in Blueprints
In some plugins, similar operations can be seen: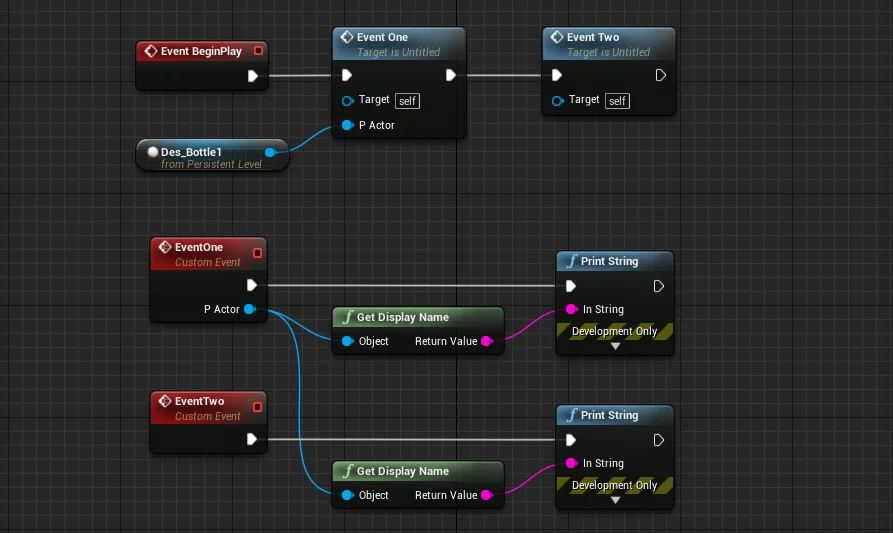
In reality, the parameters of Unreal Blueprint event nodes are members of the class, allowing them to be accessed directly in other places.
Similar issues can be found with delay operations: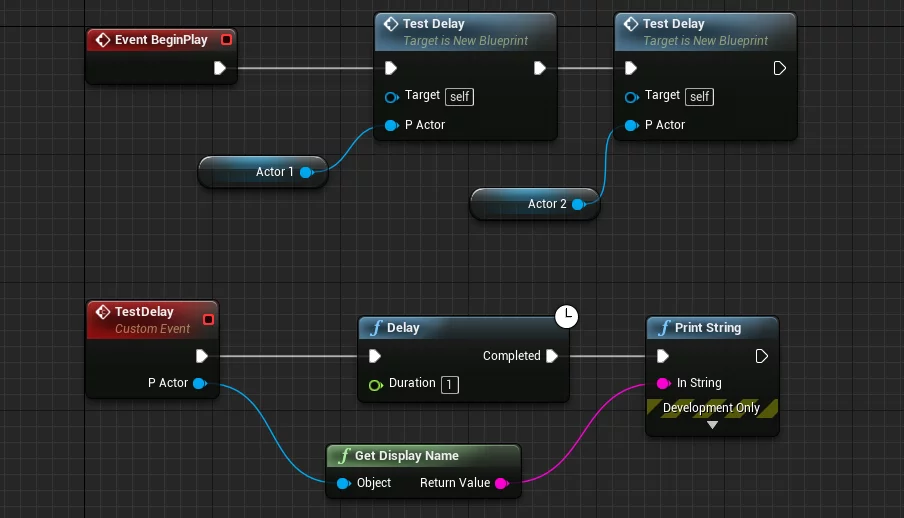
Collision Detection Issues with UProjectileMovementComponent in UE
When using the UProjectileMovementComponent for features like arrows, collisions may fail to trigger due to high speeds. This issue is recorded for future investigation.
Config and Editor
Modifying the Esc Key to Exit Editor Mode in UE
Open Editor Preferences-Keyboard Shortcuts and modify the key for Play World (PIE/SIE).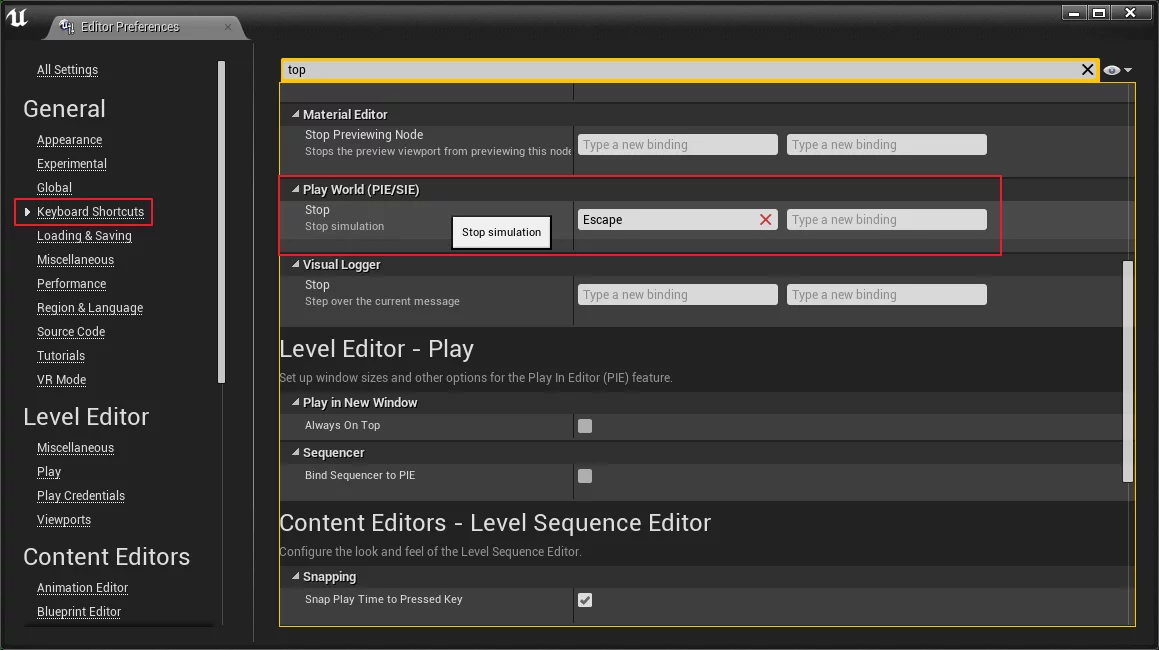
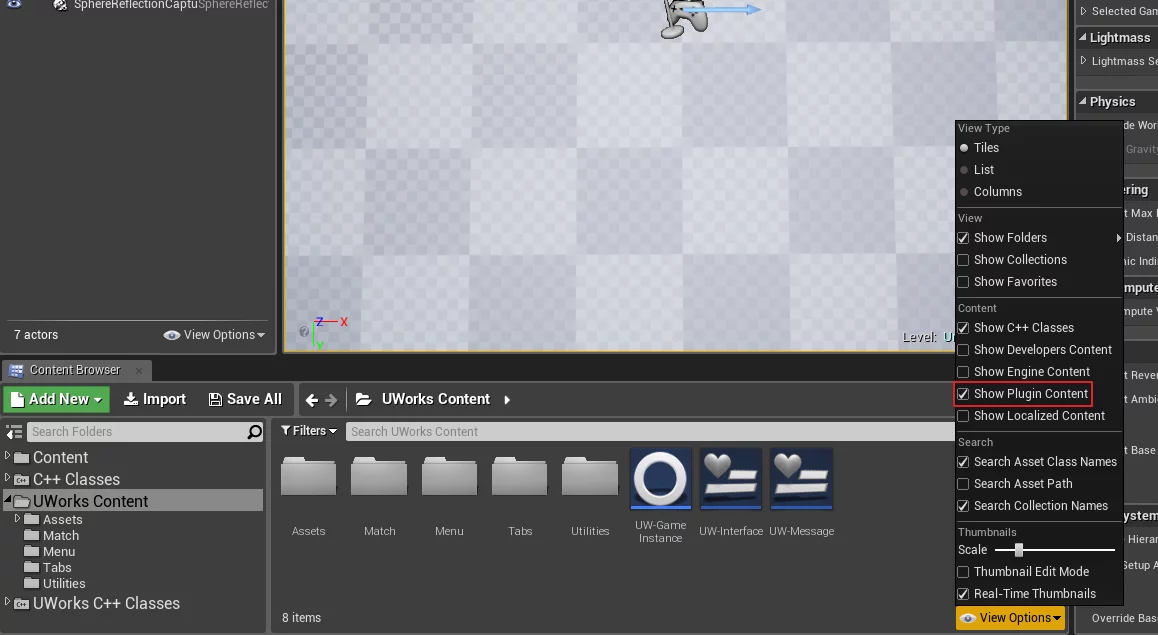
Displaying Plugin Content in Editor
Modifying Parallel Count During UE Compilation
On Windows, you can modify the following files:
1 | Engine/Saved/UnrealBuildTool/BuildConfiguration.xml |
On Mac and Linux, modify the following paths:
1 | /Users/<USER>/.config//Unreal Engine/UnrealBuildTool/BuildConfiguration.xml |
The structure is as follows:
1 |
|
MaxProcessorCount is the maximum number of processors for local execution.
For more configuration parameters, see: UBT configuration
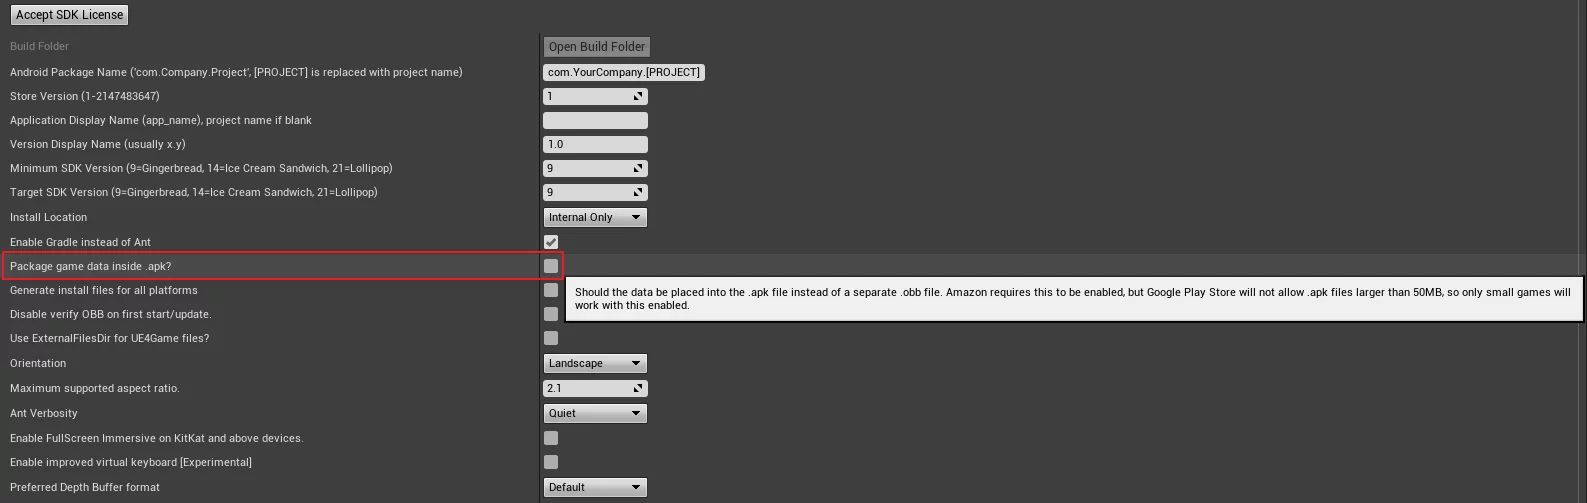
Storing Data in OBB Files When Packaging for Android in UE
Lag Issues in Editor Mode When Focus is Not in Window in UE
When playing a game in the editor on Windows, if the focus is not in the editor/VR application, CPU utilization decreases, causing lag (this does not occur when packaged). This is because UE performs a focus-checking operation in the editor environment:
1 | // Runtime/ApplicationCore/Private/Windows/WindowsPlatformApplicationMisc.cpp |
Simply commenting out the line FPlatformProcess::Sleep(0.005f); will resolve the issue.
Resolving Chinese Character Encoding Issues in UE Compiler Logs on Windows 10
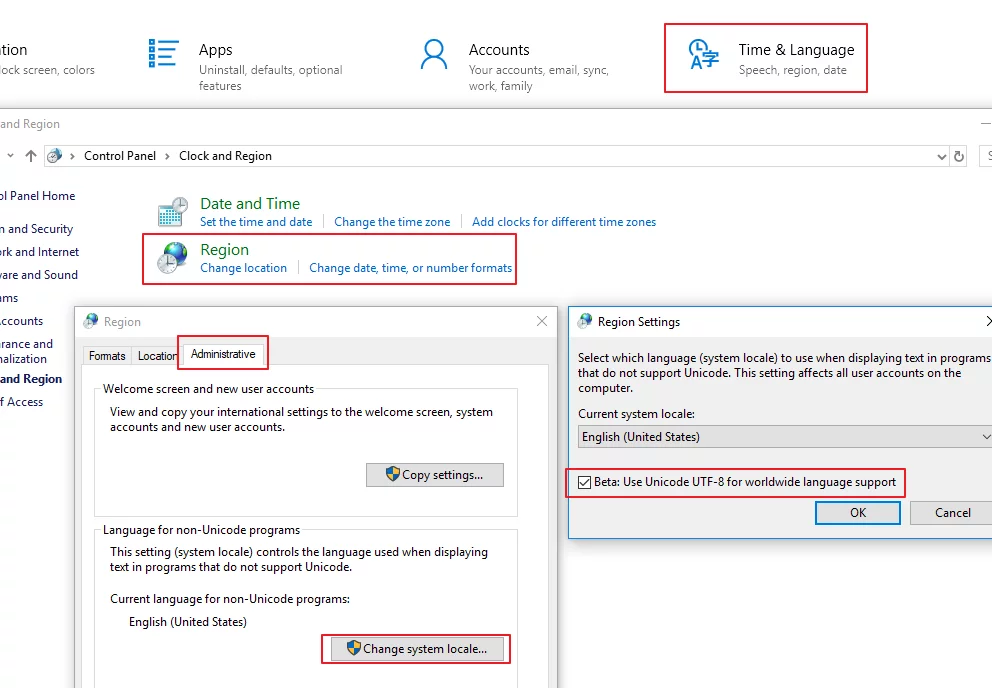
Note: There may be encoding issues in certain software (for instance, GBK encoding might show garbled characters).
Package
ObservedKeyNames.Num()>0
For detailed solutions, see: UE Package Error: ObservedKeyNames.Num()>0
UE Package Error:RenderDocPlugin
RenderDocPlugin: Error: unable to initialize the plugin because no RenderDoc library has been located.
Solution: Disable the RenderDocPlugin before packaging.### UE4 Packaging 32bit Requires 16-byte Alignment Error
When selecting the 32bit platform to package in the engine, the following error occurs:
1 | error C2719: 'SpawnTransform': formal parameter with requested alignment of 16 won't be aligned |
This is because FTransform is passed by value in the code:
1 | AProps* SpawnProps(FTransform SpawnTransform); |
Since FTransform requires 16-byte alignment: Math/TransformVectorized.h#L36
1 | MS_ALIGN(16) struct FTransform |
The MS_ALIGN macro is defined in Core/Public/Windows/WindowsPlatform.h#L131:
1 | // Alignment. |
So FTransform requires 16-byte alignment.
FTransform is implemented using vector intrinsics, and instances of it need to have 16-byte alignment. I think the stack is guaranteed to be aligned to 16-bytes on Win64 so the compiler can pass it on the stack correctly, but there’s no such guarantee on Win32 (which is what we use for shipping builds).
Changing to pass by pointer or reference solves the issue (both passing by reference and pointer are sizeof(void*) in size):
1 | AProps* SpawnProps(const FTransform& SpawnTransform); |
Related issues:
- Shipping: formal parameter with declspec(align(‘16’)) won’t be aligned
- FVector4 error not usable with x32 game package
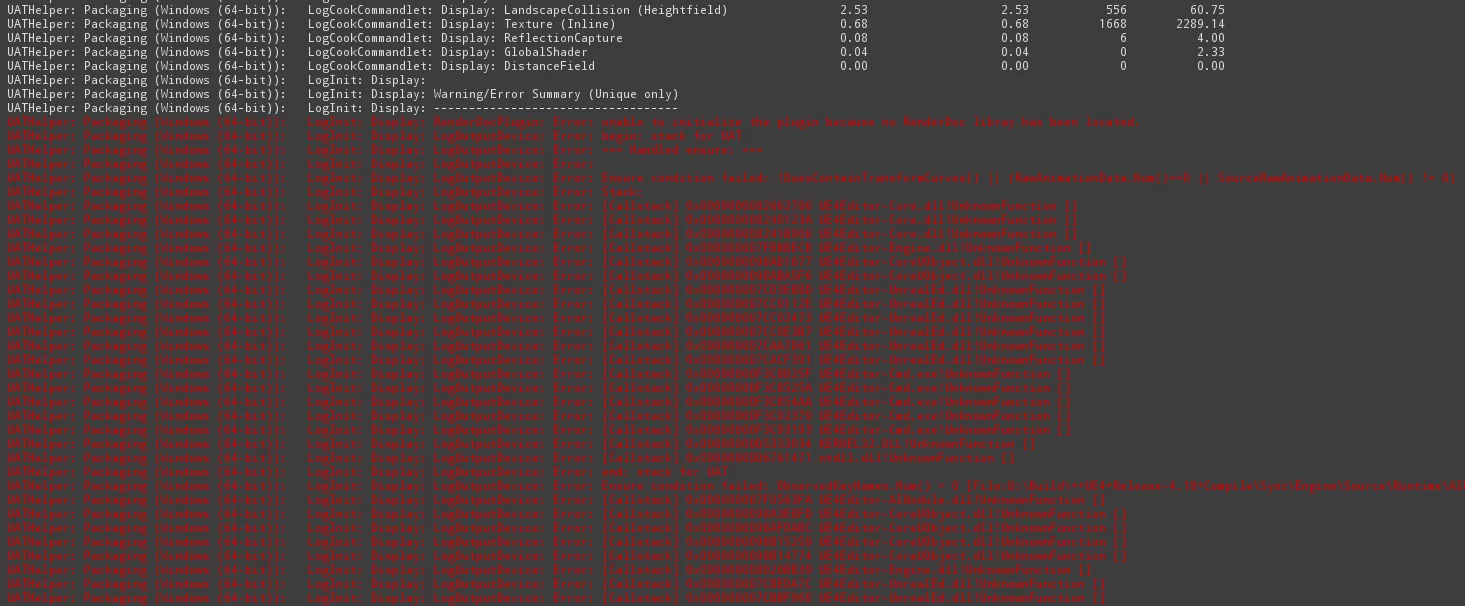
UE Packaging Fails Due to File in Use
- Engine version: 4.18.3
- Packaging platform: Windows
- Running mode: VR
- Build Configuration: Shipping
Error message log during packaging:
1 | UATHelper: Packaging (Windows (64-bit)): Program.Main: ERROR: AutomationTool terminated with exception: System.IO.IOException: The process cannot access the file** ‘C:\YourProjectPath\Saved\StagedBuilds\WindowsNoEditor\Engine\Extras\Redist\en-us\UE4PrereqSetup_x64.exe’ **because it is being used by another process**. |
The error message during UE packaging indicates is being used by another process because the EpicGameLauncher is also running in the process; it can be closed before packaging.
Online
UE Actor Replication Config
Replication
OnlyRelevantToServer (default false)
If true, this actor is only relevant to its owner; if this flag is changed during play, all non-owner channels would need to be explicitly closed.
Always Relevant (default false)
Always relevant for network (overrides bOnlyRelevantToOwner)
ReplicateMovement (default true)
If true, replicate movement/location related properties.
Actor must also be set to replicate.
- see SetReplicates()
- see https://doc.unrealengine.com/latest/INT/Gameplay/Networking/Replication/
NetLoadOnClient (default true)
This actor will be loaded on network clients during map load.
NetUseOwnerRelevancy (default false)
If the actor has a valid Owner, call Owner’s IsNetRelevantFor and GetNetPriority
Replicates (default true)
If true, this actor will replicate to remote machines
See SetReplicates()
NetDormancy (default DORM_Awake)
Dormancy setting for actor to take itself off the replication list without being destroyed on clients.
1 | // This actor can go dormant, but is not currently dormant; Game code will tell it when it goes dormant. |
NeuCullDistanceSquared (default 225000000.0)
Square of the max distance from the client’s viewpoint that this actor is relevant and will be replicated.
NetUpdateFrequency (default 100.0)
How often (per second) this actor will be considered for replication, used to determine NetUpdateTime.
MinNetUpdateFrequency (default 2.0)
Used to determine what rate to throttle down to when replicated properties are changing infrequently.
NetPriority: (default 3.0)
Priority for this actor when checking for replication in a low bandwidth or saturated situation; higher priority means it is more likely to replicate.
Replicated Movement
LocationQuantization Level: (default EVectorQuantization::RoundTwoDecimals)
1 | enum EVectorQuantization |
VelocityQuantization Level: (default ERotatorQuantization::RoundWholeNumber)
1 | enum ERotatorQuantization |
RotationQuantization Level (default ByteComponents)
Allow tuning the compression level for replicated rotation. You should only need to change this from the default if you see visual artifacts.
1 | enum ERotatorQuantization |
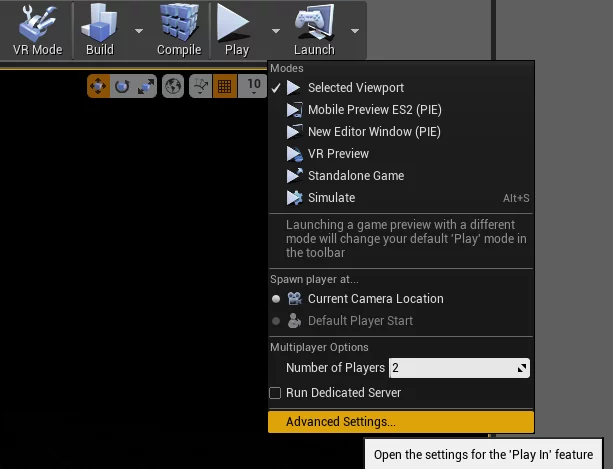
Disable Automatic Connection When Testing Multiplayer in UE Editor

Some Issues When Using UE Online
UE provides AController::IsLocalControlled to determine whether the current controller is controlling a local entity:
1 | bool AController::IsLocalController() const |
Note: Be cautious not to use the
AutoPossessPlayeroption in Pawn. This will cause the joining player’s Controller to be automatically assigned as Player0, resulting in strange bugs.
There are also UKismetSystemLibrary::IsServer/UKismetSystemLibrary::IsDedicatedServer, which fetch the current World‘s GetNetMode for judgment:
1 | bool UKismetSystemLibrary::IsServer(UObject* WorldContextObject) |
Members of enum ENetMode and their meanings are as follows:
| Name | Description |
|---|---|
| NM_Standalone | Standalone: a game without networking, with one or more local players. |
| NM_DedicatedServer | Dedicated server: server with no local players. |
| NM_ListenServer | Listen server: a server that also has a local player who is hosting the game, available to other players on the network. |
| NM_Client | Network client: client connected to a remote server. |
| NM_MAX |
Using UE’s OnlineSubsystem for Networking
UE networking can be accomplished via CreateSession/FindSession/JoinSession, but some simple configurations need to be done first.
Edit Config\DefaultEngine.ini, and add the following content:
1 | +NetDriverDefinitions=(DefName="GameNetDriver",DriverClassName="/Script/OnlineSubsystemSteam.SteamNetDriver",DriverClassNameFallback="/Script/OnlineSubsystemUtils.IpNetDriver") |
Note the difference in integration with Steam; you should set DefaultPlatformService to Null, otherwise you won’t be able to join the session.
UE Networking Client Cannot Pathfind
You need to set Allow Client Side Navigation to true in Project Settings - NavigationSystem: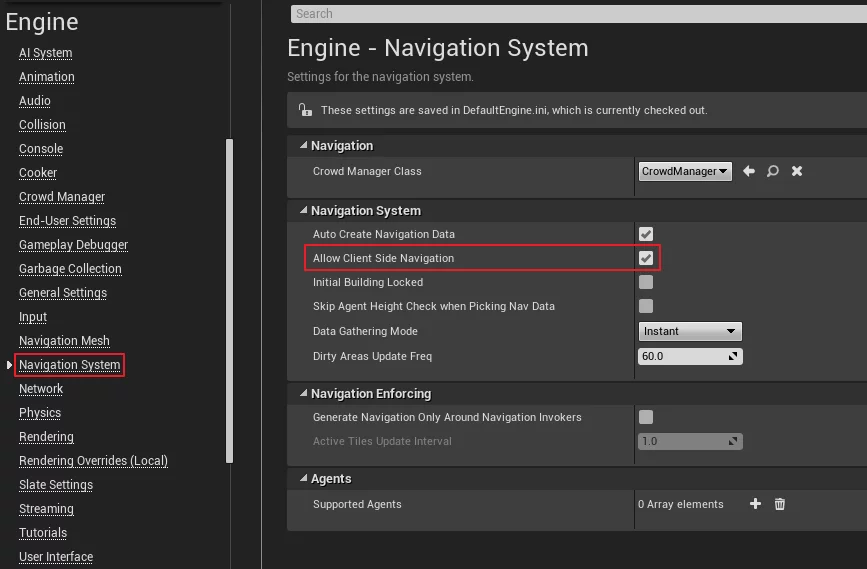
UE Sessions Not Found in LAN
After creating a session using CreateSession, if you cannot find the session list using FindSession on another machine in LAN, the cause is that the computer has VM or VirtualBox installed. Disabling the VMware Network Adapter or VirtualBox Network Adapter will resolve the issue.
The specific location in the control panel is Control Panel/Network and Internet/Network and Sharing Center/Change Adapter Settings: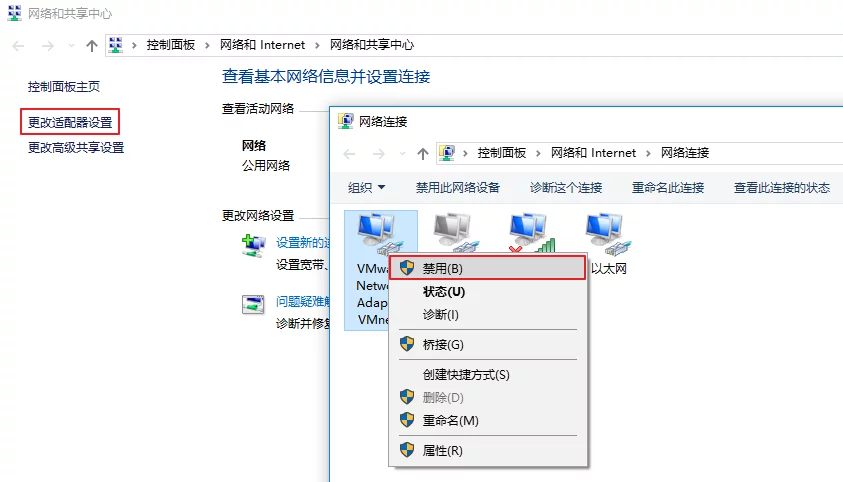
Other Script
Unexplained Compilation and Linking Errors in UE
It’s best to delete the following files after modifying the code:
1 | Binaries |
The bat script is as follows:
1 | del *.VC.db |
Also, search all plugin directories for Binaries and Intermediate:
1 | $ find . -name "Binaries"|xargs rm -rf |
Profiling Commands
Display FPS
1 | stat FPS |
Display Stat Units (total time per frame, logic thread/render thread and GPU consumption):
1 | stat Unit |
Display Various Parameter Values in the Render Thread
1 | Stat SceneRendering |
Display Consumption of Render Thread Commands
1 | stat RenderThreadCommands |
Display Parameters on the Game Thread (AI/Physics/Animation/Blueprint/Memory Allocation, etc.)
1 | stat game |
Display Time and Efficiency Data Required for Culling
1 | Stat InitViews |
Display the Time Required for Lighting and Shading Rendering
1 | Stat LightRendering |
Capture GPU Information for the Current Frame
1 | ProfileGPU |
This will pop up the GPU Data Visualizer showing the data for the captured frame.
Capture Profiling Information (CPU/GPU)
1 | stat StartFile |
This will generate *.ue4stats files in the project’s Saved/Profiling/UnrealStats directory, which can be opened using UnrealFrontend.
UE Network Analysis
1 | # Start and stop recording |
Captured data will be saved in Saved/Profiling with the extension *.nprof.
Documentation for the UE Network Profiler tool can be found at Network Profiler.
Links: