最近想到还有块树莓派在吃灰,今天使用frp折腾了一下内网穿透,把放在家里的树莓派也可以通过外网访问。
前置需求:
- 具有公网IP的机器一台(具有公网IP的宽带或者VPS均可)
- 域名一个(非必需)
环境介绍
首先我们需要在具有公网IP的机器上配置和启动frp的服务端,我使用的我是自己的VPS,以下涉及frp服务端的操作均在我的VPS上执行,系统环境如下:
1 | root@visionsmile:~# lsb_release -a |
下载frp
然后下载frp,frp项目提供了很多平台的二进制程序,可以在这里按需下载。
我这里需要下载的是amd64版本的:
1 | $ wget https://github.com/fatedier/frp/releases/download/v0.20.0/frp_0.20.0_linux_amd64.tar.gz |
下载完之后解压:
1 | $ tar -xvzf frp_0.20.0_linux_amd64.tar.gz |
frp配置和启动
此时目录下具有这样的目录结构:
1 | root:~/downloads/frp_0.20.0_linux_amd64# ls |
frps是frp的服务端程序,frps.ini是服务端的配置。frps.ini的全部配置选项可以看这里:frps_full.ini.
当前的frp版本的frps.ini的默认配置如下:
1 | $ cat frps.ini |
这里的bind_port既是后面我们使用frpc(frp客户端)连接到服务端的端口,请保证该端口被防火墙(iptables)放行。
注意:如果是阿里云的服务器,需要在网页的安全组里设置放行端口,直接在服务器上使用ufw或者iptables是没有效果的。
在这里我不写太复杂的东西,保持默认即可,更多功能可以去读项目的frp/README
然后就可以启动frp了:
1 | $ ./frps -c frps.ini |
执行之后如下图:
配置frps在服务器上开机启动
Linux上设置开机启动有两种方法,一种是把启动命令添加到/etc/ec.local中,另一种则是使用systemd创建服务。这里我两种都会介绍一下,但是我推荐使用systemd.
首先先在服务器上将frp拷贝到/etc目录下:
1 | $ sudo mkdir /etc/frp |
使用systemd
然后新建开机启动的服务,我使用的是systemd来启动frps服务:
1 | $ sudo cd /etc/systemd/system |
将下面内容填入其中:
1 | [Unit] |
保存退出,然后修改权限:
1 | $ sudo chmod 755 frps.service |
现在就可以启动了:
1 | $ sudo systemctl start frps |
使用/etc/rc.local
因为服务端是被动接收不需要依赖其他的服务启动顺序也可以直接写到了/etc/rc.local中,客户端有点不一样,后面详说。
添加开机启动命令(已经执行过移动frp的目录到/etc/frp):
1 | $ sudo nano /etc/rc.local |

使用域名解析服务端地址(可选)
之所以要使用域名是因为如果我们的服务端出现了问题,客户端直接也没用了,但是我又想如果这台服务器挂掉,我可以在不修改客户端的情况下连接到另一台服务器。
如果在frpc中直接填死服务端的IP地址是没办法做到这一点的,所以我想到的是使用一个域名解析到我想要连接到的服务器地址。
所以,我们使用一个域名(或者二级域名)解析到我们想要连接的服务器地址:比如我在dnspod上将frp.imzlp.com解析A到了服务器XXX.XXX.XXX.XXX。改完之后记得ping一下看是否连通。
与上面下载frp服务端的方式相同,下载frp的客户端。注意下面的命令在客户端机器(raspberry pi)上执行。
frp客户端的默认配置如下:
1 | $ cat frpc.ini |
暂时需要修改的是server_addr和server_port,因为上面我使用了默认的端口,所以在这里只需要修改server_addr就可以了。
改为我的自定义域名(如果没有域名则也可以直接指定服务端的IP地址),如下:
1 | $ cat frpc.ini |
在[ssh]lable下的local_port的客户端的端口转发到服务端的remote_port端口。也要保证在服务端remote_port被防火墙放行,不然也是连接不上的。
然后就可以在客户机上启动frpc了:
1 | $ ./frpc -c frpc.ini |

尝试连接内网SSH
通过上面的操作,frps和frpc均已启动,我们可以尝试一下通过互联网连接树莓派的ssh,因为我上面使用了域名的解析,所以我可以直接使用域名:
1 | $ ssh -oPort=6000 pi@frp.imzlp.com |
注意:要指定ssh连接的服务端端口(即在frpc.ini)中的remote_port参数。不出意外连接成功,如下: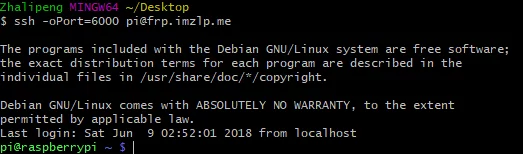
配置frpc在客户端上开机启动
注意:这里是Linux的介绍,Windows的脚本在后面。
1 | # 执行在frp_0.20.0_linux_arm的目录(配置文件均已更改) |
在客户端开机启动我使用的是systemd的服务:
1 | $ sudo cd /etc/systemd/system |
将下面内容填入其中:
1 | [Unit] |
请特别注意上面脚本中的这两行:
1 | Type=idle |
这两条语句的目的是等待系统初始化完成,如果frp直接在开机时启动会因为链接不上网络(如果是使用域名的可能会因为DNS解析不到)而错误中止。
注意:如果不希望等待,则可以把ExecStartPre去掉,但是要求在frpc的配置中把login_fail_exit设置为false。
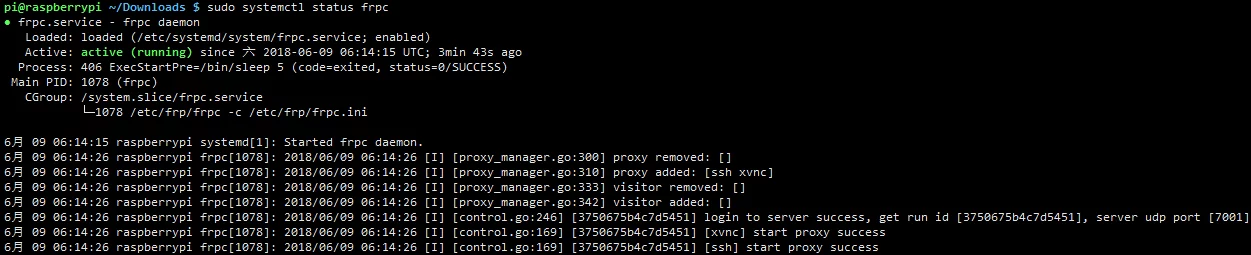
启动frpc并设置为开机启动:
1 | $ systemctl start frpc |
使用kcp协议
使用过kcp来加速ss肯定会知道,kcp加速会带来更高的传输效率和降低延迟。
frp现在的版本(>v0.12.0)的底层通信协议支持kcp,可以在配置文件中手动启用:
服务端:
在服务端的frps.ini中启用 kcp 协议支持,指定一个 udp 端口用于接收客户端请求:
1 | # frps.ini |
客户端:
在 frpc.ini 指定需要使用的协议类型,目前只支持 tcp 和 kcp。其他代理配置不需要变更:
1 | # frpc.ini |
开启加密和流量压缩
有些局域网会做流量的特征识别进行拦截,frp也提供了流量加密和压缩(在frpc.ini中添加):
1 | use_encryption = true |
使用Mstsc远程连接
在我之前的文章将树莓派打造成便携的Linux编译环境中写到过可以在树莓派上安装xrdp使其可以被windows的mstsc连接。
1 | # 安装xrdp 使其可以使用mstsc连接 |
通过局域网连接时这样的: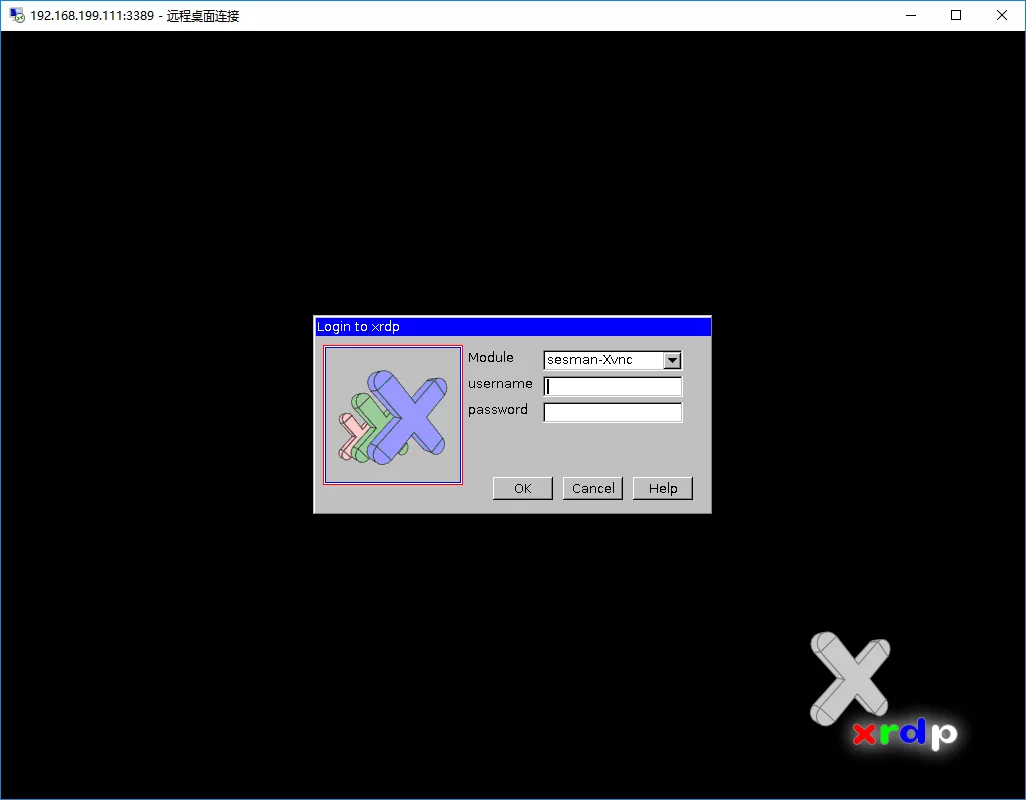
因为mstsc默认访问的端口时3389,所以在我们想要通过互联网访问时,需要将树莓派(客户端)的3389端口映射到服务器端的端口。
具体操作如下:
编辑客户端frpc.ini,添加一个lable:
1 | [xvnc] |
代表着就是,将���地的3389端口映射为服务器端的6001端口,保存后重启frpc服务即可。
1 | $ systemctl restart frpc |
注意:与上面提到的相同,要保证服务器端的6001端口没有被防火墙禁用。
操作完毕之后就可以使用Mstsc在外网链接了(同样我使用域名):
连接上之后就和局域网连接一样了: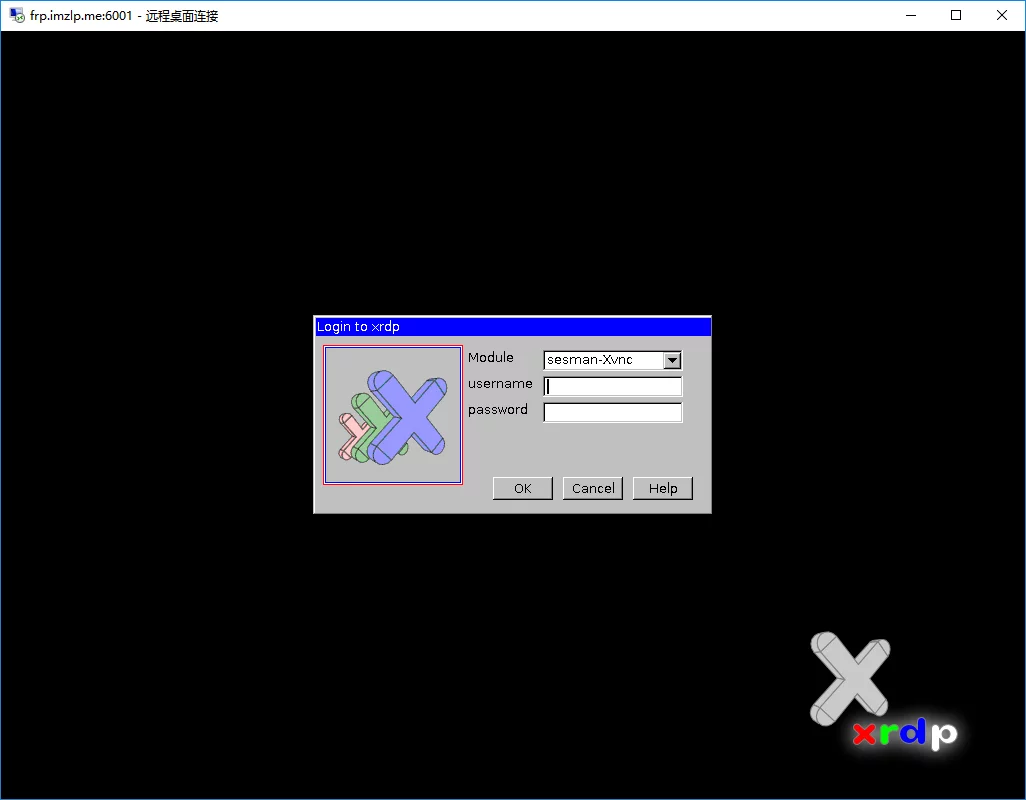
登陆进去之后:
同样的方法也可以使用在windows作为客户端的远程连接上,比anydesk或者teamviewer强多了。
十分酸爽,太流畅了,就像操作本地的电脑一样。
还可以使用rdpwrap,使远程连接访问其他账户时不会把本地账户踢出(等同于WindowsServer的功能)。
重新加载配置
frp提供了一种方法从修改的配置文件读取变动并应用代理的更新(这样就不用中止再重新启动了)。
将下面的参数添加到frpc.ini:
1 | # frpc.ini |
重新加载的命令:
1 | frpc reload -c ./frpc.ini |
注意:当前的frp版本(v0.20.0)只有start里的内容才会被重新加载,比如server_addr等,所以如果frpc.ini中server_addr有变动,使用reload也并不会重新连接到新的服务器。
我的frp配置文件
1 | #frps.ini |
1 | #frpc.ini |
我写了一个py脚本来检测我域名的DNS更新,如果有更新就重启客户端的frpc服务:
1 | # 注意,此脚本不能在windows上用。 |
同样地我把它加入到了systemctl的启动服务里面:
1 | # /etc/systemd/system/syncfrpcdns.service |
也同样开启开机启动:
1 | $ sudo systemctl enable syncfrpcdns.service |
上上面的脚本是只能在Linux下跑的,我也写了一个功能相同的可以在Win下跑的:
1 | # SyncFrpServerHost.py |
注意:该脚本可以作为Frpc的开机启动程序,不用再单独设置Frpc的开机的开机启动。最好把frpc.ini中的login_fail_exit设置为false。
开机启动且隐藏窗口可以写一个简单的vbs来实现(其实也可以使用pythonw):
1 | DIM objShell |
将其快捷方式放在C:\ProgramData\Microsoft\Windows\Start Menu\Programs\StartUp下即可。
这样当我切换frp.imzlpe.me的服务器时,客户端检测到DNS变化也会更新连接到新的服务器的。
结语
操作时最重要的一点是要检查端口是否被防火墙放行,因为连接不上很有可能是端口被禁止了而不是frp配置的问题。
frp的更多使用方法可以看这里:frp/README。
Update
2018.11.10 16:19
- 增加服务端上使用systemd来启动frps.
- 修改部分措辞
- 增加阿里云的安全组介绍
Recently, I remembered I had a Raspberry Pi gathering dust. Today, I tinkered with internal network penetration using frp so that the Raspberry Pi at home can also be accessed via the external network. Prerequisites:
- A machine with a public IP address (either broadband with a public IP or a VPS is acceptable)
- A domain name (optional)
Environment Introduction
First, we need to configure and start the frp server on a machine with a public IP. I’m using my own VPS, so all operations related to the frp server below are performed on my VPS. The system environment is as follows:
1 | root@visionsmile:~# lsb_release -a |
Download frp
Then download frp. The frp project provides binary programs for many platforms, which can be downloaded as needed here.
Here, I need to download the amd64 version:
1 | $ wget https://github.com/fatedier/frp/releases/download/v0.20.0/frp_0.20.0_linux_amd64.tar.gz |
After downloading, decompress it:
1 | $ tar -xvzf frp_0.20.0_linux_amd64.tar.gz |
frp Configuration and Startup
At this point, the directory has the following structure:
1 | root:~/downloads/frp_0.20.0_linux_amd64# ls |
frps is the frp server program, and frps.ini is the server’s configuration. All configuration options for frps.ini can be found here: frps_full.ini.
The default configuration for frps.ini in the current frp version is as follows:
1 | $ cat frps.ini |
Here, bind_port is the port that we will later use frpc (frp client) to connect to the server. Please ensure that this port is allowed by the firewall (iptables).
Note: If it’s an Alibaba Cloud server, you need to set the allowed ports in the security group on the webpage. Using ufw or iptables directly on the server will not be effective.
I won’t write anything too complex here; keeping the defaults is fine. For more features, you can read the project’s frp/README.
Then, you can start frp:
1 | $ ./frps -c frps.ini |
After execution, it will be as shown below:
Configure frps to Start on Boot on the Server
There are two ways to set up autostart on Linux: one is to add the startup command to /etc/ec.local, and the other is to create a service using systemd. I will introduce both here, but I recommend using systemd.
First, copy frp to the /etc directory on the server:
1 | $ sudo mkdir /etc/frp |
Using systemd
Then, create a new autostart service. I’m using systemd to start the frps service:
1 | $ sudo cd /etc/systemd/system |
Fill in the following content:
1 | [Unit] |
Save and exit, then modify permissions:
1 | $ sudo chmod 755 frps.service |
Now it can be started:
1 | $ sudo systemctl start frps |
Using /etc/rc.local
Since the server is passively receiving and does not need to rely on the startup order of other services, it can also be written directly into /etc/rc.local. The client is a bit different, which will be discussed in detail later.
Add the autostart command (assuming frp directory has already been moved to /etc/frp):
1 | $ sudo nano /etc/rc.local |
Using Domain Name Resolution for Server Address (Optional)
The reason for using a domain name is that if our server encounters issues, the client becomes useless. However, I want to be able to connect to another server without modifying the client if the current server goes down.
If you hardcode the server’s IP address directly in frpc, this is not possible. So, I thought of using a domain name to resolve to the server address I want to connect to.
Therefore, we use a domain name (or subdomain) to resolve to the server address we want to connect to: for example, I resolved frp.imzlp.com to server XXX.XXX.XXX.XXX with an A record on dnspod. After making changes, remember to ping it to check connectivity.
Similar to downloading the frp server, download the frp client. Note that the following commands are executed on the client machine (Raspberry Pi).
The default configuration for the frp client is as follows:
1 | $ cat frpc.ini |
For now, server_addr and server_port need to be modified. Since I used the default port above, only server_addr needs to be changed here.
Change it to my custom domain name (if you don’t have a domain name, you can also directly specify the server’s IP address), as follows:
1 | $ cat frpc.ini |
The client’s local_port under the [ssh] label is forwarded to the server’s remote_port. Also ensure that the remote_port on the server is allowed by the firewall, otherwise, the connection will not be established.
Then, you can start frpc on the client machine:
1 | $ ./frpc -c frpc.ini |
Attempt to Connect to Intranet SSH
With the above operations, both frps and frpc have started. We can try connecting to the Raspberry Pi’s SSH via the internet. Since I used domain name resolution above, I can directly use the domain name:
1 | $ ssh -oPort=6000 pi@frp.imzlp.com |
Note: You must specify the server port for the SSH connection (i.e., the remote_port parameter in frpc.ini). If all goes well, the connection will succeed, as follows:
Configure frpc to Start on Boot on the Client
Note: This section introduces Linux. The Windows script will be discussed later.
1 | # Execute in the frp_0.20.0_linux_arm directory (configuration files have all been changed) |
For client autostart, I’m using a systemd service:
1 | $ sudo cd /etc/systemd/system |
Fill in the following content:
1 | [Unit] |
Please pay special attention to these two lines in the script above:
1 | Type=idle |
The purpose of these two statements is to wait for system initialization to complete. If frp starts directly at boot, it might terminate with an error because it cannot connect to the network (or because DNS resolution fails if a domain name is used).
Note: If you don’t want to wait, you can remove ExecStartPre, but it requires setting login_fail_exit to false in the frpc configuration.
Start frpc and set it for autostart:
1 | $ systemctl start frpc |
Using KCP Protocol
Anyone who has used KCP to accelerate SS will know that KCP acceleration brings higher transmission efficiency and reduced latency.
Current versions of frp (>v0.12.0) support KCP as the underlying communication protocol, which can be manually enabled in the configuration file:
Server:
Enable KCP protocol support in the server’s frps.ini and specify a UDP port to receive client requests:
1 | # frps.ini |
Client:
In frpc.ini, specify the required protocol type; currently, only tcp and kcp are supported. Other proxy configurations do not need to be changed:
1 | # frpc.ini |
Enabling Encryption and Traffic Compression
Some local area networks perform traffic signature recognition and interception. frp also provides traffic encryption and compression (add to frpc.ini):
1 | use_encryption = true |
Using Mstsc for Remote Connection
In my previous article Building a Portable Linux Compilation Environment with Raspberry Pi, I wrote about installing xrdp on Raspberry Pi to enable connection via Windows Mstsc.
1 | # Install xrdp to allow connection with mstsc |
When connecting via a local area network, it looks like this:
Because Mstsc’s default access port is 3389, when we want to access it over the internet, we need to map the Raspberry Pi’s (client’s) 3389 port to a server-side port.
The specific steps are as follows:
Edit the client’s frpc.ini, add a label:
1 | [xvnc] |
This means mapping the local port 3389 to the server-side port 6001. Save and restart the frpc service.
1 | $ systemctl restart frpc |
Note: As mentioned above, ensure that server-side port 6001 is not disabled by the firewall.
After the operation is complete, you can use Mstsc to connect from the external network (again, I’m using a domain name):
After connecting, it’s just like a local area network connection:
After logging in:
The same method can also be used for remote connections with Windows as the client, which is much better than Anydesk or TeamViewer.
It’s incredibly smooth, just like operating a local computer.
You can also use rdpwrap to prevent the local account from being kicked out when another account is accessed via remote connection (equivalent to a Windows Server feature).
Reload Configuration
frp provides a method to read changes from modified configuration files and apply proxy updates (thus avoiding stopping and restarting).
Add the following parameters to frpc.ini:
1 | # frpc.ini |
Reload command:
1 | frpc reload -c ./frpc.ini |
Note: In the current frp version (v0.20.0), only content within start will be reloaded, such as server_addr, etc. Therefore, if server_addr in frpc.ini changes, reload will not reconnect to the new server.
My frp Configuration Files
1 | #frps.ini |
1 | #frpc.ini |
I wrote a Python script to detect DNS updates for my domain. If there’s an update, it restarts the client’s frpc service:
1 | # Note: This script cannot be used on Windows. |
Similarly, I added it to the systemctl startup services:
1 | # /etc/systemd/system/syncfrpcdns.service |
Also enabled autostart:
1 | $ sudo systemctl enable syncfrpcdns.service |
The script above can only run on Linux. I also wrote one with the same functionality that can run on Windows:
1 | # SyncFrpServerHost.py |
Note: This script can serve as the Frpc autostart program, so you don’t need to set up Frpc autostart separately. It’s best to set login_fail_exit to false in frpc.ini.
Autostarting with a hidden window can be achieved by writing a simple VBS script (you can also use pythonw):
1 | DIM objShell |
Place its shortcut under C:\ProgramData\Microsoft\Windows\Start Menu\Programs\StartUp.
This way, when I switch the server for frp.imzlpe.me, the client will detect the DNS change and update to connect to the new server.
Conclusion
The most important point during operation is to check whether the port is allowed by the firewall, because the inability to connect is most likely due to the port being blocked rather than an frp configuration issue.
More ways to use frp can be found here: frp/README.
Update
2018.11.10 16:19
- Added the use of systemd to start frps on the server.
- Modified some wording
- Added an introduction to Alibaba Cloud’s security groups