Our company recently set up an intranet server. From now on, all projects will use Git for version control. I’m documenting some common operations here for easy reference.
Install Git
Windows: Git installer/portable version can be downloaded from the official website. The difference between the installer and the portable version is that the portable version requires you to manually add GitBinaryPath/bin to the system’s Path.
Linux(debian): sudo apt-get install git
First-time Setup
After installation, launch git.exe (Windows), or directly enter in the terminal for Linux:
1 | $ git config --global user.name "Your Name" |
Generate SSH Key (replace the email address with your own email address):
1 | $ ssh-keygen -t rsa -C "youremail@example.com" |
Then press Enter all the way (or set your own password). After execution, a .ssh directory will be created under C:\Users\${userName}\ (or ~/ in Linux), containing two files: id_rsa and id_rsa.pub.
id_rsa is the private key and must not be leaked. id_rsa.pub is the public key and can be safely shared with anyone.
Then add your SSH Key to your account on the remote Git (GitHub, GitLab).
Because GitHub needs to identify that the commits you push are indeed from you, not someone impersonating you, and Git supports the SSH protocol, GitHub can confirm that only you can push as long as it knows your public key.
Of course, GitHub allows you to add multiple Keys. Suppose you have several computers, and you commit sometimes at work and sometimes at home; as long as you add the Key from each computer to GitHub, you can push to GitHub from any of them.
Create Local Repository
Launch Git Bash and cd (or use Easy Context Menu to add GitBash to the system right-click menu) to the directory where you want to create a local repository and execute the following command:
1 | // Initialize a directory |
Commit Files Locally
1 | $ git add ${file_name} |
Add Remote Repository
1 | // Add a remote repository (${repo_name} can be customized) |
Remove Remote Repository
1 | // If you want to remove the remote repository associated with the local repository, you can execute the following command |
Push to Remote Repository
1 | // ${branch} defaults to master (main branch) and can be modified (not recommended). -f forces submission ignoring conflicts. |
Push to Multiple Remote Repositories
There are two ways to push to two or more remote repositories in one step.
The first method is to use Git’s set-url --add command:
1 | # Add the first remote repository |
The second method is to directly edit the .git/config file and add multiple remote repository addresses under the same remote repository name:
1 | $ nano .git/config |
Create New Branch
1 | // -b means base, which is to create a new branch based on the current branch |
checkout has three uses: switching branches, discarding changes, and checking out from historical versions, which will be covered later.
1 | # Create a local branch based on the remote origin/level |
Push Local Current Branch to Remote Branch
1 | // If the ${new_branch_name} branch does not exist remotely, it will be created automatically |
Merge Branches
1 | // First, switch back to the branch you want to merge into, for example, merge the dev branch into the master branch |
Abort Merge
If there are conflicts between local and remote branches (or local branches), you can abort the merge to revert the local branch to its pre-merge state.
1 | $ git merge --abort |
Resolve Conflicts
In Git, if there are conflicts in text files, you can directly diff them when pulling, but it’s not as convenient if Git manages binary files.
If you want to undo changes from a local commit ${123456}, you can revert to a historical version, then use:
1 | $ git reset --hard 123455 |
Binary File Conflicts
In Git, text file merges are directly visible, but binary files can be quite tricky.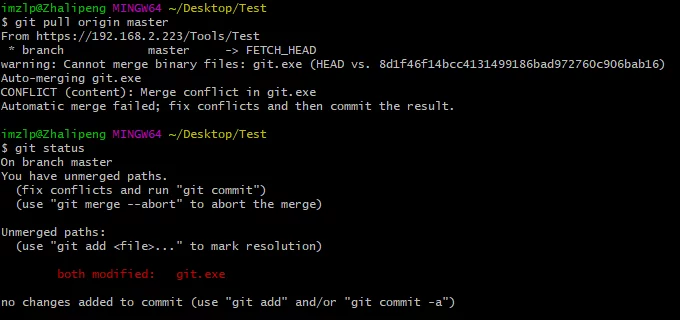
If we want to keep the remote branch’s git.exe, we can execute the following command:
1 | # Keep the remote version of git.exe |
The command to keep the local branch’s file is:
1 | $ git checkout --ours git.exe |
Then execute:
1 | $ git add git.exe |
At this point, the local repository is merged with the remote, and the remote file version is preserved during the merge.
Delete Branch
1 | // Delete local branch |
Undo Deleted Branch
Two scenarios
- Terminal already exited
git reflog to view the commit SHA1 value of your last commit

1 | $ git branch ${branch_name} ${SHA1} |
You can create a branch based on your SHA1 value. For this commit, you can choose the commit SHA1 of the branch deletion operation.
- Terminal not exited
The SHA1 value will be displayed when deleting a branch.
1 | $ git branch -d dev |
Then you can use this SHA1 value to restore the deleted branch.
1 | $ git branch ${branch_name} ffe7c46 |
Revert Version
1 | // View all committed versions |
1 | // Revert to a specific version |

1 | // Revert a specific file to a specific version |
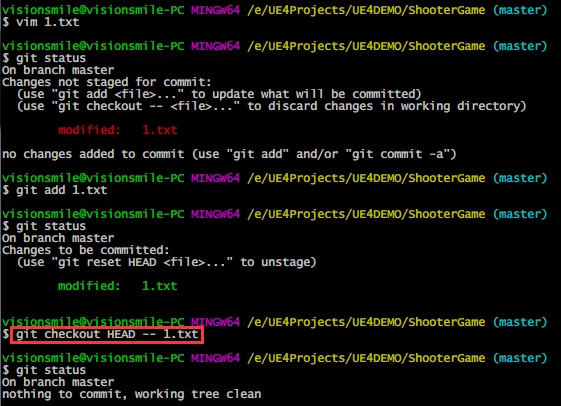
Undo Uncommitted File Changes
Undo Local Changes Only
Suppose we have made some modifications to files within a branch, and they have not yet been staged (git add).
After modifying the file, use the status command to check the file status.

Git prompts us that for files not added to the staging area, you can use git checkout -- to quickly undo local changes.
1 | // Quickly undo local changes |
Undo Both Local and Staged Changes
So, for files already added to the staging area, how do you undo local changes? First, use the status command to check the file status:

You can unstage first:
1 | $ git reset ${filename} |
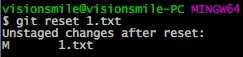
Then undo local changes:
1 | // Quickly undo local changes |
One-step Quick Undo of Changes
1 | $ git checkout HEAD -- ${filename} |
Check Out Files from Historical Versions
Sometimes we commit new versions, but feel that some file changes are not appropriate. If we want to revert certain files to previous versions while keeping the rest in the new version’s state, we can use the checkout command.
1 | // View historical committed versions |
Subsequently, you can commit them using add just like regular files.
Rename Local Branch
1 | git branch -m ${CurrentBranchName} ${NewCurrentBranchName} |
Clone Remote Repository
1 | // Clone all branches of the repository |
Switch to Remote Branch
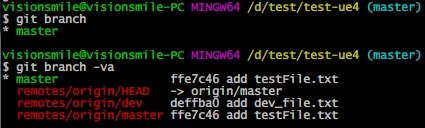
After git cloneing a remote repository, running git branch will only show:
1 | * master |
You won’t see other branches, even if there are other branches on the remote repository.
You can use git branch -va to first list local/remote branches:
1 | $ git branch -va |
Switch to the remote origin/master branch:
1 | $ git checkout remotes/origin/master |
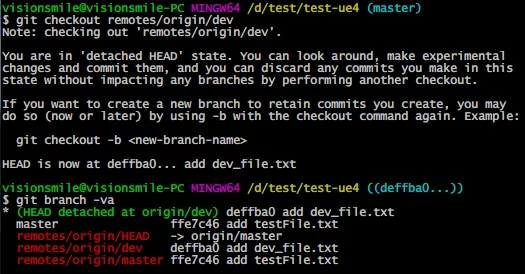
Further operations are required:
1 | $ git checkout -b ${remote_branch_to_local_branch_name} |
-b means base, creating a new branch named dev based on the current branch. Of course, other names can also be used here. Then, executing git branch -va will show:
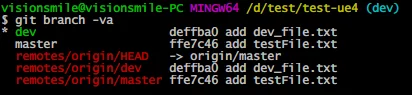
And you’re all set~
After modifying the dev branch locally, you can directly push it to the remote dev branch:
1 | $ git push origin dev |
Clone Specific Branch from Remote Repository
1 | $ git clone -b ${OriginRepoBranchName} ${OriginRepoAddr} |
For example:
1 | git clone -b master git@github.com:imzlp/blog-source.git --depth=2 |
That is, pull the master branch from the remote repository, and --depth specifies the depth of historical versions to pull.
Ignore Unnecessary Files for Committing
Sometimes we don’t want to commit everything to the repository (e.g., some compiled binary files). We can use .gitignore to exclude files that don’t need to be committed.
On Windows, we cannot directly create this file because it starts with a dot and has no filename. Therefore, it needs to be created using a command in GitBash:
1 | $ touch .gitignore |
Then edit .gitignore and add the files/directories you want to exclude.
1 | # Exclude the public folder in the current directory |
For more information about .gitignore, see here — Ignoring Special Files - Git Tutorial
Compare Differences Between Versions
1 | # View which parts of unstaged files have been updated |
Diff Between Two Branches
Common diff usage involves comparing the working directory, index, HEAD, or diffing two commits. In addition to these uses, diff can also compare two branches, as follows:
1 | $ git diff topic master (1) |
Usage 1: Directly specifying two branch names separated by a space will directly diff the latest commits on those two branches, effectively diffing two commits.
Usage 2: Branch names separated by two dots, works the same as Usage 1 (a cool trick).
Usage 3: Branch names separated by three dots will output changes on the master branch since topic and master were developed separately.
It should be noted that .. and ... here should not be confused with .. and ... in git rev-list.
Error Handling
bad signature
If the following error occurs when using the git terminal:
1 | $ git status |
This is caused by index corruption and can be resolved in the following way:
1 | rm -f .git/index |
For more details, see the discussion on Stack Overflow: How to resolve “Error: bad index – Fatal: index file corrupt” when using Git
Disable Git SSL Verification
1 | $ git config --global http.sslVerify false |
Private Key Permissions Too Open Error
When using Git, you might sometimes encounter this prompt (usually when sharing private keys between machines).
1 | @@@@@@@@@@@@@@@@@@@@@@@@@@@@@@@@@@@@@@@@@@@@@@@@@@@@@@@@@@@ |
This indicates that your Git private key’s read/write permissions are too open, posing a security risk (mine is 644 here). The solution is to change the read/write permissions of the private key (id_rsa) to 600. For Linux read/write permissions, see Collection of Tools and Environment Knowledge: Linux File Permission Modification.
1 | sudo chmod 600 ~/.ssh/id_rsa |
Solution for Windows:
Right-click on the .ssh/id_rsa file, go to Properties -> Security -> Advanced, disable inheritance. Change the file owner to your own account, then add your own account and SYSTEM with Read & Execute permissions, then save.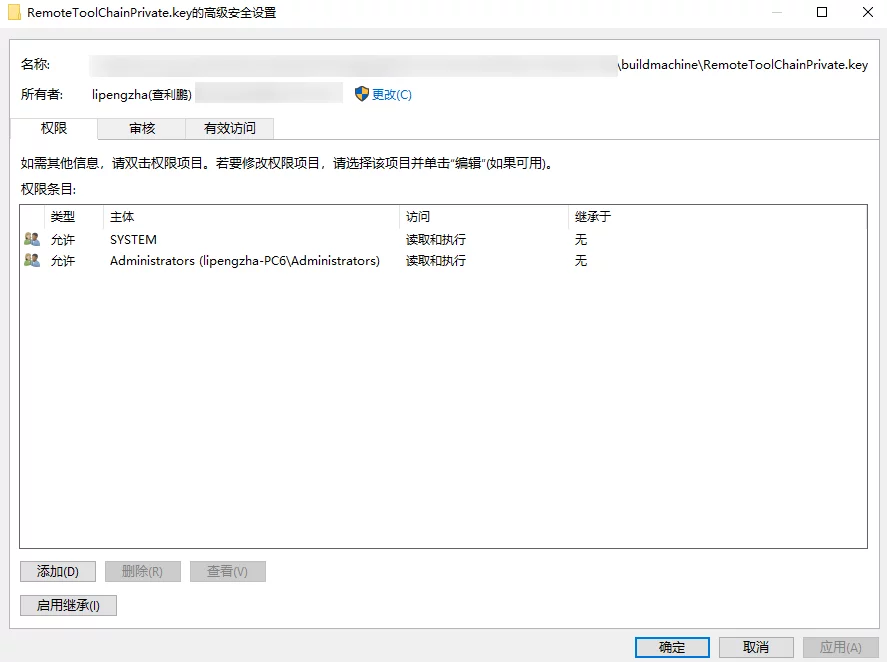
Alternatively, use WSL to set permissions with
chmod.
Reference article: Windows SSH: Permissions for ‘private-key’ are too open
Git Update Remote Branch List
1 | $ git remote update origin --prune |
submodule
If another Git repository is used within a Git repository, git module can be used to handle this inclusion relationship.
If you directly clone repository B into repository A as a subdirectory, when you git add, you will see a prompt similar to the following:
1 | hint: You've added another git repository inside your current repository. |
The purpose is to tell you that you’ve included another Git repository.
The correct way to handle this is to first delete the previously cloned B, and then use git submodule to clone B:
1 | $ git submodule add git@github.com:ufna/VaRest.git Plugins/VaRest |
It will clone B, then you enter B’s directory, change the version record to your desired commit, and then add/commit.
1 | $ git status |
Then push to the remote repository. In the remote repository, the B directory within project A will not be directly uploaded files, but rather a link to the real source repository of B.
Initial Submodule Update
1 | $ git submodule update --init --recursive |
Subsequent Submodule Update
1 | $ git submodule foreach git fetch |
Delete Submodule
Deleting an added submodule requires the following steps:
- Delete the submodule directory
- Delete information about the submodule from
.gitmodules - Delete information about the submodule from
.git/config - Delete the submodule directory under
.git/modules
After completing the above steps, it should be done. However, if there are errors, you can delete the cache:
1 | $ git rm --cached 子模块名称 |
Update All Submodules
1 | git submodule foreach git pull origin master |
git gc
If you see the following prompt when pulling:
1 | Auto packing the repository for optimum performance. You may also |
Because the default format Git uses to save objects to disk is called the loose object format. Git occasionally packs these objects into a binary file called a packfile to save space and improve efficiency. When there are too many loose objects in the repository, it will prompt you to run git gc.
So, when the above prompt appears, just run in the terminal:
1 | $ git gc |
And it’s done after execution.
Pull Branch from Remote
1 | # View remote branches |
Method one:
1 | # Pull remote branch and create local branch |
Method two:
1 | $ git fetch origin ${RemoteBranchName}:${LocalBranchName} |
fatal: The remote end hung up unexpectedly
You can increase the postBuffer (in bytes):
1 | $ git config http.postBuffer 524288000 |
Enable Git Case Sensitivity
Git on Windows is case-insensitive by default; this can be achieved by modifying the configuration:
1 | $ git config core.ignorecase false |
Git Proxy Settings
1 | git config --global http.proxy 'socks5://127.0.0.1:1080' |
Disable Git proxy:
1 | git config --global --unset http.proxy |
Create Local Empty Repository
1 | $ git --bare init |
This command creates an empty repository, which can be added as a remote repository in other projects.
Early EOF Error
1 | user@USER ~ |
Solution: Disable core.compression:
1 | git config --global core.compression 0 |
Repository Not Found
If prompted when pulling:
1 | $ git.exe pull--progress-v--no-rebase "origin" |
After confirming normal server connectivity and no issues with the SSH Key, you can use the following method to resolve it.
The reason for this issue is that this computer had previously used other Git accounts and saved their passwords. When requesting a remote repository, it will default to using the saved password for an account. If the account requesting the server does not have access rights to the repository, this error will occur.
The solution is to delete redundant credentials in the Control Panel:
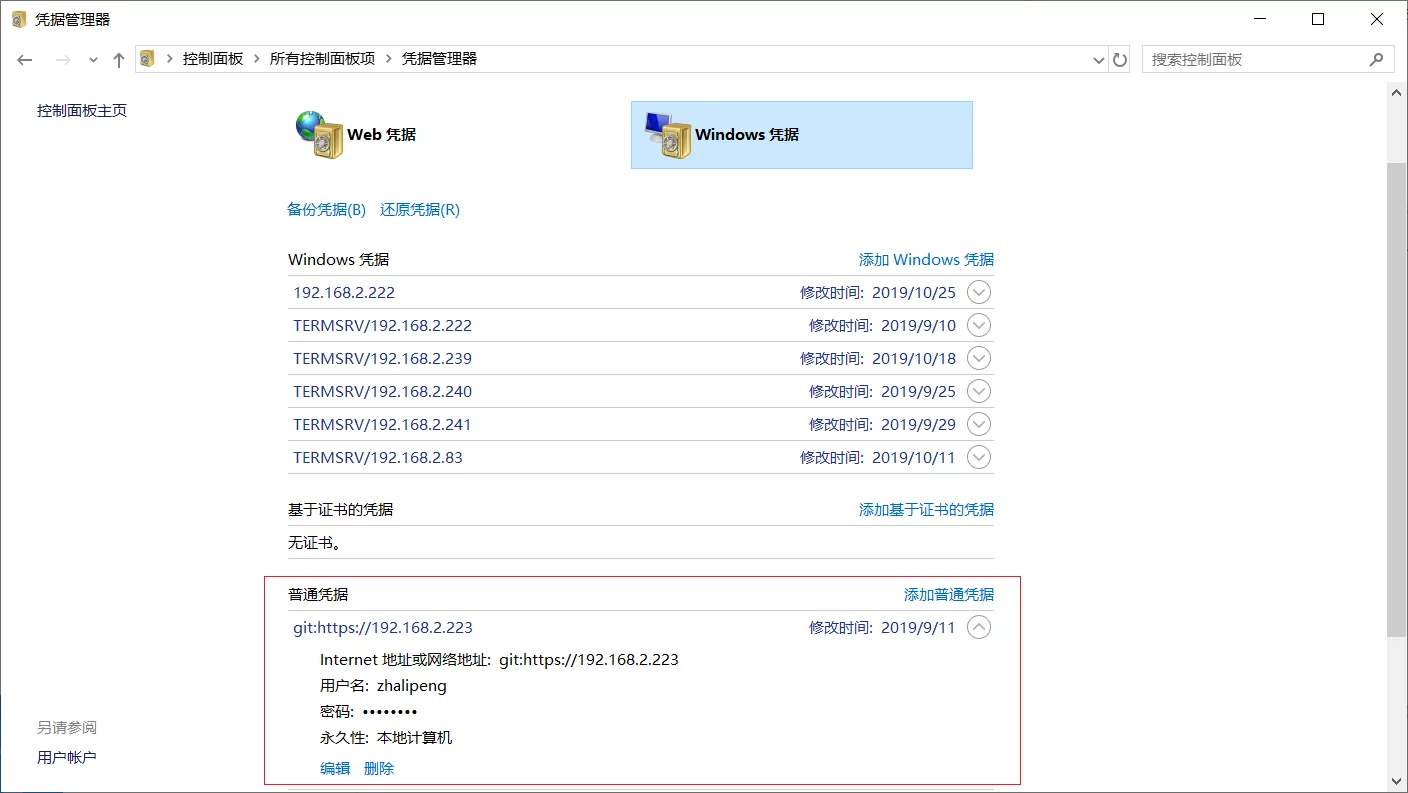
Afterward, cloning or pulling again will prompt for the Git username and password.
Export Diff Files
Sometimes you need to know which file information has been updated between two versions, which can be done using the git diff command. However, if you don’t want to know the specific details of the changes, but just need to know which files were modified, you can use the following method:
1 | $ git diff COMMIT_HASH_1...COMMENT_HASH_2 --name-only > diff.txt |
This will list all modified filenames. The key point is the --name-only parameter.
PS:
COMMIT_HASH_1...COMMENT_HASH_2must have the older version first and the newer version second.
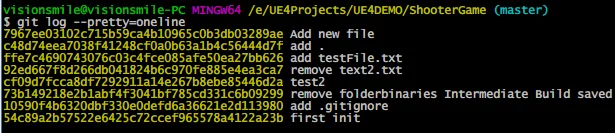
List Commits
Unlike a direct git log, I only want to simply list each commit record without caring about the committer, time, and so on.
You can use Git’s placeholders: Git Basics - Viewing the Commit History
1 | $ git log --pretty=format:"%h \"%s\"" |
--pretty=format: supports more options:
| Option | Description of Output |
|---|---|
%H |
Commit hash |
%h |
Abbreviated commit hash |
%T |
Tree hash |
%t |
Abbreviated tree hash |
%P |
Parent hashes |
%p |
Abbreviated parent hashes |
%an |
Author name |
%ae |
Author email |
%ad |
Author date (format respects the –date=option) |
%ar |
Author date, relative |
%cn |
Committer name |
%ce |
Committer email |
%cd |
Committer date |
%cr |
Committer date, relative |
%s |
Subject |
rebase
If you only use merge to combine branches, all commit information and history from the target branch will be merged. Sometimes we want a feature version to be a single commit, rather than committing every small change. This results in many meaningless commits in Git’s history. How to solve this? By using rebase.
First, let’s talk about the rebase process:
- Create branch B based on branch A:
git checkout -b B - Then freely modify and commit on branch B.
- When the feature on branch B is almost complete and you want to synchronize it back to branch A, you can use
rebaseto fold commits.
The specific operation is:
On branch B, find the hash information of the base version commit from which branch A was cut, and then use the following command:
1 | # Specify the base version to rebase to |
At this point, a vim editing interface will pop up, listing all commits in branch B from the base version to HEAD. By default, all are pick, but because we need to fold commits, we need to combine multiple commits using Git’s squash command:
- pick: Keep this commit (abbreviation: p)
- reword: Keep this commit, but I need to modify its commit message (abbreviation: r)
- edit: Keep this commit, but I want to stop and modify this commit (not just the message) (abbreviation: e)
- squash: Combine this commit with the previous commit (abbreviation: s)
- fixup: Combine this commit with the previous commit, but I don’t want to keep its commit message (abbreviation: f)
- exec: Execute shell command (abbreviation: x)
- drop: I want to discard this commit (abbreviation: d)
Just keep one pick and replace the others with squash. Then a commit editing interface will pop up, where you can comment out unwanted commit messages using #, then save and exit. The rebase is then complete.
- The final step is to switch back to branch A and perform a
mergeoperation:git merge B. After the merge, you will only see one commit on branch A.
Clean LFS Cache
When using LFS acceleration for a while, the cache can become exceptionally large. You can use the following command to clean it:
1 | git lfs prune |
error:cannot lock ref
1 | error: cannot lock ref 'refs/remotes/origin/SN/feature/Terrain_CDLod': is at 076e430ca921e6a02b6c2a431609090e635f8ea8 but expected 48b8b9ebd04ab04a7053d3aca304beca46da16f6 |
Solution:
1 | $ git update-ref -d refs/remotes/origin/SN/feature/Terrain_CDLod |
Git View Staged Files List
git diff
AMCR retrieves files from four operations: Add/Modify/Copy/Rename:
1 | git diff --cached --name-only --relative --diff-filter=AMCR |
Using -cached will detect the differences between files after the current git add and the most recent commit.
1 | $ git diff --cached --name-only --relative --diff-filter=AMCRX |
Specific parameters can also be found in Git’s parameters: –diff-filter.
git status
Using git diff can only compare between versions or files after git add, but it cannot retrieve untracked files.
1 | git status -s |
Will show a short list:
1 | M Assets/Scene/BaseMaterials/4X4_MRA.uasset |
The first two characters indicate the file status, followed by a space. ?? indicates the file is untracked. More status codes can be found in git-status.
Undo Commit
1 | git reset --soft ^HEAD |
Delete Tag on GitHub
1 | git push origin --delete tagname |
Specify Account Password when Committing with Git
1 | git remote set-url origin https://username:password@github.com/username/repo_name.git |
Note that LFS also needs modification; you can edit the .git/config file.
SSH Login Failed with Key
You can modify Mac’s SSH configuration (/etc/ssh/sshd_config):
1 | RSAAuthentication yes |
Then reload the configuration:
1 | $ sudo launchctl unload /System/Library/LaunchDaemons/ssh.plist |
error: cannot lock ref
1 | error: cannot lock ref 'refs/remotes/origin/SN/feature/avinchen/Develop': is at 651a8bcf620db8e6bbc6c874e0949ff6c09bb37f but expected f0f49ccce3abfe552e2301eca5711741a390af6b |
Solution:
1 | $ git update-ref -d refs/remotes/origin/SN/feature/avinchen/Develop |
Or force a full pull:
1 | $ git pull -p |
Pull LFS Files
1 | git lfs fetch |
Pull Pull Request to Local
1 | git fetch origin pull/58/head:ue5 |
This means pulling the remote pull request #58 to the local ue5 branch.
Historical Files Support LFS
After enabling LFS, files in historical commits can also be tracked by LFS.
1 | # Use current gitattributes configuration |
Delete Changed Files
Delete all changed files:
1 | git clean -xdf |
Note: This will delete all untracked files (including files ignored in .gitignore). If you don’t want to delete files in .gitignore, remove x from the above command;
no hostkey alg
If this message appears when connecting to an SSH Server, it’s due to an SSH version mismatch: the remote SSHD version is too high, while the local SSH version is too low.
1 | OpenSSH_5.1p1, OpenSSL 0.9.8i 15 Sep 2008 |
UE updated the SSH client version in the 4.27 engine: Replace Windows ssh and rsync from DeltaCopy with new version from cw…
If using an engine version prior to 4.27 and upgrading to MacOS13+, this problem may occur during remote builds.## detected dubious ownership in repository at
1 | $ git remote set-url origin https://git.woa.com/xxxx/UnrealEngine.git |
If you switch to a new account, you might encounter the error above for repositories pulled with the previous account.
Solution: Add all paths to the safe directory:
1 | git config --global --add safe.directory "*" |
Note: This command should be executed in the new account.
Warning: the ECDSA host key
When you encounter this warning when committing to GitHub: Warning: the ECDSA host key for 'github.com' differs from the key for the IP address '192.30.255.112', it means your SSH client has authenticated another host matching the target IP address.
To resolve this issue, follow these steps:
1. Delete the old key from the known_hosts file:
Use a text editor to open the ~/.ssh/known_hosts file (Windows users can find it at %UserProfile%\.ssh\known_hosts) and locate the corresponding entry (referencing the IP address and hostname), then delete that line of text.
For example, in the known_hosts file, find an entry like this:
1 | github.com,192.30.255.112 ssh-rsa AAAAB3NzaC1yc2EAAAABIwAAAQEAq2A7hX ... |
Delete this line.
2. Confirm GitHub’s SSH host fingerprints:
Confirm the currently valid Transport Layer Security (TLS) public key fingerprints and SSH public key fingerprints from the GitHub official documentation.
3. Reconnect via SSH and add the new host key:
In the terminal or command prompt, execute the following command:
1 | ssh -T -oStrictHostKeyChecking=accept-new git@github.com |
This will automatically add the new github.com host key.
If you see “Hi username! You’ve successfully authenticated, but GitHub does not provide shell access.”, it means the SSH authentication was successful, and the issue is resolved.
Now, you should be able to commit code to GitHub normally, and the warning message will no longer appear.
pull/push always prompts for password
You can execute the following command:
1 | git config --global credential.helper store |
Get the latest commit information for the current repository
If you only want to get the latest commit ID, you can use the following command:
1 | $ git rev-parse HEAD |
If you want to see branch and commit information, you can use the command below:
1 | $ git log -1 --pretty=oneline |
The -1 parameter lists only the latest commit.
If you add --decorate, you will see branch information (also depends on the git version; newer versions include branch information by default):
1 | $ git log -1 --pretty=oneline --decorate |
SSH key login failed
If the SSH connection prompts the following error:
1 | lipengzha@192.168.31.55: Permission denied (publickey,password,keyboard-interactive). |
You can modify the Server-side SSH configuration (/etc/ssh/sshd_config):
1 | RSAAuthentication yes |
Then restart the SSHD service.
View the last modifier of a specific line of code
To view the last person who modified lines n to m of a file:
1 | git blame filename -L n,m |
It will output:
1 | e74836f557b (lipengzha 2024-01-10 09:43:02 +0800 541) TArray<FString> FoundShaderLibs = UFlibShaderCodeLibraryHelper::FindCookedShaderLibByPlatform(PlatformName,SavePath,false); |
1 | git blame -L 541,541 --incremental --minimal Plugins\\HotPatcher\\HotPatcher\\Source\\HotPatcherCore\\Private\\CreatePatch\\PatcherProxy.cpp |
Output:
1 | e74836f557bc5ddf01de3f5f8d3b797107d9a767 541 541 1 |
Clear all history
To clear all history in a Git repository and keep only the latest commit, follow these steps:
Create a new branch:
First, ensure you are in a clean working directory (no uncommitted changes), then create a new branch.1
git checkout --orphan latest_branch
This command creates a new branch with no history.
Add all files:
Add all files to the new branch.1
git add -A
Commit changes:
Commit all files.1
git commit -am "Initial commit with latest state"
Delete the old branch:
Switch back to the main branch and delete the old branch.1
git branch -D main
Rename the new branch to the main branch:
Rename the new branch to the main branch.1
git branch -m main
Force push to the remote repository:
Finally, force push the changes to the remote repository. Note: This will overwrite all history in the remote repository.1
git push -f origin main
This will clear all history, keeping only the latest commit. This operation is irreversible, and all historical records will be permanently deleted. Therefore, before performing this operation, make sure you genuinely do not need this history.
Windows and Linux newline character differences
Windows uses carriage return and line feed (CRLF, \r\n), while Linux uses line feed (LF, \n). If you create or modify files on Windows and then view them on Linux, Git might detect changes due to the different newline characters.
Solution: You can configure Git’s handling of newline characters. Use the following commands to set Git to automatically convert newline characters:
1 | git config --global core.autocrlf true # Windows |
- Use the
.gitattributesfile to specify newline character handling for specific files, for example:
1 | `* text=auto |
Note, after I set this, I found that changed files did not display in the working directory in real-time. You can remove this configuration in
C:\User\[USER_NAME]\.gitconfig.
Batch convert end-of-line characters
I wrote a python script to achieve this: git_eol_normalize.py
1 | python3 git_eol_normalize.py --repo_Dir REPO_ROOT_DIR --eol LF |
You can modify the list of text formats in g_text_exts as needed.
Pull TAG to local branch
- Fetch tags from remote (
git fetch --tags) - View tag list (
git tag) - Pull remote tag to local branch (
git checkout -b LOCAL_BRANCH ORIGIN_TAG_NAME)
Package commit history
Sometimes we want to synchronize some commit history between two machines, but there is no public repository accessible.
In this case, you can use git bundle to package specific commit history:
1 | # Package the latest commit |
Another machine can then execute git pull with the bundle file:
1 | git pull create_last_commit.bundle |
This will restore the commit history on the other machine.
subtree
Sometimes we want to put the code of one repository into another repository, but not using the submodule method. In this case, we can use subtree.
First, you already have a main repository, and you want to put another repository into a directory of the main repository: for example, the main repository MainProj, and you want to put HotPatcher into the Plugins directory.
Required operations:
- In the main repository, add a remote for the sub-repository (
git remote add lib-hotpatcher git@github.com:hxhb/HotPatcherUE.git) - Add the sub-repository to the sub-directory using
git subtree add(git subtree add --prefix=Plugins/HotPatcher lib-hotpatcher master --squash)
The above command will pull the master branch of the lib-hotpatcher remote repository into the Plugins/HotPatcher directory and create two commit records:
1 | git subtree add --prefix=libs/my-library library-remote main --squash |
Parameter explanation:
--prefix=libs/my-library: Specifies the path of the subdirectory where the code will be placed. If the directory does not exist, Git will create it automatically.library-remote: The alias of the remote repository added in the previous step.main: The branch name of the library-project repository you want to pull (could bemainormaster).--squash: (Optional but highly recommended) This parameter compresses all historical records of the sub-repository into a single commit. This keeps your main repository’s history clean; otherwise, hundreds or thousands of commits from the sub-repository would be merged in.
How to pull updates from the sub-repository later:
1 | git subtree pull --prefix=libs/my-library library-remote main --squash |
How to push changes made in the main repository to the subdirectory back to the sub-repository (Push)?
This is an advanced usage. If you modify the code in the libs/my-library directory within main-project and want to contribute these changes back to library-project, you can do this:
1 | git subtree push --prefix=libs/my-library library-remote main |
UPDATE
CheatSheet
Reference Articles
Git Remote Operation Details
Creating and Merging Branches
Git Undo Branch Deletion
git checkout command to undo changes
git diff - diff two branches