This article excerpts some content from the official Unreal Engine blog post: Capturing Stereoscopic 360 Screenshots, Videos, Movies in Unreal Engine 4, while the rest corrects errors in that article and provides a ready-to-use solution.
Capturing Single Frame Stereoscopic Image
First, we need to make sure that the corresponding plugin is enabled.
With the editor open, go to Edit -> Plugins, then select Movie Capture on the left and ensure that Stereo Panoramic Movie Capture is set to Enabled. Then restart the scene editor.
Note: You may also need to quickly Build again, depending on whether you have made local changes in the branch, as the plugins included with the tools may be outdated.
Once the editor restarts, go back to Editor -> Plugins -> Movie Capture, and check again if it has been enabled.
Open the level Blueprint, create a new Event BeginPlay event, and then add several (depending on the requirements) Execute Console Command nodes to hold the commands we need to execute. We can conduct a capture test first by placing the two commands below into the Execute Console Command node:
1 | SP.OutputDir F:/StereoCaptureFrames |
As shown:
Then you can Play the project. The system may be unresponsive for a long time (about a minute or so), and then two frames of images will be stored in the directory you specified with SP.OutputDir (actually in a date and time folder under that directory), one for the left eye and the other for the right eye.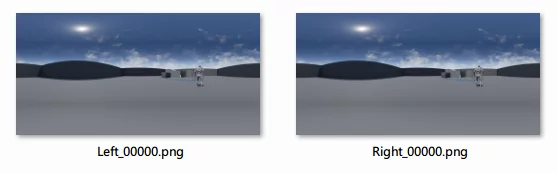
Automatically Combine Left and Right Eye Images into a Single Image
This section has been modified based on the official article mentioned above and is also the part with the most errors in that article. Before proceeding with the following steps, ensure that you can successfully export left and right eye images using the official plugin for panoramic capture.
First, cut (note that it’s cut and not copy) the Stereo Panoramic Movie Capture plugin directory from the engine for modification and to prevent conflicts with our own compiled version. The plugins in the Unreal Engine are found under the path \4.12\Engine\Plugins, and here we need to cut out the StereoPanorama (\Engine\Plugins\Experimental\StereoPanorama).
Next, open your project folder where you want to capture panoramic video, create a new Plugins folder at the root of the project folder, and paste the previously cut StereoPanorama folder here. At this point, the project’s file structure should look like this (listing only the necessary files for brevity):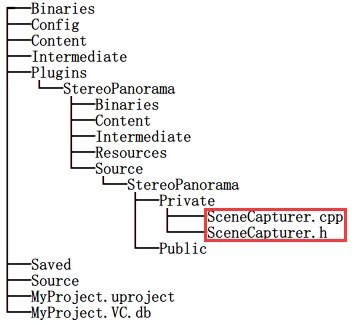
Next, I will focus on modifying the code in SceneCapturer.cpp to achieve our desired functionality.
Now, open the project you want to capture panoramic video from. In the scene editor, sequentially open Edit -> Plugins -> Project -> MovieCapture to enable Stereo Panoramic Movie Capture, then restart the scene editor. Check again if Stereo Panoramic Movie Capture is enabled. If everything above is OK, we will officially start.
First, open \YouProjectFolder\Plugins\StereoPanorama\Source\StereoPanorama\Private\SceneCapturer.cpp, which should have around eight to nine hundred lines of code. I compared the differences between SceneCapturer.cpp in engine versions 4.11 and 4.12, and there are no substantial changes; it is merely some variable naming that doesn’t conform to standards (random), so this tutorial is applicable for both 4.11 and 4.12.
To conveniently control the merging switch, we need to define a bool constant at the top of the file, so that when we don’t need to enable merging, we can modify the value of that constant without changing the rest of the code.
1 | // Newly inserted code. Defined a const bool |
Now we need to conditionally disable the output for each eye (controlled by the CombineAtlasesOnOutput defined above) in the code.
Then locate the bottom of USceneCapturer::SaveAtlas() and find this segment of code:
1 | IImageWrapperPtr ImageWrapper = ImageWrapperModule.CreateImageWrapper(EImageFormat::PNG); |
These few lines of code control the output for the left and right eyes. If we define CombineAtlasesOnOutput as true, it means we want to merge the two eye images, so we need to disable it (outputting left and right separately). If it is set to false, we need to output separate sequences for the left and right eyes. Therefore, we can write an if statement to check the value of CombineAtlasesOnOutput:
1 | IImageWrapperPtr ImageWrapper = ImageWrapperModule.CreateImageWrapper(EImageFormat::PNG); |
This will lead to an error because PNGData is defined within the scope of the if statement. If it executes and gets released or does not execute at all (if the check is false (!true)), it will cause an error when attempting to use PNGData later.
The usage of PNGData in the following code block is:
1 | if (FStereoPanoramaManager::GenerateDebugImages->GetInt() != 0) |
diff: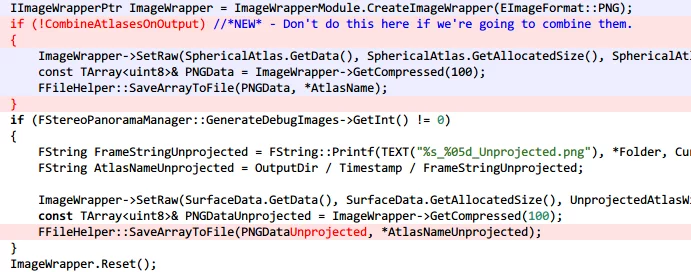
To disable the output of separate frames for left and right eyes, if you only write this part of the code, executing the capture will not yield any meaningful image output (because we have already disabled left and right eye outputs). Below, we will continue to discuss how to merge the two images together.
The official blog provided this part of the code, but for some reason, the template class (TArray<T>) has lost all parameters, so pasting it directly into the code will not compile under any circumstances.
The official code provided:
1 | TArraySphericalLeftEyeAtlas = SaveAtlas(TEXT("Left"), UnprojectedLeftEyeAtlas); |
It’s quite frustrating because I hadn’t read Unreal Engine’s code before, and I thought I had made a mistake. Later, I read the related code (cross-referenced the syntax of the above code) and found that the official code had errors…
The template parameters for all above TArray are missing. The correct usage is TArray<T>, and template type deduction is calculated at compile time. The current issue is how to reverse-engineer TArray‘s required template parameters from the existing code.
We need to analyze line by line.
First, we can determine that SphericalLeftEyeAtlas and SphericalRightEyeAtlas are of the same type (obviously) through the following two lines of code:
1 | TArraySphericalLeftEyeAtlas = SaveAtlas(TEXT("Left"), UnprojectedLeftEyeAtlas); |
Now we can check the engine’s existing code (the definition of SaveAtlas()) to find out what type SphericalLeftEyeAtlas and SphericalRightEyeAtlas should be, focusing on the return type of SaveAtlas().
The defined return type of SaveAtlas() in the engine is TArray<FColor>:
1 | TArray<FColor> USceneCapturer::SaveAtlas(FString Folder, const TArray<FColor>& SurfaceData) |
OK, we can now confirm that SphericalLeftEyeAtlas and SphericalRightEyeAtlas are both TArray<FColor>.
Next, the type of CombinedAtlas can be deduced from SphericalLeftEyeAtlas and SphericalRightEyeAtlas:
1 | TArrayCombinedAtlas; |
The member function Append() clearly indicates that it adds elements to an instance defined by the container TArray, so we can confirm that CombinedAtlas is of the same type as SphericalLeftEyeAtlas and SphericalRightEyeAtlas, namely TArray<FColor>.
The remaining piece of code using TArray<T> is just PNGData:
1 | const TArray& PNGData = ImageWrapper->GetCompressed(100); |
To find out the true type of PNGData, we can simply check the definition of GetCompressed().
GetCompressed() is a member of the FImageWrapperBase class:
1 | const TArray<uint8>& FImageWrapperBase::GetCompressed(int32 Quality) |
Thus, we determine that the true type of PNGData is TArray<uint8>&.
The modified code now looks like this:
1 | TArray<FColor> SphericalLeftEyeAtlas = SaveAtlas(TEXT("Left"), UnprojectedLeftEyeAtlas); |
You can download my modified SceneCapturer.cpp here.
At this point, recompiling this plugin and launching the project will allow you to capture and merge the left and right eyes into a single image.

In fact, there’s an even simpler way to fix the above code: In C++11, you can avoid writing all the tedious definitions and just use the auto keyword when defining new objects to receive the return values. This way, the compiler will automatically deduce the actual types of the objects to be received.
For example, the above code can be written as:
1 | auto SphericalLeftEyeAtlas = SaveAtlas(TEXT("Left"), UnprojectedLeftEyeAtlas); |
Isn’t that much more convenient? However, if you wish to refactor later… the picture looks too nice. As the saying goes, dynamic typing is great for a while, but code refactoring is a funeral pyre. Even though C++ with auto is still a statically typed language, the type deduction at compile time is enough to cause developers to create dependencies (mainly out of laziness).
C++11 has many useful new features, and while reviewing Unreal Engine’s code, I found that they extensively utilized C++11 features, so it’s advisable to supplement your knowledge about C++11 features.
More on C++11 can be found in my blog post: C++11 Syntax Sugar
Capturing Continuous Sequential Frames
Through the previous steps, we can successfully capture a merged single frame of both eyes, but we ultimately need to capture continuous frames and merge these sequences into a video.
We can use the following command to capture continuous frames:
1 | // To capture multiple continuous frames (a video), you can use SP.PanoramicMovie, which should have two parameters starttime and endtime. |
However, doing this directly has problems. Suppose your project is set to FPS 30; directly adding this command (SP.PanoramicMovie 0 29) will lead you to capture 30 frames, which are not the actual frames of 1s in the project. If you render the video from these captured frames, it would effectively be equivalent to fast-forwarding it by 4-5 times. Therefore, this approach causes frame drops. This is because the engine does not run in fixed time increments while capturing the video.
When capturing a movie, the most important thing to remember is: it must run with a fixed time step.
If we need to capture 30 frames in 1 second, we must instruct the engine to run with fixed time steps to avoid having two output frames for a two-second video.
You need to follow these steps:
In
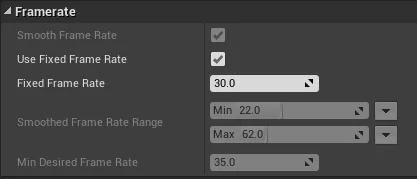
Scene Editor (UE4Editor)->Edit->Project Settings->Engine->General Settings->Framerate, checkFixed Frame Rateand set it to30(depending on the FPS you want to capture).![]()
Add parameters when starting the engine.
We can add-usefixedtimestep -fps=when starting the engine to make the engine advance time by fixed timesteps.
You can add this instruction to the UE4Editor shortcut:1
X:\Unreal\4.12\Engine\Binaries\Win64\UE4Editor.exe -usefixedtimestep -fps=30 -notexturestreaming
The
-notexturestreamingparameter disables texture streaming.
After executing the above two steps, using SP.PanoramicMovie to capture will not result in dropped frames.
Merging Captured Image Sequences into a Panoramic Video
Through previous steps and by referring to some portions of the official documentation, we can successfully get a sequence of frames.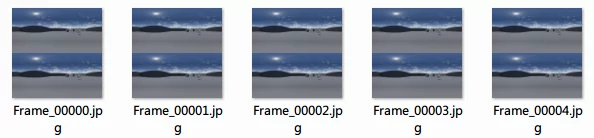
The next task is how to merge these sequences into a playable panoramic video. The official blog recommends using ffmpeg (we tend to just use ffmpeg.)
You can download ffmpeg from the ffmpeg official site or download my offline version.
The method of use is to place the ffmpeg.exe downloaded from the previous step in the directory of the exported panoramic images, then open CMD, navigate to that directory, and execute the following command:
1 | ffmpeg -y -r 30 -i Frame_%05d.webp -vcodec mpeg4 -qscale 0.01 video.mp4 |
-r is the frame rate (FPS), and you can find more parameters in the ffmpeg documentation - ffmpeg Documentation
Upon completion, a video.mp4 file will be generated in the current directory.
Alternatively, if you really don’t want to do it manually, you can use the following batch command (note: do not place ffmpeg and this batch file in the same directory as the images)
1 | @echo off |
Your directory structure should look like this for ConvertImagesToVideo.bat to execute properly: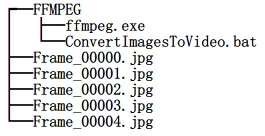
The ffmpeg package containing ConvertImagesToVideo.bat can be downloaded here.
Resource Organization
If you don’t want to modify the code and are too lazy to compile, you can download the modified and compiled version here, and the usage is similar to above. Delete the official plugin folder’s StereoPanorama (or keep a copy for safety) and then extract the downloaded plugin package to the root directory of your project (or directly replace the official plugin).
At this point, the project’s file structure should look like this (listing only the necessary files for brevity):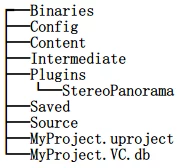
Then launch the project, enable (and add the collection nodes) in the scene editor, and you can begin capturing the panoramic sequence frames.
Additionally, here are some other tools:
- Modified and compiled StereoPanorama
- Modified SceneCapturer.cpp
- ffmpeg (There is no bat)
- ffmpeg and bat
Reference Articles
Conclusion
After writing so much, the essential parts are not many; it mainly records the method of debug…
Moreover, it’s crucial to read the engine’s code more and not blindly trust the official documentation.