In previous articles, I primarily introduced how HotPatcher can be applied in the hot update process. However, HotPatcher is not just capable of fulfilling the needs for hot updates; it is also a flexible resource packaging framework.
As the project development reaches a certain stage, a massive amount of resources needs to be packaged, and waiting for a complete package to be built can take a long time. If a real device encounters issues, the serial process of repair -> package -> verify can become exceedingly lengthy. There are often cases of script, data, or other resource errors that lead to package abnormalities.
In such cases, waiting hours to generate a complete package prevents smoke testing from proceeding. Even if you rebuild the package, there’s no guarantee that there won’t be other overlooked issues; otherwise, you have to start over again.
Based on this pain point, we urgently need a method to quickly fix resource issues within packages and validate them during the development phase. HotPatcher provides this functionality, allowing you to utilize it fully without waiting for a complete package.
This article will introduce how to utilize the editor features provided by HotPatcher to quickly package preset configurations and specific resources, accelerating the validation process of resources on real devices and significantly improving testing efficiency.
Preset Actions
HotPatcher offers a feature called Preset Actions that allows custom patch configurations to be added to project settings. In the editor, these can be quickly invoked to execute the packaging process.
Configuration method:
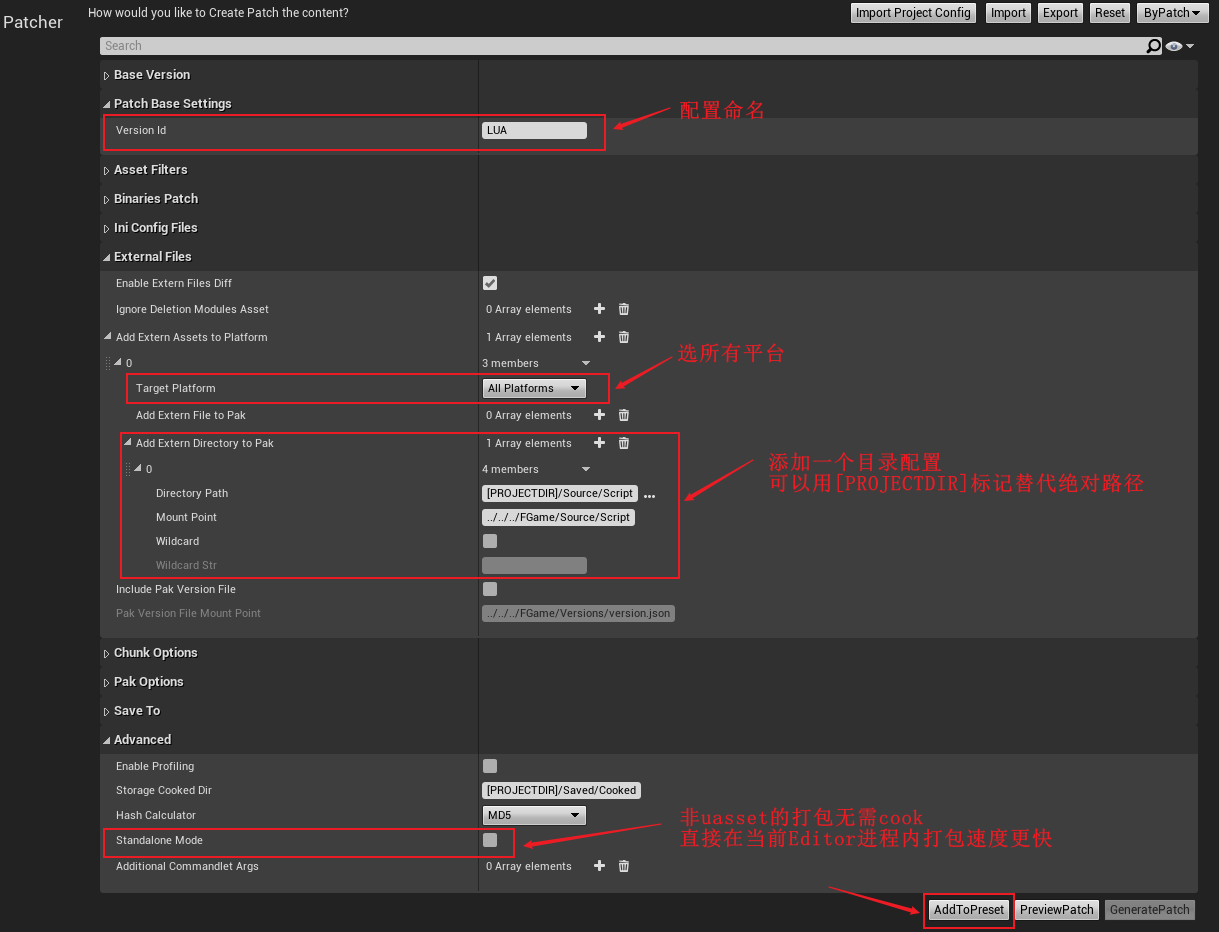
- Open the main interface of HotPatcher
- Edit the patch configuration without specifying a base version
- AddToPreset
For example, to package Lua, you need to package a specific directory in the project as an external file in the form of a pak. The configuration can be as follows:

The accompanying configuration file is:
1 | {"bByBaseVersion":false,"baseVersion":{"filePath":""},"versionId":"LUA","bImportProjectSettings":false,"bBinariesPatch":false,"binariesPatchConfig":{"binariesPatchType":"None","encryptSettings":{"bUseDefaultCryptoIni":false,"cryptoKeys":{"filePath":""}},"baseVersionPaks":[],"matchRules":[]},"bIncludeEngineIni":false,"bIncludePluginIni":false,"bIncludeProjectIni":false,"bEnableExternFilesDiff":true,"ignoreDeletionModulesAsset":[],"addExternAssetsToPlatform":[{"targetPlatform":"AllPlatforms","addExternFileToPak":[],"addExternDirectoryToPak":[{"directoryPath":{"path":"[PROJECTDIR]/Source/Script"},"mountPoint":"../../../FGame/Source/Script","bWildcard":false,"wildcardStr":""}]}],"bIncludePakVersionFile":false,"pakVersionFileMountPoint":"../../../FGame/Versions/version.json","bEnableChunk":false,"bCreateDefaultChunk":false,"chunkInfos":[],"bCookPatchAssets":true,"cookAdvancedOptions":{"bCookParallelSerialize":false,"numberOfAssetsPerFrame":100,"overrideNumberOfAssetsPerFrame":{"Class'/Script/Engine.World'":2},"bAccompanyCookForShader":false},"cookShaderOptions":{"bSharedShaderLibrary":false,"bNativeShader":true,"shaderNameRule":"CHUNK_NAME","customShaderName":"","shaderLibMountPointRegular":"[PROJECTDIR]/ShaderLibs"},"serializeAssetRegistryOptions":{"bSerializeAssetRegistry":false,"bSerializeAssetRegistryManifest":false,"assetRegistryMountPointRegular":"[PROJECTDIR]/AssetRegistry","assetRegistryRule":"PATCH","bCustomAssetRegistryName":false,"assetRegistryNameRegular":"[CHUNK_NAME]_AssetRegistry.bin"},"ioStoreSettings":{"bIoStore":false,"bAllowBulkDataInIoStore":false,"ioStorePakListOptions":[],"ioStoreCommandletOptions":[],"platformContainers":{},"bStoragePakList":true,"bStorageBulkDataInfo":true},"unrealPakSettings":{"unrealPakListOptions":[],"unrealCommandletOptions":[],"bStoragePakList":true},"defaultPakListOptions":["-compress"],"defaultCommandletOptions":["-compress","-compressionformats=Zlib"],"encryptSettings":{"bUseDefaultCryptoIni":false,"cryptoKeys":{"filePath":""}},"replacePakListTexts":[],"pakTargetPlatforms":[],"bCustomPakNameRegular":false,"pakNameRegular":"{VERSION}_{CHUNKNAME}_{PLATFORM}_001_P","bCustomPakPathRegular":false,"pakPathRegular":"{CHUNKNAME}/{PLATFORM}","bStorageNewRelease":true,"bStoragePakFileInfo":true,"bIgnoreDeletedAssetsInfo":false,"bStorageDeletedAssetsToNewReleaseJson":true,"bStorageDiffAnalysisResults":true,"bStorageUnrealPakList":true,"bEnableProfiling":false,"storageCookedDir":"[PROJECTDIR]/Saved/Cooked","assetScanConfig":{"bPackageTracker":true,"assetIncludeFilters":[],"assetIgnoreFilters":[],"bIncludeHasRefAssetsOnly":false,"bAnalysisFilterDependencies":true,"assetRegistryDependencyTypes":["Packages"],"includeSpecifyAssets":[],"bRecursiveWidgetTree":true,"bAnalysisMaterialInstance":true,"bSupportWorldComposition":false,"bForceSkipContent":true,"forceSkipContentRules":[{"path":"/Game/__ExternalActors__"},{"path":"/Game/__ExternalObjects__"},{"path":"/Engine/Editor*/"},{"path":"/Engine/VREditor/"}],"forceSkipAssets":[],"forceSkipClasses":[]},"bStorageConfig":true,"savePath":{"path":"[PROJECTDIR]/Saved/HotPatcher/"},"hashCalculator":"MD5","bStandaloneMode":false,"additionalCommandletArgs":[]} |
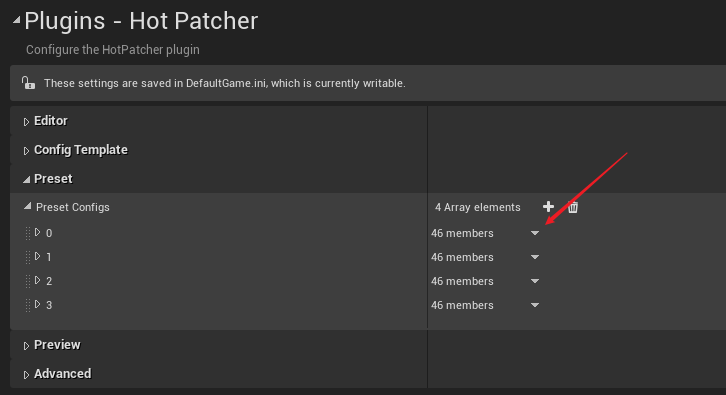
Executing AddToPreset will add this configuration to project settings under ProjectSettings-Plugins-HotPatcher-PresetConfigs:

It’s an array and can hold multiple presets. You can also edit the parameters of the presets within the project settings, which are identical to the configuration items in the HotPatcher main interface.
Then, you can right-click in the blank area of the Content Browser and see the added preset in Preset Actions.
Select the name, choose a platform, and you can quickly package:
After packaging, a notification will pop up in the engine:
Clicking the hyperlink will open the folder where the pak is located, making it convenient to test on a mobile device:
You can configure scripts, ini files, project data, and other content as an independent Action, allowing changes to be quickly packaged and directly validated.
Cook And Pak
For asset packaging, in most cases, resource issues cannot be predicted in advance, and it is not feasible to add them as a fixed Preset-Action configuration.
For example, a missing texture reference, local modifications made by clients on UMG, or artists or planners wanting to temporarily test a map, etc. All require accurately packaging specific resources, so for UASSET resources, I provided another set of features for HotPatcher called CookAndPak.
In the Content Browser, select the resource or directory, right-click, and you will see several choices at the bottom:
- Cook Actions, as the name suggests, simply executes COOK, aiming to validate resources after being cooked, typically used to analyze the impact of resource parameters on serialization size, such as texture compression specifications, animation compression configurations, etc.
- Cook And Pak Actions: executes Cook and packages the result into a PAK.
- Add To Patch Settings: adds the selected resources to the HotPatcher configuration main interface.
Typically, for quick resource packaging, the CookAndPak mode is used:

Then select the corresponding platform and whether to enable dependency analysis, which is usually necessary unless you clearly know that they are not needed.
Regarding CookAndPak, I also provide two execution methods:
- Execute within the current Editor process, which will block the editor.
- Launch a new Cmdlet process for execution, which does not block the current editor.
For cases with fewer resources, executing within the current process is faster. However, for resources with large dependencies such as maps, launching a separate process is preferable.
Whether to launch a separate process can be controlled under ProjectSettings-Plugins-HotPatcher-TempPatchSetting-StandaloneMode.
When executed within the current Editor, a reminder will pop up after packaging is complete, allowing you to click to navigate to the directory:

Launching an independent Cmdlet execution will display a persistent reminder while executing, and will notify upon completion:
You need to wait for the execution to finish, but this process will not freeze the editor, allowing you to perform other editing operations.

The execution time depends on the number of referenced resources and whether the selected resources have been packaged before (DDC).
Once completed, a corresponding .pak file will be created under Saved/HotPatcher/Paks/{EXECUTE_TIME}/Android_ASTC in the project. This pak file serves as the patch package for the packaged resources, with its filename containing the platform name; pak files of different platforms cannot be mixed.

Placing on the Real Device
For local validation, you can place the Pak file in the engine’s automatically mounted paths, which typically include three default locations:
- Engine/Content/Paks
- GAME_DIR/Content/Paks
- GAME_DIR/Saved/Paks
Usually, on mobile devices, we place it under Saved/Paks, and for Windows, it can be placed in any of the mentioned directories.
Windows
The Windows package requires placing this Pak file in the following directory:
1 | WindowsNoEditor\PROJECT_NAME\Content\Paks |
If the Paks directory does not exist, you can create it manually.
Android
For Android, this pak file needs to be placed in the following directory:
1 | UE4Game/PROJECT_NAME/PROJECT_NAME/Saved/Paks |
If the data directory has been modified to a sandbox path (UE Source Analysis: Modify Game Default Data Storage Path), then the path would be:
1 | Android/data/com.xxxx.yyyy/files/UE4Game/PROJECT_NAME/PROJECT_NAME/Saved/Paks |
If the Paks directory does not exist, you can create it manually.
IOS
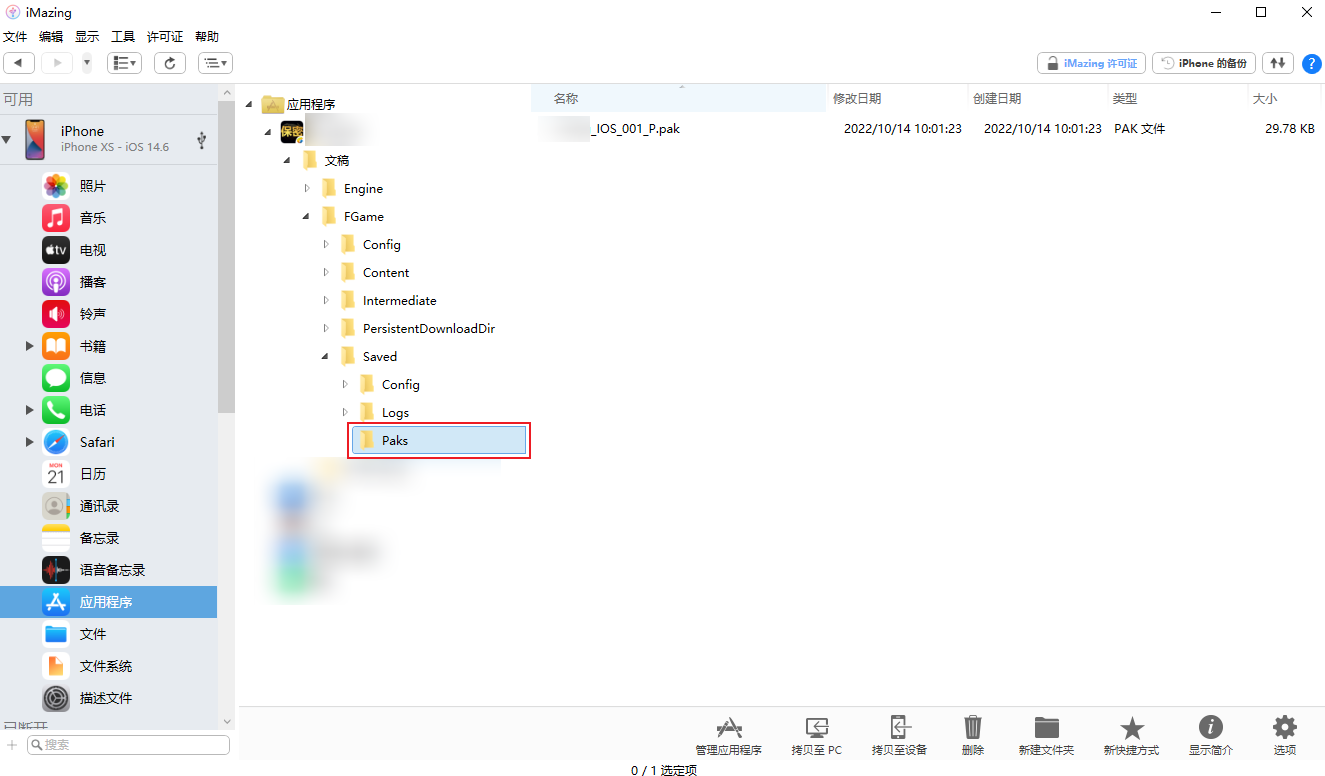
For IOS, the process is more complex, as you need to use IOS management tools such as 3utools or iMaZing to transfer files.
Place it in Documents - PROJECT_NAME - Saved - Paks, and create the Paks directory manually if it does not exist.

Check Mount Status
After placing the pak file in the above directories, you can start the game.
To confirm whether the pak file is effective, you can check the Log:
1 | LogPakFile: Display: Found Pak file ../../../PROJECT_NAME/Saved/Paks/2022.10.18-13.02.53_IOS_001_P.pak attempting to mount. |
If such logs appear, it indicates that the resource package has been successfully read by the engine and can be used just as if it were embedded in the base package.
Notes
Manually packaging Pak has a higher priority than resources in the base package, which means that if a resource exists simultaneously in both the patch package and the base package, it will replace the resource in the base package, just like hot update logic.
- Pak files for different platforms cannot be mixed!
- After testing, it’s advisable to delete the pak files on the device, or else newly created packages might exhibit resource representation errors.
Conclusion
This article details the usage methods for the rapid packaging features provided by HotPatcher, enabling resource and file packaging for validation during the development phase without waiting for a complete build. This maximizes validation efficiency, quickly creates patches, and avoids delays. Once patches are validated, initiating a complete package construction process is also acceptable to ensure that changes have not introduced other issues.
Additionally, we will integrate resource checks to ensure compliance during the build process to the greatest extent possible. The blog contains a series of articles introducing:
- Using Reflection to Establish Property Caches for Assets in UE
- Design and Implementation of Resource Self-Correction in UE
- Multi-Stage Automated Resource Inspection Solutions in UE
- Automation Practice of Resource Inspection Based on ResScannerUE
- Resource Compliance Inspection Tool ResScannerUE in UE
These enhance version stability and repair efficiency from two different dimensions:
- Resource inspections ensure the resources entering the packaging process are reliable.
- HotPatcher rapidly creates repair patches when resource anomalies occur.
Overall, game asset management within a project is a highly complex task that requires involvement in various aspects of the project. Doing it well can improve efficiency and avoid problems; doing it poorly can lead to substantial time spent troubleshooting resource issues.

